- Trending Now
- Foundational Courses
- Data Science
- Practice Problem
- Machine Learning
- System Design
- DevOps Tutorial

Working with Tables in MS Word
Microsoft Word or MS-WORD is a graphical word processing program that users can type with. It allows the users to type and save documents very similar to other word processors. There are many versions of MS-word in market, which the user can install as per te. In this tutorial, we will learn about the tables in MS-Word.
Tables in MS Word are made up of rows and columns with an organized arrangement of text. These tables can be used to align numbers in columns and then various operations can be performed on them. Tables can also be used to create page layouts. Rows in a table are series of data banks laid out horizontally in a table or spreadsheet. Columns are vertical series of cells in a chart, table, or spreadsheet.
How to Create a Table?
Tables in MS Word can be created in the following two ways:
1. Using the Grid
2. Using Table Dialogue Box
Using the Grid
Following are the steps of creating a table using the Grid provided in MS Word:
Step 1: Go to the Insert tab and click on the Table button.

Step 2: In the dropdown menu, select the number of rows and columns from the Grid.

Using Table Dialogue Box
Following are the steps of creating a table using Table Dialogue Box in MS Word:
Step 2: Under the grid, you will see an Insert Table button. Click on it.

Step 3: In the Insert Table Dialogue box, mention the number of rows and number of columns as per the requirement and click on OK button.

How to Modify a Table?
We can also edit/modify a table to make it more creative. Multiple operations can be performed on a table like changing the layout, splitting of cells, merging the cells, applying borders, etc. Here, we will see some of the operations performed on a table in MS Word.
Changing Layout of a Table
Changing the layout of a table can be done with the help of the following steps:
Step 1: Select the table for which the layout is to be changed. Go to the design tab .

Step 2: Click on the dropdown menu to get various different types of layouts for your table.

Step 3: Select any layout as per the need.

Splitting the Cell
Splitting of a cell can be done with the help of the following steps:
Step 1: Select the cell that you want to split into multiple cells. Then go to the Layout tab and click on the Split Cells button.

Step 2: In the dialogue box , mention the new dimensions as per the requirement.

Step 3: Click on the Ok button.

Merging the Cells
Merging of various cells can be done by the following steps:
Step 1: Select all the cells that are to be merged into a single cell. Then go over the layout tab, and you will see a Merge Cell button.

Step 2: Now click on the Merge Cell button and the selected cells will be merged.

Applying Borders and Styles on a Table
Borders and styles can also be applied to a table in a similar way as the layout of a table is changed. Go through the following steps to do the same:
Step 1: Select the entire table and go over the design tab.

Step 2: Select the style that you want to apply to your table.

Converting Text to a Table
MS Word allows the conversion of existing text into a table with the help of the following steps:
Step 1: Select the text that is to be converted into the table. Now go to the Insert Tab and you will see a Table button.

Step 2: Click on the Insert Table button and in the drop-down menu, click on the Convert Text to Table button.

Step 3: In the dialogue box, mention the dimensions of the required table and other data that is required.

Step 4: Click on the OK button and the selected text will be converted to a Table.

Inserting Images in a Table
MS Word allows adding images inside the table cells. To insert an image in a table, go through the following steps:
Step 1: Select the cell in which you want to add the Image. Go to the Insert tab and select the Pictures button.

Step 2: You can either choose a picture from your device or select one online.
Step 3: Choose a picture from the browser window and click on the Insert button.

Step 4: Selected Image will be added in the cell selected.

Performing Calculations in a Table
Mathematical calculations can also be performed on the values present in the table. Microsoft provides various formulas to perform these operations. By default, the sum of the values lying in the rows to the left or column lying above are calculated by Word. Following are the steps to do the same:
Step 1: Select the cell in which the result of the mathematical operations is required.

Step 2: Now go to the Layout tab and select the formula button.

Step 3: In the dialogue box, define the formula for the mathematical operation, the default formula is the sum of the values to the left or above.

Step 4: After defining the formula, click on the OK button to apply the formula on the cells given in the formula.

Please Login to comment...
Similar reads.
- School Learning
Improve your Coding Skills with Practice
What kind of Experience do you want to share?
Module 5: Microsoft Word, part 3
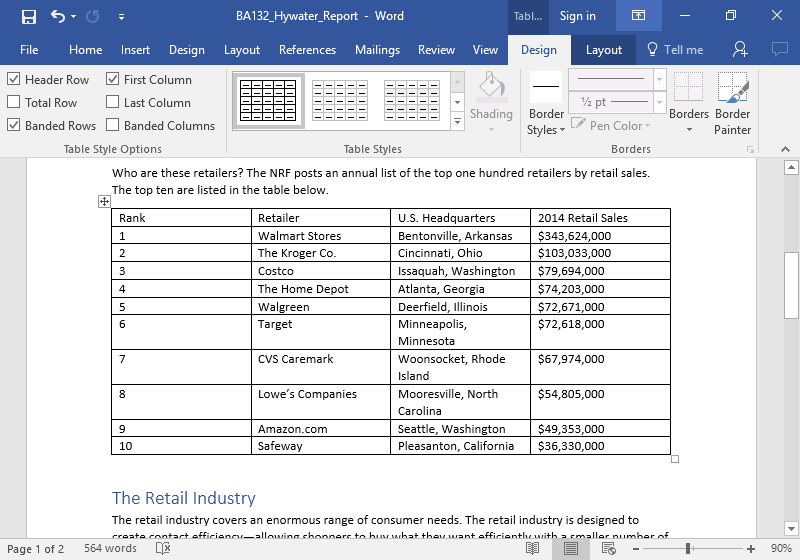
Assignment: create document with tables and images.
For this assignment, you will format a document with a table and an image. Follow the directions, then submit your assignment. If you get stuck on a step, review this module or previous modules and ask your classmates for help in the discussion forum.
- Download the report document and open it in Microsoft Word.
- Save the document as BA132_LastName_Report.docx , replacing “LastName” with your own last name. (Example: BA132_Hywater_Newsletter). It is a good idea to save your work periodically.
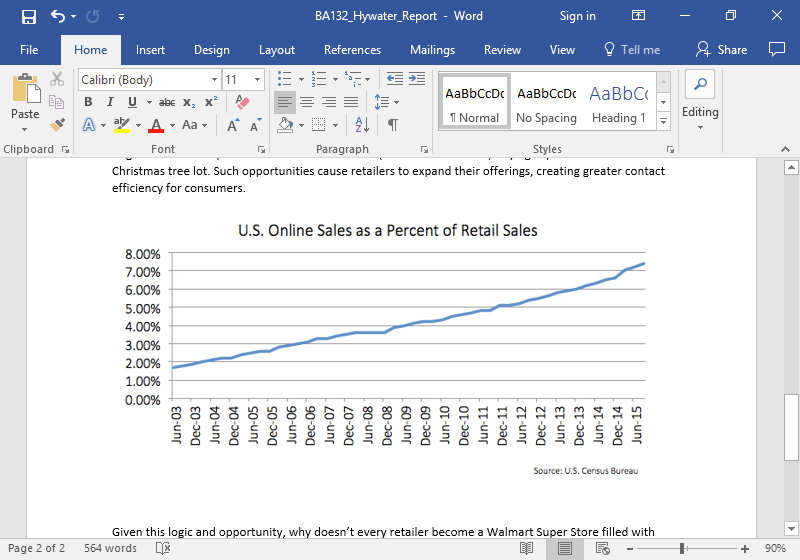
- Insert the graph image into your document after “creating greater contact efficiency for consumers.”
- Save your document again and submit your work to Canvas.
- shopping-business-retail [used in report document]. Authored by : Alexas_Fotos. Located at : https://pixabay.com/en/shopping-business-retail-1165437/ . License : CC0: No Rights Reserved
- Reading: Types of Retailers. Authored by : Lumen Learning. Located at : https://courses.lumenlearning.com/marketing-spring2016/chapter/reading-types-of-retailers/ . License : CC BY: Attribution
- Assignment: Report. Authored by : Lumen Learning. License : CC BY: Attribution
- The Retail Industry [used in report document]. Authored by : Lumen Learning. Located at : https://courses.lumenlearning.com/marketing-spring2016/chapter/reading-define-retailing/ . License : CC BY: Attribution
- Outcome: Retailers As Channels of Distribution. Authored by : Lumen Learning. Located at : https://courses.lumenlearning.com/marketing-spring2016/chapter/outcome-retailers-as-channels-of-distribution/ . License : CC BY: Attribution

- All about AI
- Google Gemini AI
- Inflection AI Pi Chatbot
- Anthropic Claude
- Multimodal AI
- Generative AI
- AI Image Generation
- AI VIdeo Generation
- AI Coding Assistants
- AI Regulation
- AI Research
- Large Language Models (LLM)
- Microsoft Azure
- Google Cloud
- Amazon Web Services (AWS)
- Surface Pro
- Surface Laptop
- Surface Book
- Surface Duo
- Surface Neo
- Surface Studio
- Surface Hub
- Surface Pen
- Surface Headphones
- Surface Earbuds
- About WinBuzzer
- Follow Us: PUSH, Feeds, Social
- Join our Team
- Cookie Policy and Privacy Policy
- Terms of Service
How to Use Tables in Word: Creating, Editing, Formatting and Everything Else
In our complete guide we show you everything from how to make a table in Word, how to edit and format it, how to insert table of contents, and everything else you might need to know.

Table of Contents:
Creating and formatting tables in Microsoft Word is not just a skill—it's an art form that enhances the clarity, accessibility, and visual appeal of your documents. A well-constructed Word table can transform a mundane document into an engaging and informative piece of content. Whether you're compiling data, organizing information, or designing a layout, learning how to insert and format tables in Word is indispensable.
Tables in Word are incredibly versatile. They enable users to align text, numbers, and graphics in a streamlined manner, offering a more sophisticated alternative to basic tab stops. This is particularly advantageous when dealing with multi-line text, where traditional alignment methods fall short. For those wondering how to insert a table in Word, the process is intuitive and user-friendly, allowing for quick integration of tables into any document.
Beyond basic alignment, tables are fundamental in creating various forms and lists. They provide an organized framework for storing and displaying data like telephone numbers, client information, and employee rosters. The structured format of a Word table makes it easy to scan, understand, and interact with this information.
One of the most significant advantages of Word tables is their interoperability with other Microsoft Office applications. For instance, a table created in Word can be seamlessly integrated into an Excel spreadsheet or an Access database. This feature is invaluable for users who work across multiple platforms and need a consistent and reliable method of data transfer.
Formatting tables in Word opens up a world of design possibilities. With a range of customization options, users can tailor their tables to fit the aesthetic and functional needs of their documents. From adjusting cell sizes and borders to applying different color schemes and fonts, formatting tables in Word allows for a high degree of personalization and professionalism.
Furthermore, tables are essential in creating professional publications like calendars, brochures, business cards, and more. Their ability to neatly organize and present complex information makes them a preferred choice for designers and business professionals alike.
Normal Tables vs. the Table of Contents in Word
When working with Microsoft Word, it's important to distinguish between normal tables and a table of contents, as each serves a unique purpose within a document.
Normal Word Tables
Normal tables in Word are the grid-like structures used for organizing and presenting data in a clear, tabular format. These tables are versatile and can be used for a wide range of purposes, including:
- Data Representation : They are ideal for showcasing numerical data, comparison charts, or any information that benefits from a structured layout.
- Layout Design : Normal tables can be used to design layouts for things like invoices, forms, or even certain types of brochures, where information needs to be presented in a neat and orderly fashion.
- Customization : These tables offer a high degree of customization in terms of size, color, border style, and cell alignment, allowing for a tailored appearance that fits the document's overall design.
Table of Contents
A table of contents in Word , on the other hand, serves as a navigational guide for the document. It lists the titles and major sections of the document, along with their corresponding page numbers. It's an essential element in lengthy documents, such as reports, manuals, or books, to help readers locate specific information quickly. Key features of a table of contents in Word include:
- Automatic Generation : Word can automatically generate a table of contents based on the heading styles used in the document. This feature ensures that the table of contents is consistently updated to reflect the document's content.
- Easy Navigation : In digital documents, the table of contents can be hyperlinked, allowing readers to click on a section title and jump directly to that part of the document.
- Customization : While less flexible than normal tables, the table of contents in Word still offers options for customization, including the style and formatting of the text.
How to Insert a Table in Word Selecting Rows and Columns
This method focuses on the most straightforward way to insert a table into your Word document. It involves manually selecting the desired number of rows and columns from a grid. This technique is particularly useful for quickly adding a table when you already know the required dimensions, offering an intuitive and visual way to create a table that matches your specific needs.
- Go to the top menu bar and click on the ‘Insert' tab. This tab is typically found in the ribbon at the top of the Word interface.
- Click the ‘Table' button that resembles a grid or matrix.
- A drop-down menu will appear, displaying a grid. This grid allows you to visually select the needed number of rows and columns for your table. Hover your cursor over the grid squares; each square represents a cell in your table. As you move the cursor over the grid, Word highlights the number of rows and columns that will be created.

How to Insert a Table in Word With the Insert Table Dialog Box
Using the Insert Table Dialog Box allows for more precision and customization when inserting a table in Word. This method is ideal when you need a table with specific dimensions that may not be easily selectable via the grid method. It provides additional options like setting the exact number of rows and columns, and adjusting the column width.

How to Create a Table in Words using the Drawing Tool
Creating a table using the Drawing Tool in Word is a method for those who require a highly customized table. This approach is best suited for scenarios where tables need non-standard layouts or specific designs that cannot be achieved through the standard insert table options. It offers flexibility in designing each cell and row independently.

How to Create a Word Table from Existing Text
This method is about converting existing text into a table format. It is particularly useful for organizing previously unstructured data, such as lists or separated text, into a more readable and manageable table format. This approach enhances the document's structure and readability without manually re-entering data.

How to Convert a Word Table Into Text
Converting a Word table into text is the reverse process of creating a Word table from text. This is useful when you need to remove the table format from your data, perhaps for stylistic reasons or to prepare the content for a different format. It allows for a smooth transition of tabular data back into standard text format.

How to Select a Table or Cells, Columns, Rows for Formatting
This section covers the essential skills of selecting entire tables, specific cells, columns, or rows in Word. This knowledge is crucial for effectively formatting and modifying tables. It includes techniques for both simple and complex selections, catering to various formatting needs.
Selecting the Entire Table :
- Option 1 : Move your cursor to the upper left corner of the table until a small box with a diagonal arrow appears, then click to select the entire table.
- Option 2 : Right-click on any cell in the table, and from the context menu, choose ‘Select' followed by ‘Select Table'.
Selecting Individual Cells :
- Click once on a cell to place your cursor inside it.
- To select the entire cell, move your cursor to the left edge of the cell until it turns into a right-pointing arrow, then click.
Selecting Columns :
- Hover your cursor at the top of the column until it turns into a downward-pointing arrow, then click to select the entire column.
- To select multiple columns, click on the first column, then hold down the ‘Shift' key while clicking on additional columns.
Selecting Rows :
- Hover your cursor to the left of the row until it turns into a right-pointing arrow, then click to select the entire row.
- To select multiple rows, click on the first row, then hold down the ‘Shift' key while clicking on additional rows.
Selecting a Block of Cells :
- Click and drag your cursor across a group of cells to select a specific area within the table.

- Once you have made your selection (whether it be the entire table, specific cells, a column, or a row), you can start formatting. Use the ‘Table Tools' that appear in the Ribbon when the table is selected, specifically the ‘Design' and ‘Layout' tabs, to adjust alignment, apply styles, change colors, and more.
How to Align Text in a Word Table Cell
Aligning text within table cells is a key aspect of Word table formatting. This section will guide you through the process of adjusting text alignment in cells, which is crucial for enhancing the readability and visual appeal of your table. You'll learn how to vertically and horizontally align text to meet your specific document design requirements.
- Select the Cell(s) Click on the cell or cells where you want to align the text. You can select a single cell by clicking in it, or select multiple cells by clicking and dragging across them, or by using the ‘Shift' or ‘Ctrl' keys for non-adjacent selections.
- Access the Layout Tab: After selecting, go to the ‘Layout' tab under ‘Table Tools' in the Word ribbon. This tab becomes available when a table or a cell within a table is selected.
Align Text Horizontally : Within the ‘Layout' tab, locate the alignment options in the ‘Alignment' group. You can align text horizontally within the cell(s) to the left, center, or right. Click the respective alignment button based on your requirement (e.g., click the ‘Align Left' button to align text to the left).
Align Text Vertically : In the same ‘Alignment' group, you can also align text vertically within the cell. Choose from top, middle, or bottom alignment by clicking the corresponding button (e.g., click the ‘Align Top' button to align text to the top of the cell).

How to Edit the Table Design of a Word Table
Editing table design encompasses a broad range of formatting options. This part of the tutorial will delve into how to change the overall appearance of your table, including applying different styles, colors, and borders. This is essential for ensuring that your table not only serves its functional purpose but also complements the overall design of your document.

Plain Tables : These styles are the most basic, often featuring no borders or background colors. They are ideal for a very clean and unobtrusive look, where the focus is solely on the content rather than the table's design.
Grid Tables : Grid tables come with distinct borders around each cell, resembling a grid-like structure. This style is helpful for data-heavy tables where individual cell delineation is important for easy reading and comprehension.
List Tables : These styles are designed to make tables look more like lists, often featuring minimal horizontal borders and sometimes a banded row effect. List tables are great for creating a more narrative, flowing format for data presentation, as opposed to the rigid structure of grid tables.
Light Styles : These styles are characterized by a minimalist design, often featuring light colors and subtle borders. They are suitable for documents that require a clean and understated look.
Medium Styles : Offering a balance between subtlety and emphasis, medium styles typically use moderate color intensity and medium-thickness borders. They are ideal for making tables stand out without overwhelming the rest of the document's content.
Dark Styles : These styles use bold colors and often heavier borders, creating a strong visual impact. Dark styles are suitable for documents where the table is a focal point or needs to attract immediate attention.
Banded Rows and Columns : Many table styles include banded rows or columns, which means alternating colors are used for consecutive rows or columns. This banding makes it easier to read and navigate large tables by visually segmenting the data.
Header Row : Styles with a header row apply distinct formatting to the top row of the table, which is typically used for column titles or headings. This formatting often includes bold text and contrasting colors to differentiate the header from the rest of the table.
First Column and Last Column : Some styles emphasize the first and/or last column of the table with distinct formatting, useful for tables where the first or last column contains specific types of information, like categories or totals.
Total Row : Designed for tables that include sums or totals, these styles apply special formatting to the bottom row, helping to distinguish summary data from the rest of the table content.
Custom Styles : In addition to the pre-defined styles, Word allows users to create custom table styles. You can modify existing styles or create a new style from scratch, selecting specific colors, borders, and shading to meet your specific needs.

How to Resize Columns and Rows in Word Tables
Resizing columns and rows is an integral part of table formatting in Word and luckily a straightforward process. . This section teaches how to adjust the size of your table's columns and rows, allowing for a customized fit of your data within the table. It is particularly useful for optimizing the layout of your table to match the content and overall design of your document.

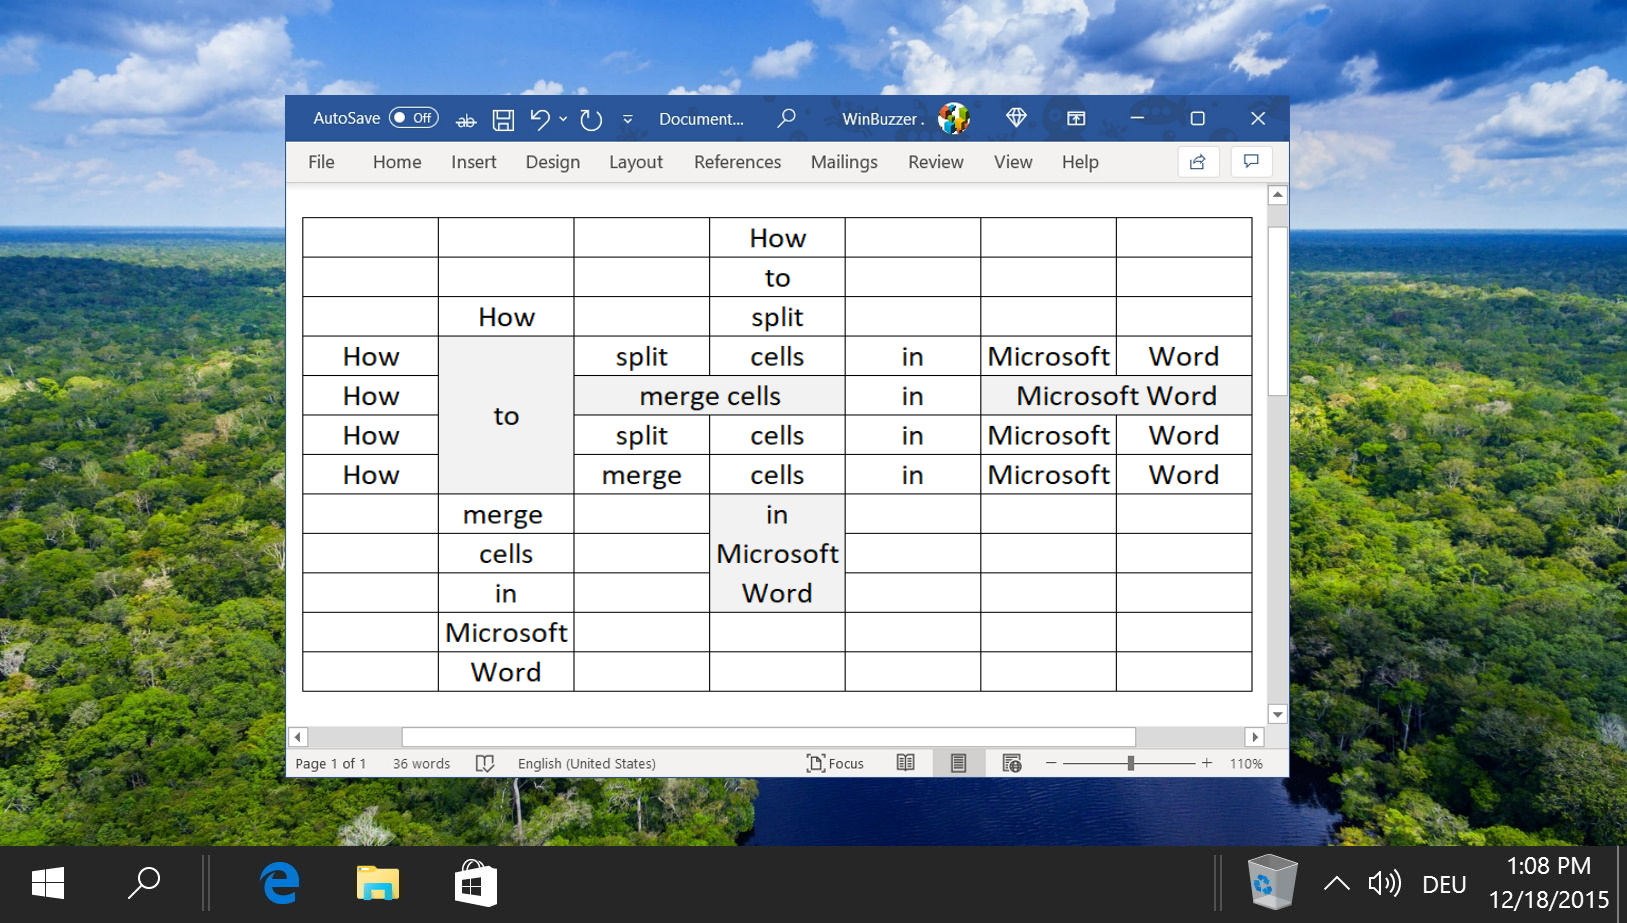
How to Merge and Split Tables and Cells in Word
How to Delete a Table in Word or Cut and Paste It Elsewhere

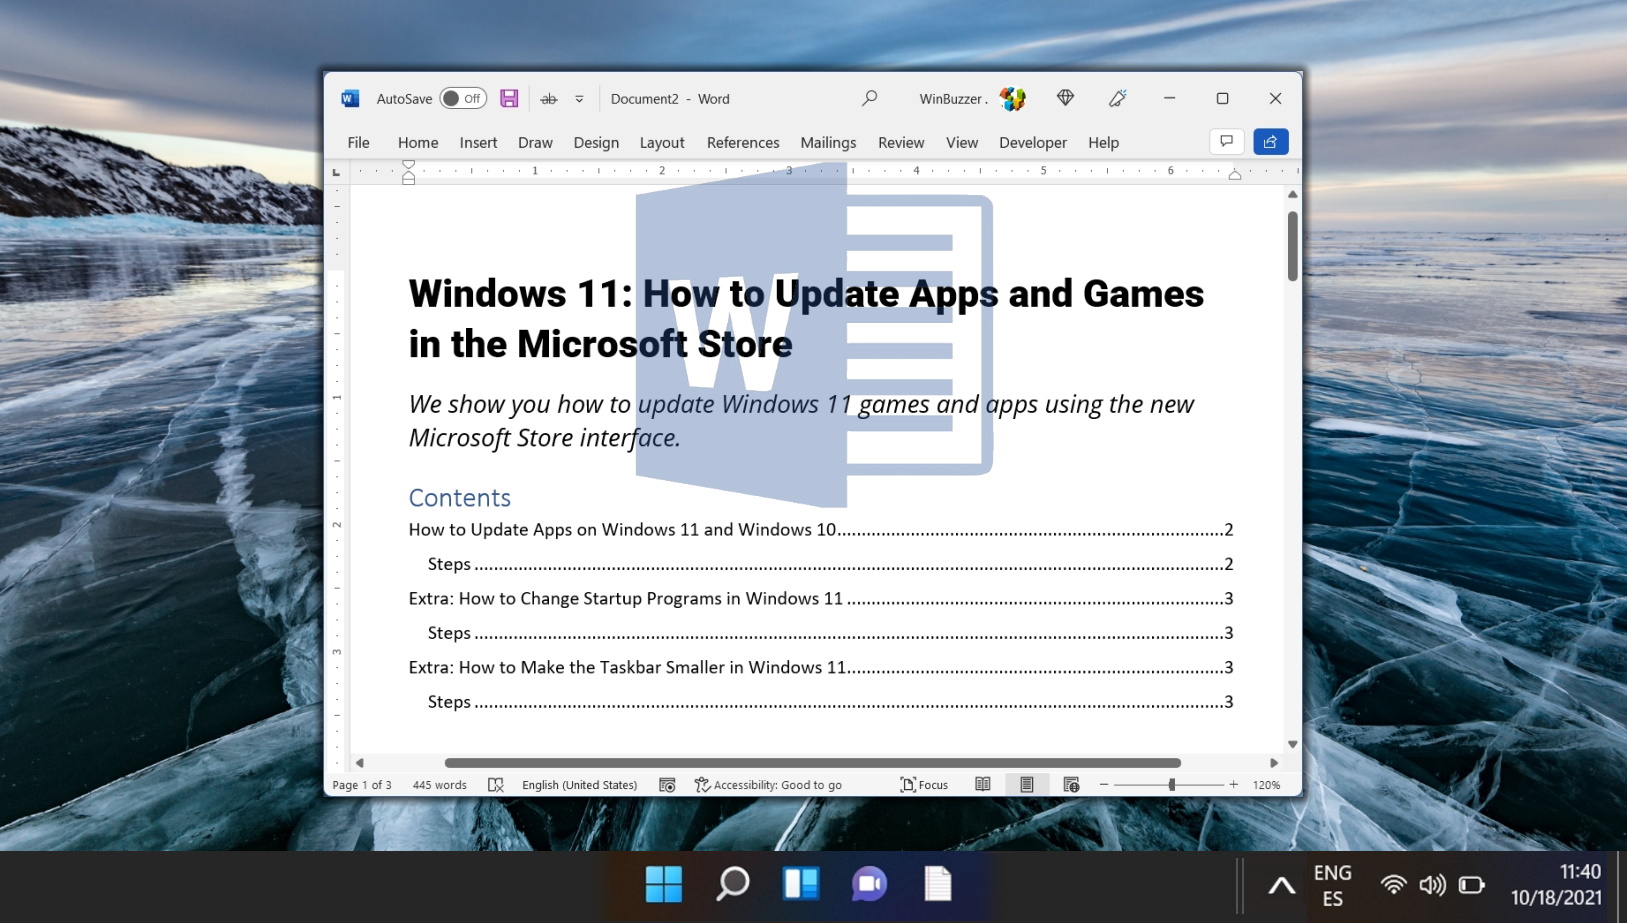
How to Create a Table of Contents in Word
FAQ – Frequently Asked Questions About Using Tables in Word
How can i autofit a table of contents in word.
To autofit the contents of a table in Word, right-click anywhere inside the table and select ‘ AutoFit ‘. You will see three options: ‘ AutoFit to Contents ‘, ‘ AutoFit to Window ‘, and ‘ Fixed Column Width ‘. Choose ‘ AutoFit to Contents ‘ to adjust the width of each column based on its content, ensuring that all data is visible and neatly organized without manual adjustments.
How Can I add subheadings to the Table of Contents in Word?
To include subheadings in your Table of Contents, ensure they are formatted using Word's built-in heading styles, such as ‘ Heading 2 ‘ or ‘ Heading 3 ‘. Apply these styles by selecting your subheading text, navigating to the ‘ Home ‘ tab, and choosing the appropriate style from the ‘ Styles ‘ gallery. When you generate or update your Table of Contents, Word will automatically include these subheadings at their respective hierarchy levels.
How Can I convert text into a table in Word?
To convert text into a table, highlight the text you want to organize and ensure it is separated by a consistent delimiter like commas or tabs. Go to the ‘ Insert ‘ tab, click on ‘ Table ‘, and select ‘ Convert Text to Table ‘. In the dialog box, choose your delimiter under ‘ Separate text at ‘, set the number of columns and rows, and click ‘ OK ‘. Word will organize your text into a table based on these specifications.
How Can I insert a row in a Word table?
To add a new row, place your cursor where you want to insert a row above or below, right-click, and navigate to ‘ Insert ‘. Choose ‘ Insert Rows Above ‘ or ‘ Insert Rows Below ‘. Word will add a new row in the specified location. For multiple rows, select the number of rows you want to add before right-clicking to insert.
How Can I adjust table size in Word without altering formatting?
To adjust the size of a table without changing its formatting, position your cursor on the table edge until it turns into a two-sided arrow and drag to resize. For specific rows or columns, hover over the boundary and drag to adjust. Use the ‘ Layout ‘ tab to enter precise measurements for row heights and column widths, preserving the original formatting.
How Can I merge two tables in Word?
To combine two tables, copy rows or columns from one table and paste them into the other. If tables are adjacent, remove any paragraph marks or lines between them, and they will merge automatically. Ensure alignment for a uniform structure.
How Can I split a cell into multiple cells in Word?
To split a cell, place your cursor within it, go to the ‘ Layout ‘ tab, and click ‘ Split Cells ‘. Specify the number of columns and rows in the dialog box and click ‘ OK ‘. The cell will be divided accordingly for more complex layouts.
How Can I make text vertical in a Word table?
To change text orientation to vertical, select the cells and go to the ‘ Layout ‘ tab. Click ‘ Text Direction ‘ in the ‘ Alignment ‘ group to rotate the text. You may need to click multiple times to achieve vertical alignment, useful for saving space or adding visual interest.
How Can I apply a specific table style, like Grid Table 4 Accent 1, in Word?
To apply a predefined table style such as ‘ Grid Table 4 Accent 1 ‘, click on the table to select it. Navigate to the ‘ Design ‘ tab under ‘ Table Tools ‘ and find the style in the ‘ Table Styles ‘ gallery. Click on the style to apply it. Hover over different styles to preview them on your table before applying.
How Can I remove table borders in Word?
To remove borders from a table, select the table or specific cells, then go to the ‘ Design ‘ tab under ‘ Table Tools ‘. Click the ‘ Borders ‘ button in the ‘ Table Styles ‘ group and select ‘ No Border ‘. This will remove all visible borders, making the table appear as if it's not contained within a table structure.
How Can I keep a table from breaking across pages in Word?
Prevent a table from splitting across pages by selecting the rows you want to keep together, right-clicking to choose ‘ Table Properties ‘, and then unchecking ‘ Allow row to break across pages ‘ under the ‘Row' tab. This ensures the selected rows stay on one page.
How Can I add a caption to a table in Word?
To add a caption, click on the table and go to the ‘References' tab to select ‘ Insert Caption ‘. In the dialog box, type your caption in the ‘ Caption ‘ field, choose the label and position, and click ‘ OK ‘. This provides context or references the table in your document.
How Can I lock a table in Word to prevent editing?
To restrict editing, select the table, navigate to the ‘ Review ‘ tab, and click ‘ Restrict Editing ‘. In the ‘ Editing restrictions ‘ section, check ‘ Allow only this type of editing in the document ‘ and select ‘ No changes (Read only) ‘. Start enforcing protection with or without a password to make the table content read-only.
How Can I align a table to the center of the page in Word?
For center alignment, select the table and click the ‘ Center ‘ alignment button under the ‘ Home ‘ tab or go to ‘ Table Properties ‘ under the ‘ Layout ‘ tab, choose ‘ Center ‘ under alignment in the ‘ Table ‘ tab, and apply the changes for a more polished document layout.
How Can I convert a table to text separated by tabs in Word?
To convert a table into text with tab separators, select the table, go to the ‘ Layout ‘ tab under ‘ Table Tools ‘, click ‘ Convert to Text ‘, choose ‘ Tabs ‘ as your separator, and click ‘ OK ‘. The table will be converted to text, maintaining clear data separation.
Last Updated on April 19, 2024 11:28 am CEST
- Microsoft 365
- Microsoft Office
- Microsoft Word
- Word Processors
Recent News

Adobe Releases Illustrator Beta for ARM Windows Devices

Amazon Faces Recall Order for Over 400,000 Hazardous Products

Meta Shuts Down Celebrity AI Chatbots Due to Low User Engagement
- The making of an Office Legend
- Choose what you pay
- Free Training
- Computers for the Terrified!
- Beginners Word Bootcamp
- Word Mastery
- Beginners Excel Bootcamp
- Excel Mastery
- PowerPoint Mastery
- Outlook Mastery
- Publisher Mastery
- Office Legends Academy
- Member Login
Reading Time: minutes remaining
How to Create & Manipulate Tables in Word

by Jason Morrell May 10, 2021
Tables in Word are useful in so many situations. In this post you'll discover how to create tables, then manipulate and design them in the quickest and easiest way to provide that visual punch.
RELATED POST :
Enhance your Word tables with these advanced features
1. What are tables in Word good for?
Tables are useful for 2 distinct reasons.
- To show an actual table of data, or
- To organise and postion text, images and other elements on the page.
Many years ago, typewriters ruled the world. And a feature of a good typewriter was the tab stop , which was a device that essentially let you control indentation.
Over the years many people have continued to use tabs to indent text, because of its convenience, but they are hard work to set up properly.
Tables provide a much easier way to organise content on a page.
2. How to create TABLEs in Word
1. Select the Insert tab.
2. Click the Tables icon in the Tables group.
3. Move your mouse pointer into the table grid until the required number of rows and columns are highlighted orange, then left-click.
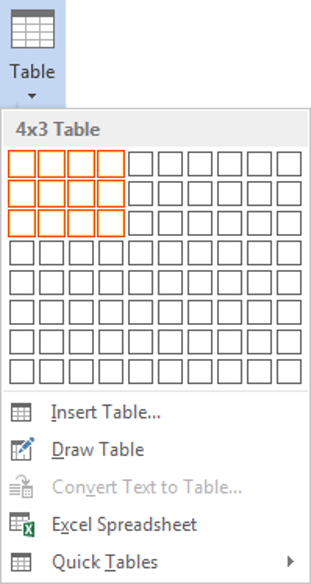
An empty table is inserted into the document.
Two new tabs, Design and Layout are also added to the ribbon area, under the banner of Table Tools .

3. MOVING AROUND A Word TABLE
- While the table is empty, you can use the cursor keys to move around the cells. However, when the cells contain information, using the cursor keys will move through the cell content first before moving to the next cell
- You can left-click in any cell to position the cursor.
- Press Tab to move to the next cell. The cursor will move across and then down the table.
- Press Shift + Tab to move to the previous cell.
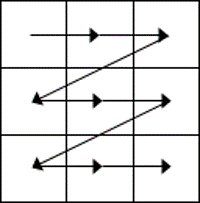
NB. Using Tab is better than using the cursors as it will move to the next/previous cell regardless of whether there is information in the cells.
NB2. If you press Tab while you are in the last cell, a new row will be added to the bottom of your table
4. SELECTING A CELL, ROW, COLUMN OR THE ENTIRE TABLE
To select a cell:
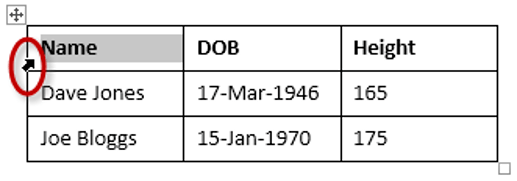
1. Position the mouse pointer inside the cell on the bottom-left corner of the cell. The pointer will change shape to a solid black arrow that points up and right.
2. Left-click.
To select a row of a table:
1. Position the mouse pointer in the left margin in line with the row you want to select. The mouse pointer will change to a white arrow that points up and right.

To select a column
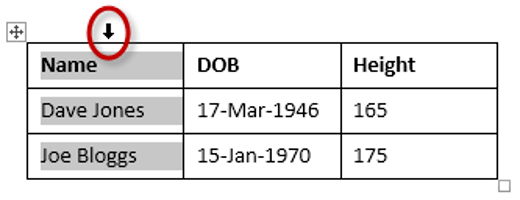
1. Position the mouse pointer so that it rests on the top border of the table, above the column you want to select. The mouse pointer will change to a solid black arrow pointing down.
To select the entire table:
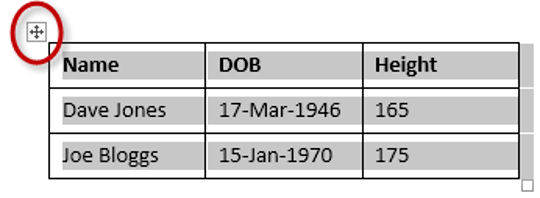
1. Position your mouse pointer over the 4-headed arrow icon situated at the top-left of the table.
5. INSERTING AN EXTRA ROW OR COLUMN
To insert an extra row:
1. Position the cursor in a cell.
2. Select the Layout tab, under the Table Tools banner.
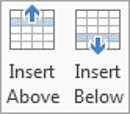
3. Click Insert Above or Insert Below in the Rows and Columns group
Here is a quick way to insert new rows:
1. Position the cursor to the left of the table, but in close proximity.
2. A plus symbol will appear above or below the mouse pointer indicating where the new row will be added.

3. Nudge the mouse pointer up or down to move the plus sign above or below.
4. Left-click to insert the new row,
To insert an extra column:
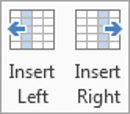
3. Click Insert Left or Insert Right in the Rows and Columns group
Here is a quick way to insert a new column:
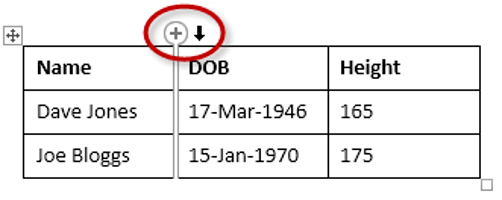
1. Position the cursor above a column, but in close proximity to the table.
2. A plus symbol will appear to the left or right of the mouse pointer indicating where the new column will be added.
3. Nudge the mouse pointer left or right to move the plus sign to the left or the right of the column.
4. Left-click to insert the new column,
6. DELETING A ROW OR COLUMN
To delete the current row or column:
1. Position the cursor in any cell of the row you want to delete.
3. Click the Delete icon in the Rows and Columns group.

4. Choose Delete Row or Delete Colum n from the drop-down menu.
7. Quickly fORMATTING tables in Word
Word provides you with a number of pre-set table designs. This means that it formats the headings and the data, applies a variety of borders and colours the cells in a way that makes it look like a professionally produced table. As a beginner this simple technique will give you a good-looking table.
1. Position the cursor in any cell in the table.
2. Select the Design tab under the Table Tools banner.
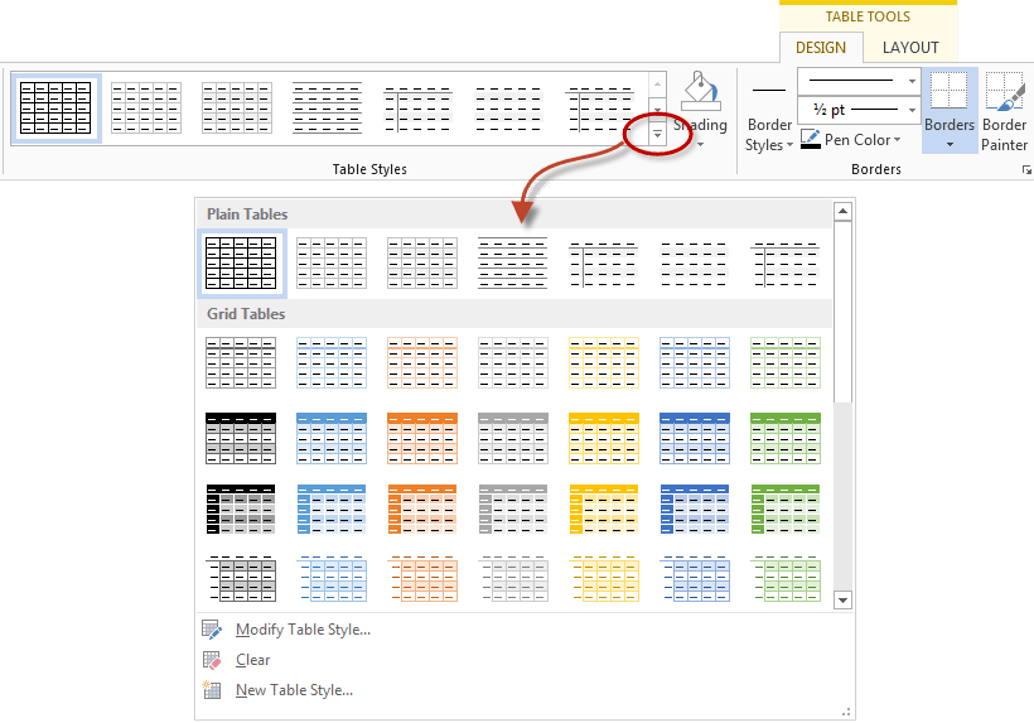
The Table Styles group lists a number of table designs. To get the full list, click the More button beneath the table styles scroll bar
The default table style is Table Grid in the Plain Tables category which adds simple gridlines but no shading to your table.
Live Preview allows you to hover over a design and see it applied to your table. If you like what you see, click to select the table design.
In the Table Style Options group of the Design tab, tick the components that you have in your table. For example, if your table has column headings, tick Header Row . In doing this, the various parts of your table are formatted accordingly

Header Row This will emphasise the header row by making the text bold or applying a different cell colour (depending on the table style selected.
Total Row This will emphasise the bottom table row by making the text bold or applying a different cell colour (depending on the table style selected.
First Column This will emphasise the first column (for labels etc.) by making the text bold or applying a different cell colour (depending on the table style selected.
Last Column This will emphasise the last column (for row totals etc.) by making the text bold or applying a different cell colour (depending on the table style selected.
Banded Rows This will make odd rows one colour and even rows a different colour. This helps readability.
Banded Columns This will make odd columns one colour and even columns a different colour. This helps readability.
8. SETTING THE BORDERS AND SHADING
The Table Styles Gallery allows you to completely format a table with one click. Whereas you used to need some nous, anybody can now create a professional looking design.
However, you will often still need to apply your own border and shading, and manually change a table design. With a little effort can add a lot of flavour to your page and dramatically enhance the overall appearance of the document.
To set the borders for tables in Word:
1. Select the portion of the table that you wish to set the borders for. This may be the entire table, a row or rows, a column or columns or a selection of cells.
3. Select the Borders icon. A drop-down list appears. This list shows every combination of border that can be turned on or off. The icons with a shaded background are currently switched on. The rest are switched off.
4. Click any icon to switch the border on or off. The border style that is applied is the default style ( ½ pt solid black line ) or the last style that was used.
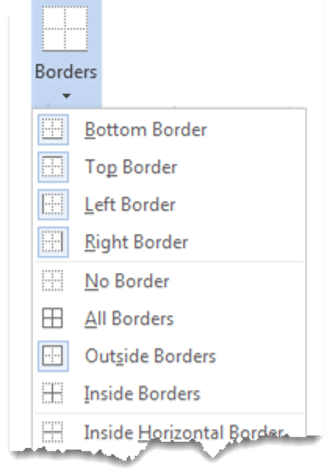
5. To apply customised borders, with different colours, styles and widths, click the Borders & Shading option at the bottom of the list to display the Borders and Shading dialog box.
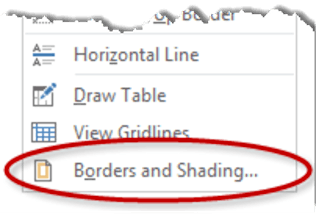
Your selection will always have an outer border, and if you selected more than one cell, you will have some inside borders as well. The easiest way to use the dialog box is to start on the bottom-middle and work your way up and right.
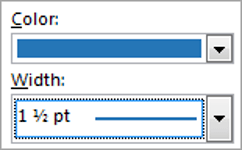
1. Select the colour and width (thickness) that you would like for your border.
2. Choose a style (e.g. dotted, dashed, double, solid etc.)
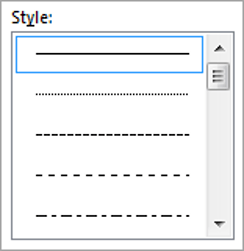
3. Paint your borders. There are two ways to do this.
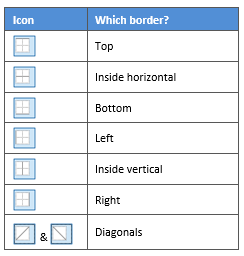
- The first way is to click directly on a border in the Preview itself.
- The second way is to click the appropriate icon around the edge of the Preview section that represents each border. Depending on which cells you selected in your table, some of these icons may not be available.
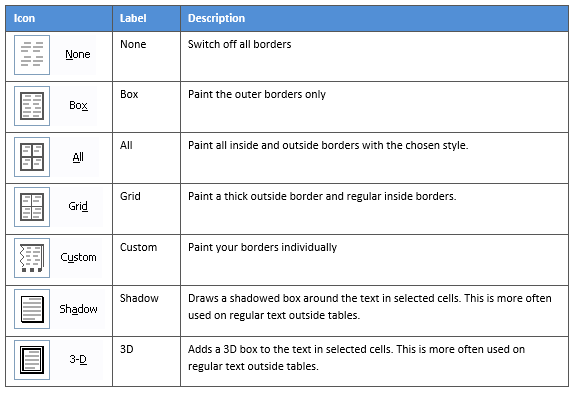
On the left-hand side of the dialog box, there are some pre-defined border combinations which you can use to save yourself some time. Depending on your selection of cells, the pre-defined options may differ. Here’s a run-down:
To shade the cells of tables in Word:
1. Select the portion of the table that you wish to shade. This may be the entire table, a row or rows, a column or columns or a selection of cells.
3. Click the Shading icon. The colours that you see displayed match the current them of the document. Themes were discussed earlier in the course.
4. Click a colour in the palette.
While you can pick any colour, it is recommended to stick with the light colour shades, otherwise your tables will appear very loud and ugly, like they’re shouting in your face. Subtle is the order of the day. The exception to this is column headings or other cells that you wish to differentiate. Under these circumstances, you can use a dark colour, but use a light font with it.
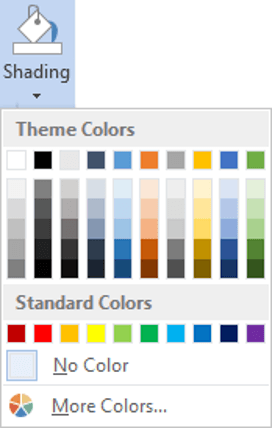
If you cannot find the exact colour you need,
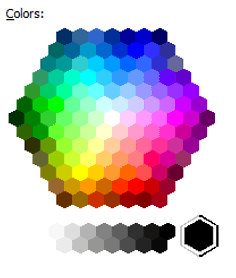
- Click the More Colours link underneath the palette. This displays a larger, more accurate colour palette.
- And if that’s not enough, click the Custom tab and you’ll get a really fine selection of colours (you can even enter your own RGB settings if you know them)
9. REPEATING table HEADINGS ON EVERY PAGE WHEN PRINTING
When you have large tables that occupy two or more pages, many people insert manual page breaks, then copy and paste their table header rows at the top of each page.
When rows are added or removed from tables in Word, the table headers end up half way down the page.
There is a simple tool that will eliminate this problem
1. Ensure that the table is a single table, with no manual page breaks in the middle, and one header at the top. The table header may occupy more than one row, it doesn’t affect the way this feature works.
2. Position the cursor somewhere in the top row of the table.
3. Select the Layout tab under the Table Tools banner.
4. Click the Repeat Header Rows icon ion the Data group.
Now, it doesn’t matter how many rows tables in Word contain, if the table ever spills across into another page, the header row (which normally displays the column headings) will always appear at the top of the table.
10. All the key points again
- Tables in Word serve 2 distinct purpose: to display a table of data and to organise and position items on the page
- To create table, select 2 tabs - Design and Layout under the Table Tools banner.
- There are 2 tabs - Design and Layout under the Table Tools banner.
- You can press the TAB key to move direct to the next cell and SHIFT and TAB together to move backwards through a table.
- The four elements of a table are cells, rows, columns and the whole table. Each can be selected.
- Rows can be inserted by selecting the Layout tab under Table Tools , then clicking the Insert Above or Insert Below icons. Alternatively, hover to the left of a row and click the plus symbol that appears above or below the mouse pointer.
- Columns can be inserted by selecting the Layout tab under Table Tools , then clicking the Insert Left or Insert Right icons. Alternatively, hover above a table column and click the plus symbol that appears to the left or right of the mouse pointer.
- Columns and rows and be removed from the table, by positioning the cursor in the row or column to be removed, then clicking the Delete icon on the Layout tab of Table Tools and choosing Delete Row or Delete Column .
- Tables can be formatted using the Table Style gallery or by manually setting the shading and borders manually. Both sets of tools are found on the Design ribbon of the Table Tools .
- When using the Microsoft Table Styles , you can control the behaviour of the formatting by setting the Table Style options – 6 tick boxes that define the structure of your table.
- For long tables that spill across onto subsequent pages, the top row, which normally contains the column headings can be set to repeat automatically . So there is no excuse for cutting and pasting headings midway through your table or taping pages together to make sense of the table!
I hope you found plenty of value in this post. I'd love to hear your biggest takeaway in the comments below together with any questions you may have. Have a fantastic day.

About the author
Jason Morrell
Jason Morrell is a professional trainer, consultant and course creator who lives on the glorious Gold Coast in Queensland, Australia.
He helps people of all levels unleash and leverage the power contained within Microsoft Office by delivering training, troubleshooting services and taking on client projects. He loves to simplify tricky concepts and provide helpful, proven, actionable advice that can be implemented for quick results.
Purely for amusement he sometimes talks about himself in the third person.
Word Pro Tips
Multilevel numbering in Word that works perfectly, first time
Word Beginner
An Express Tour of the Word Screen. Getting Started with Microsoft Word: A Beginners Guide
JOIN THE DISCUSSION
Session expired
Please log in again. The login page will open in a new tab. After logging in you can close it and return to this page.

How to Create and Customize Tables in Microsoft Word
You can organize data in a Word document by using tables. Here’s how to add and customize tables in Word.
You can use a few methods to organize the content in a Word document, but one of the best is to use a table. This allows you to separate your content into columns and rows, allowing for better presentation.
There are a few methods you can use to create tables in Microsoft Word. You can insert, draw, or copy in a table from elsewhere, should you want to. Here’s how to create and customize tables in Microsoft Word following these methods.
How to Insert a Table in Microsoft Word
You can insert a table in Microsoft Word in several ways, but three ways are worth mentioning in particular. You can add a table by inserting it automatically with a set size, or you can draw a table manually using your mouse or trackpad.
Alternatively, you can also copy and paste a grouping of cells from Microsoft Excel. Once pasted, Word will convert these cells into the format of a table. The instructions below should work for all recent versions of Word. There may be slight differences in older versions of Office, however.
To add a table in Word, you’ll need first to open a blank or existing Word document and press the Insert tab on the ribbon bar. From here, click the Table button.
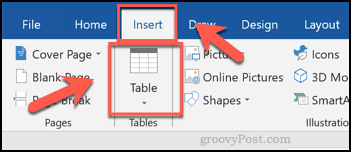
This will display a drop-down menu with various options. To insert a table automatically, select the size you want from the grid.
Once pressed, the table will be inserted onto the page using the number of rows and columns you select.
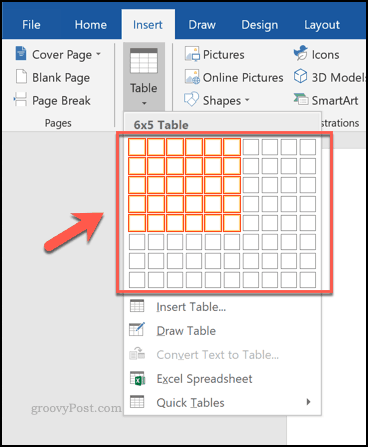
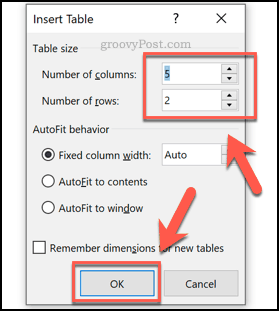
Alternatively, press the Insert Table option, selecting the number of rows and columns you need from the Insert Table pop-up box that appears afterward.
You can also draw a table instead. From the Table drop-down menu, click the Draw Table option.
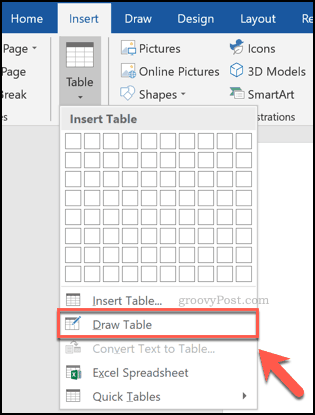
Using your mouse or trackpad, draw a table to the size you want on your chosen page.
Once you’ve created the outer border for your table, you’ll need to draw downwards inside the table to add a column or horizontally to add a row.

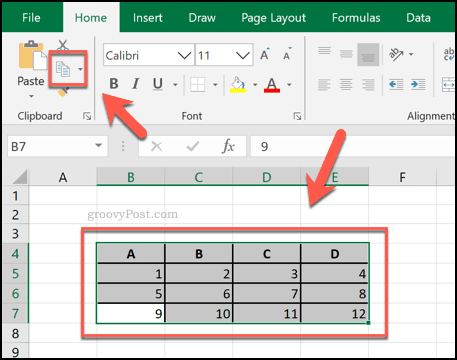
As we’ve mentioned, you can also paste in a table using cells from a Microsoft Excel spreadsheet.
To do this, open an Excel spreadsheet, select a grouping of cells and press Ctrl + C on your keyboard (or press Home > Copy ).
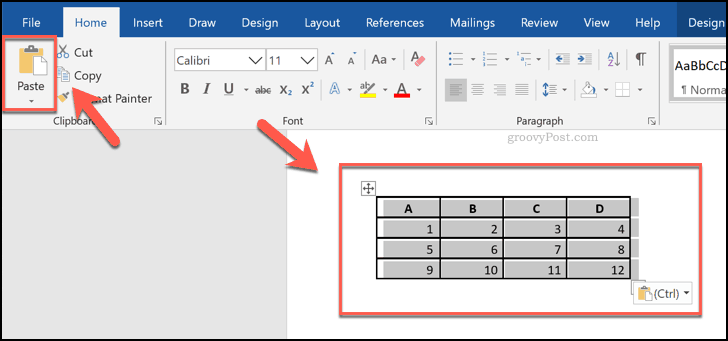
Return to your Word document, then press Ctrl + V on your keyboard to paste the cells into your document (or press Home > Paste ).
Formatting a Microsoft Word Table
Once your table is created in Word, you can then begin to format it. You can resize the table once it’s been created, as well as alter the bordering, font style, and more.
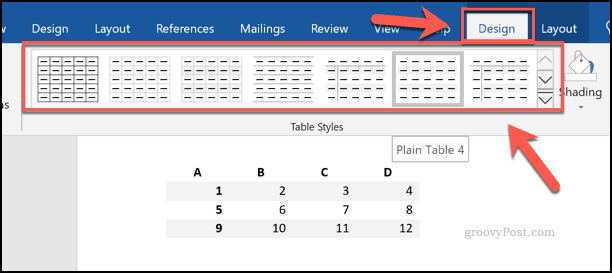
One easy way to format your table is by using a table style. These apply preset formatting choices to your table. To add these, select your table, then press the Design tab under the Table Tools section on the ribbon bar.
Click one of the options from the Table Styles section to apply that style to your table.
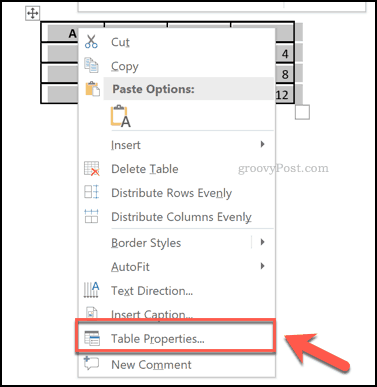
To add your own formatting, select and right-click your table, then press Table Properties .
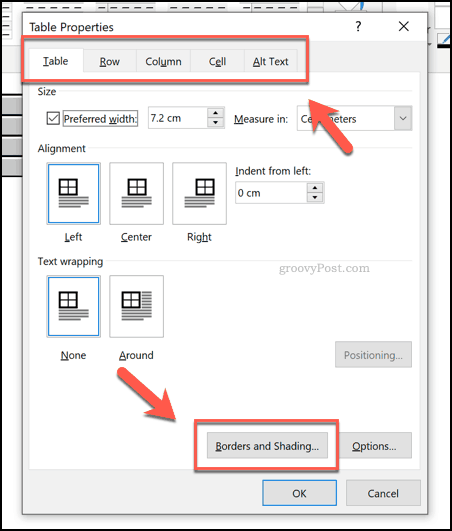
You can set the size of your table using the options shown in the various tabbed menus in the Table Properties box. These include options to alter the length, width, and alignment of your table columns and rows.
To change the border and shadings of your table, press the Borders and Shadings button at the bottom of the Table tab.
You can easily change other table formatting options, including the font, color, and other text styles, using the standard formatting options in Word.
To do this, select the text in your table, then use the formatting options from the Font and Paragraph sections in the Home tab on the ribbon bar to make changes.

Bringing Microsoft Office Skills Together
Creating tables in a Word document is, as we’ve mentioned, a good way to organize and present your data. There are other ways you can do this, however. You could add and edit images in Microsoft Word to get your points across visually, for instance.
If you want to stick with tables, don’t forget that it’s easy to copy data from Microsoft Excel and paste it into your Word document later. If you’re new to Excel, you might find these Excel beginner tips helpful.

Recommended for you

8 Formatting Tips for Perfect Tables in Microsoft Word

Your changes have been saved
Email Is sent
Please verify your email address.
You’ve reached your account maximum for followed topics.
I've Ditched ChatGPT for This Superior Alternative: 3 Reasons Why
Why i store my passwords in bitwarden (and you should too), which apple devices support apple intelligence.
On Microsoft Word, tables are essential formatting tools. Microsoft Office has made it easier to create and format basic tables in Microsoft Word for Office 365, Word 2019, Word 2016, and Word 2013.
We haven't covered tables as much as we would have liked to. It's time to correct that, as the number of people asking questions on how to format tables properly is piling up. Maybe these eight table tips can be an appetizer. You just cannot create beautiful Microsoft Word documents by cutting corners on tables—here's how to format tables in Word.
By the way, it's possible to get a free copy of Microsoft Word , should you need one.
1. How to Make a Table in Microsoft Word
Using tables, and even changing them on the fly according to the data, has become far easier in the newer versions of Word such as Microsoft Word 2019 and Office 365. Intuitive Microsoft Word table formatting features give you finer (and quicker) control over how a table looks. But first head to the Ribbon > Insert > Table > Insert Table for making your first table.
It gives you five options for creating your first table.
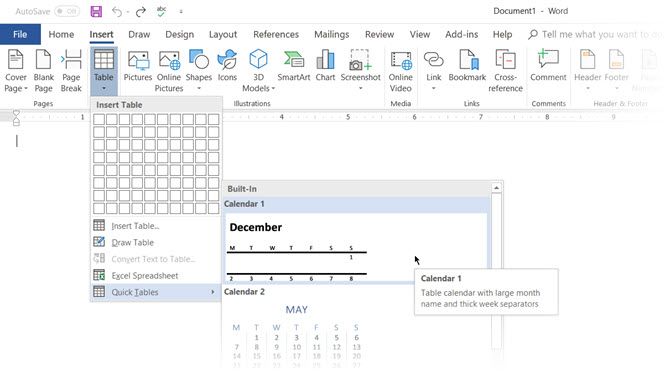
The quickest way to start is with Quick Tables . The built-in designs save you from the lack of design skills. You can modify the designs by adding your own rows and columns or deleting the ones you don't need.
Another quick way to create a table in Word is the Insert Control feature. You can create a new column or row with one click. Hover the mouse over a table. A bar appears right outside your table between two existing columns or rows. Click on it when it appears, and a new column or row will be inserted at that position.

When you want to move or order a row around, use the combination of Alt+Shift+Up Arrow and Alt+Shift+Down Arrow to order the row up or down. Move contiguous rows by selecting them all first.
How to Use Table Properties to Position Your Table on the Page
If your tables are overlapping in Word, or you want to stop them from overlaying your text, then you need to learn how to position your tables on the page using the Table Properties feature.
Right-click on the table and select Table Properties from the context menu. The Table Properties dialog box is for precise control over the data and its display. Control the size, alignment, and indentation of the table.
By default, Word aligns a table on the left. If you want to center a table on the page, select the Table tab. Click on Alignment > Center .
The Indent from left figure controls the distance of the table from the left margin.
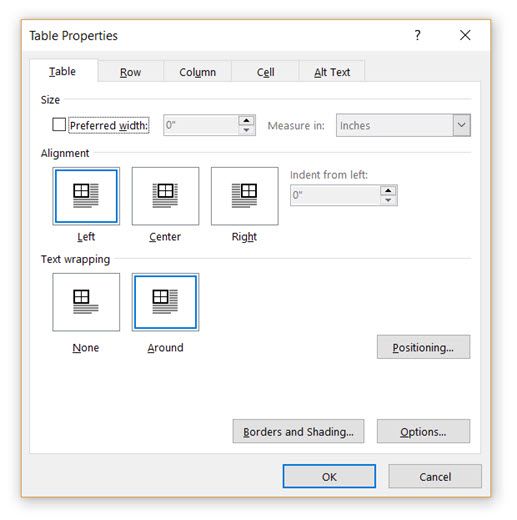
Position the table according to the text around it for a visually aesthetic look. Wrap text around tables by dragging it by the handle. The text wrapping changes automatically from None to Around . From the Table Positioning dialog box, you can set the Distance from surrounding text for each side of the table.
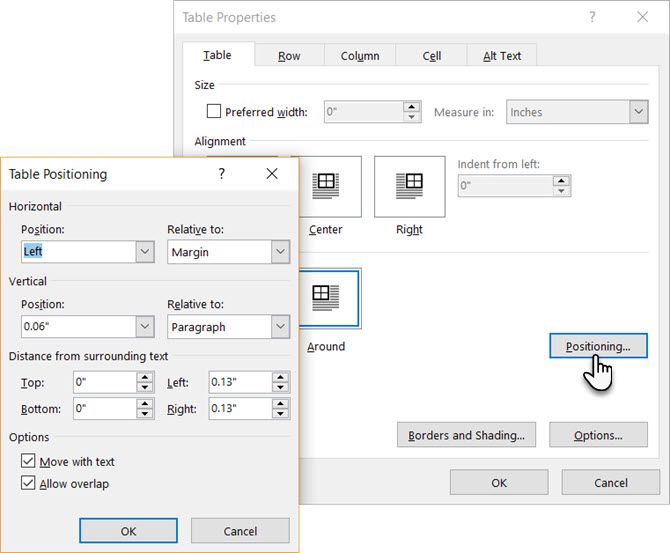
Select Move with Text if the text is directly related to the table data. The table is vertically aligned to the related paragraph around it. If the table data applies to the whole document, you can keep the option unchecked.
You can also control the tables with Microsoft Word keyboard shortcuts .
2. Use the Ruler
If you're looking for an easy way to make tables look good in Word, then sizing tables and positioning them accurately is an art in itself. If you need precise measurements to size your rows and columns— use the ruler .
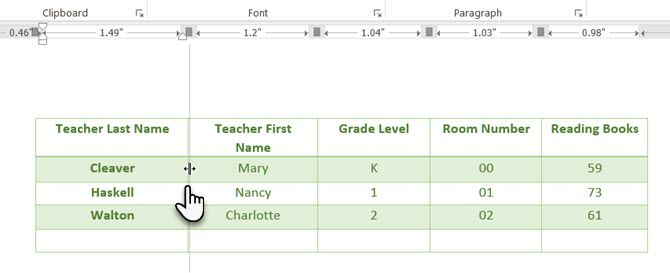
Hover the mouse over a border. When the double-arrow pointer appears, click the border and hold down the ALT key. Move the rows and columns to fit your measurements.
3. Convert Text to Table (and Vice Versa)
Tabular data gives information in its structure. It would have been frustrating if Word didn't have something to handle non-tabular data. You can convert data to tables instantly from the Insert Table command.
Select the text. Go to Ribbon > Insert > Table > Insert Table .
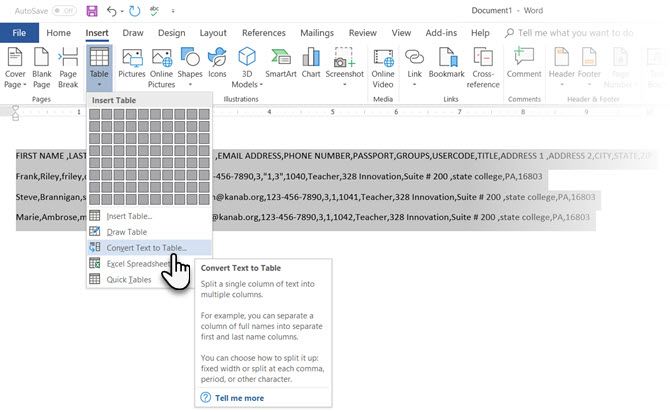
Microsoft Word determines the required number of rows and columns by considering the text separators and then auto-fits the contents. The Convert Text to Table dialog box allows you more control if the previous operation doesn't work out right. You can also choose how to fit the contents of the table on the page.
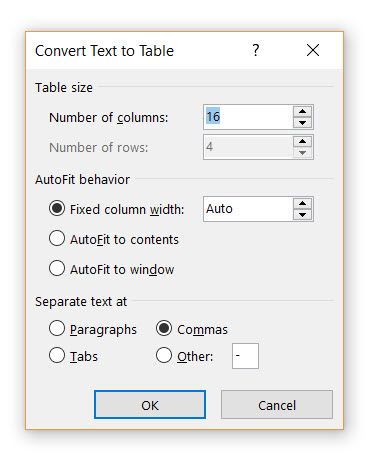
You can specify how Microsoft Word should separate the data into rows and columns. Paragraph, tabs, commas, or any other delimiting character. This allows you to easily import non-tabular data from CSV files or plain TXT files and convert them into formatted tables. Remember, you can also import data from Microsoft Word into an Excel spreadsheet.
Convert Table to Text
Engineer the reverse process if someone asks you to send them files with comma-separated values or any other delineator. Select the entire table by clicking the “move” handle above the table.
Go to Ribbon > Table Tools > Layout > In the Data Group , click Convert to Text .
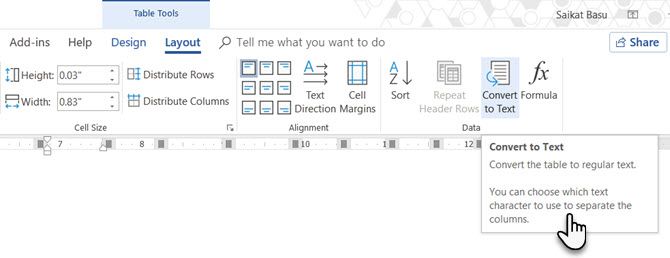
Simple text can be boring. When you have the chance, convert your table of data to a more visual chart instead with one of the underused features in Microsoft Word .
4. Auto-Fill Column Numbers
Microsoft Excel makes auto-filling a sequence of numbers very easy. Microsoft Word does not, and you may have to resort to a manual job. There is a simpler way.
Create a new column for the serial numbers if it does not exist. Select this column by positioning the mouse over the column.
With the column selected, go to Home > Paragraph > Click the Numbering button for inserting a numbered list.
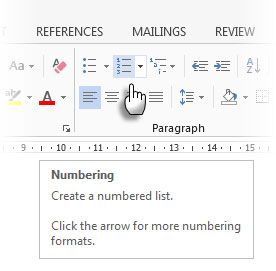
A number sequence is inserted in the column automatically.
5. Freeze Those Tables!
Microsoft Word tables change their dimension to accommodate new data. There may be times when you do not want the table to change size at all, even when new data is inserted. That is—“freeze” the size of cells.
The first step is to specify a fixed size for the cells. Go to Table Properties > Row > Enter a value in the Specify height box. For Row height is select Exactly from the dropdown.
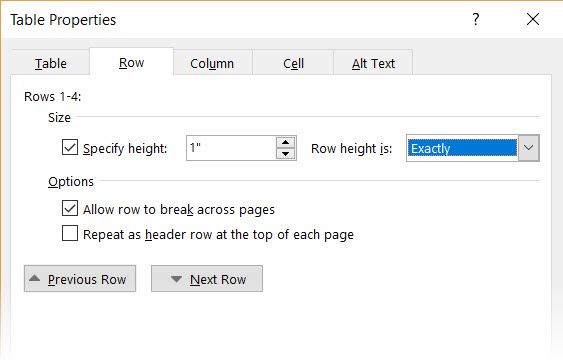
Now, select the Table tab > click the Options button > uncheck the Automatically Resize to Fit Contents check box.
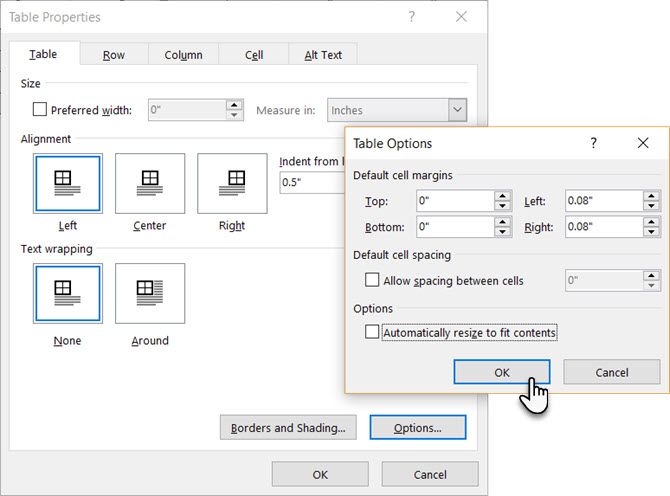
Click OK twice to exit the Table Properties dialog box.
This also solves the problem of inserting an image into a cell without the cell expanding to accommodate the image. If the image is bigger than the available space in the cell, it gets cropped to fit within the cell.
6. Change Rows Into Columns in a Table
There are situations where you have to change rows into columns and columns into rows. One possible scenario is where the number of columns exceeds the page margin. Switching columns around to rows and vice-versa is called transposition .
The bad news is that Word does not have an inbuilt method for handling this yet. Microsoft suggests that you copy-paste your table into Microsoft Excel and use its Transpose command. The transposed table can now be copy-pasted back into Microsoft Word.
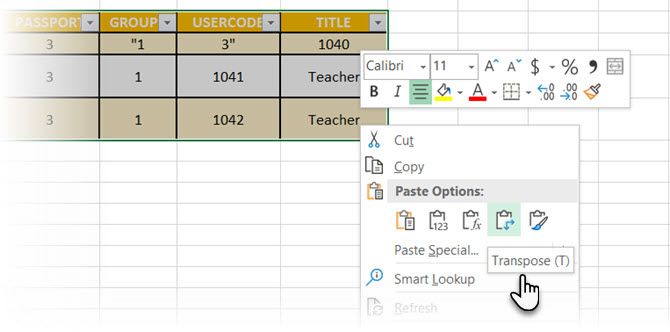
Data shows how easy it is in Excel with this short tutorial on switching rows into columns . Also, take the help of Microsoft's Support Page if you run into a problem using the Transpose command.
7. Paste Perfect Excel Tables Into Gmail
You will find a use for this simple workaround. By default, Gmail does not retain the spreadsheet format when you paste from Microsoft Excel. To email tabular data without sending it as a separate attachment, use Microsoft Word as a bridge.
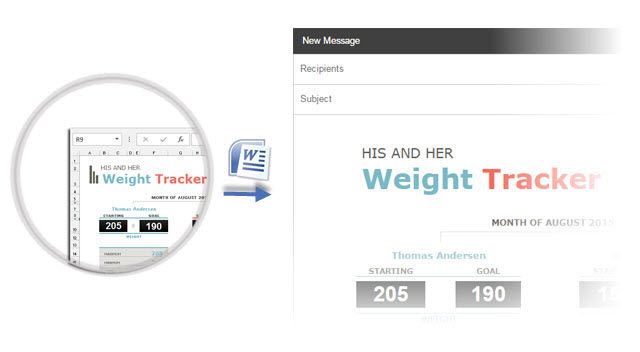
Select and copy-paste the Microsoft Excel table to a Microsoft Word document with the source formatting. Now, copy-paste from Microsoft Word to Gmail. As you can see from the screenshot, the problem is solved. You might have to tweak the more heavily formatted tables slightly, but most of the formatting is retained.
8. Reuse Your Tables to Save Time
You can save a lot of time by re-using tables in your professional Microsoft Word documents. Save empty table formats and insert new data when required. With this quick save, you won't have to recreate the layout from scratch for new data.
Select a table. Go to Ribbon > Insert > Text group > click Quick Parts > Save Selection to Quick Part Gallery .
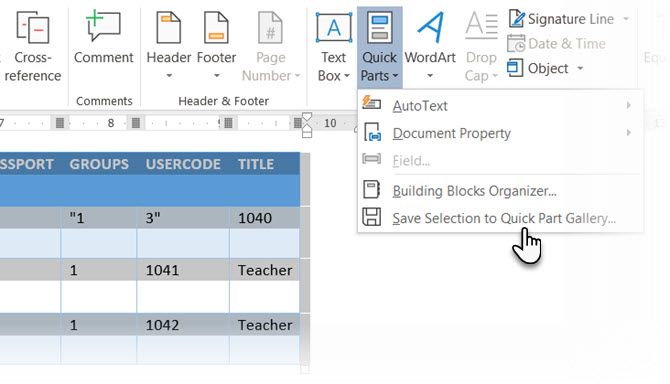
After you save a selection to the Quick Part Gallery, you can reuse the selection by clicking Quick Parts and choosing the selection from the gallery.
Use the Building Blocks Organizer to preview any table you created. You can also edit properties and delete the tables from here.
Do Microsoft Word Tables Confuse You?
These tips aren't enough to cover the scope of formatting tables in Word. I haven't talked about the role of the Design tab in creating eye-catching tables. That is a topic in itself. But it is one of the lesser areas to get confused over thanks to the visual help in that tab.
Working with tables in Word can be extremely rewarding. While tables are one common area between Microsoft Word and Excel, Microsoft Excel is more for power managing tabular data. Nonetheless, learning how to format tables well in both applications is an essential Microsoft Office skill. Use them at every opportunity.
- Productivity
- Microsoft Word
- Microsoft Office 2013
How to Make a Table in Word 2019: A Step-by-Step Guide
Creating a table in Word 2019 is a straightforward process that can greatly enhance the organization and presentation of data in your document. Whether you’re working on a report, planning an event, or just trying to keep track of information, a well-constructed table can be incredibly useful. Here’s a quick overview: simply open Word, go to the Insert tab, click on ‘Table,’ select the desired number of rows and columns, and voilà! Your table is ready for data entry.
Step by Step Tutorial: Making a Table in Word 2019
Before we dive into the steps, it’s worth noting that adding a table to your Word document can help to visually organize information, making it easier for readers to follow and understand. Let’s get started.
Step 1: Open Microsoft Word 2019
Open your Microsoft Word 2019 application to get started.
Once you have Word open, you’ll be ready to begin the process of creating your table. If you’re working with an existing document, make sure you’re in the location where you want the table to appear before you start.
Step 2: Navigate to the ‘Insert’ tab
Click on the ‘Insert’ tab at the top of the Word window.
This tab is where you’ll find all the options for adding various elements to your document, including tables. It’s your gateway to transforming a plain document into something more visually appealing and structured.
Step 3: Click on ‘Table’
Find and click on the ‘Table’ button in the ‘Tables’ group.
When you click on ‘Table,’ a drop-down menu will appear. This menu offers several ways to create your table, including a grid and the option to draw a custom table. But for now, we’ll stick with the basics.
Step 4: Select the number of rows and columns
Hover over the grid to select the number of rows and columns for your table.
As you move your cursor over the grid, you’ll see a live preview of what your table will look like. Click to confirm your selection, and the table will be inserted into your document.
After completing these steps, you’ll have a basic table in your Word document. Now, it’s time to populate it with data and customize it to fit your needs.
After you insert a table, Word will automatically switch to the ‘Table Design’ and ‘Layout’ tabs. These tabs provide you with all the tools you need to format your table, adjust its size, merge cells, and more. This is where the real fun begins, as you can make your table match your document’s style and purpose.

Tips for Making a Table in Word 2019
- Keep your table as simple as possible to ensure clarity and ease of reading.
- Use the ‘Table Design’ tab to apply pre-designed styles and customize the look of your table.
- You can add or delete rows and columns after creating the table by right-clicking within the table and selecting the appropriate option.
- Consider using ‘Header Rows’ for titles that remain visible if the table extends beyond one page.
- If you have a lot of data, you can convert your table to a graph or chart for better visualization.
Frequently Asked Questions
How do i resize my table in word 2019.
To resize your table, simply click and drag the borders of the cells, rows, or columns. You can also use the ‘Layout’ tab to specify exact measurements.
Can I merge cells in a Word 2019 table?
Yes, you can merge cells by selecting the cells you want to merge, right-clicking, and choosing ‘Merge Cells’ from the context menu.
How can I add a caption to my table in Word 2019?
To add a caption, right-click on the table, select ‘Insert Caption,’ and enter your desired text. You can also format and position your caption as needed.
Is it possible to sort data in a Word 2019 table?
Absolutely! Click within the table, go to the ‘Layout’ tab, and use the ‘Sort’ button to organize your data alphabetically, numerically, or chronologically.
How do I convert text to a table in Word 2019?
To convert text to a table, highlight the text you want to convert, go to the ‘Insert’ tab, click ‘Table,’ and then select ‘Convert Text to Table.’ You’ll be able to choose the number of rows and columns, as well as the text separation method.
- Open Microsoft Word 2019.
- Click on the ‘Insert’ tab.
- Select the ‘Table’ button.
- Choose the number of rows and columns.
Making a table in Word 2019 is a walk in the park once you know the steps. It’s like putting together a puzzle – you need the right pieces in the right places. And guess what? You’ve got all the pieces now. A table can turn a sea of data into an organized display where everything has its place. It can make or break the readability of your document, so play around with it, get the hang of it, and watch your documents transform.
Remember, practice makes perfect. Don’t be afraid to experiment with different table styles and layouts until you find the perfect fit for your needs. And if you ever get stuck, Microsoft Word offers a ton of resources and help guides to get you back on track. So go on, give it a try, and see how a simple table can make a huge difference in your document presentation.

Matthew Burleigh has been writing tech tutorials since 2008. His writing has appeared on dozens of different websites and been read over 50 million times.
After receiving his Bachelor’s and Master’s degrees in Computer Science he spent several years working in IT management for small businesses. However, he now works full time writing content online and creating websites.
His main writing topics include iPhones, Microsoft Office, Google Apps, Android, and Photoshop, but he has also written about many other tech topics as well.
Read his full bio here.
Share this:
Join our free newsletter.
Featured guides and deals
You may opt out at any time. Read our Privacy Policy
Related posts:
- How to Merge Cells in Word 2016 Tables
- How to Delete a Table in Google Docs (A Quick 5 Step Guide)
- How to Make All Columns the Same Width in Excel 2013
- How to Center a Table in Google Docs (2023 Guide)
- How to Insert Text Box in Google Docs
- How to Use the AutoFit Excel Shortcut for Columns and Rows
- How to Remove Table Borders in Word
- How to Make a Table Fit on One Page in Word 2010
- How to Remove Section Breaks in Word Documents
- How to Add a Row to a Table in Google Docs
- How to Expand All Rows in Excel 2013
- How to Delete Column from Table in Word 2010
- How to Add Table Columns in Word 2010
- How to Change Table Color in Word 2013
- How to Insert a Square Root Symbol in Word
- How to Freeze Multiple Rows in Excel 2013
- How to Return to Normal View in Word 2010
- How to Modify a Table on Word 2019: A Step-by-Step Guide
- How to AutoFit All Columns in Excel 2013 (An Easy 4 Step Guide)
- How to Select All in Word for Office 365

- Get started with computers
- Learn Microsoft Office
- Apply for a job
- Improve my work skills
- Design nice-looking docs
- Getting Started
- Smartphones & Tablets
- Typing Tutorial
- Online Learning
- Basic Internet Skills
- Online Safety
- Social Media
- Zoom Basics
- Google Docs
- Google Sheets
- Career Planning
- Resume Writing
- Cover Letters
- Job Search and Networking
- Business Communication
- Entrepreneurship 101
- Careers without College
- Job Hunt for Today
- 3D Printing
- Freelancing 101
- Personal Finance
- Sharing Economy
- Decision-Making
- Graphic Design
- Photography
- Image Editing
- Learning WordPress
- Language Learning
- Critical Thinking
- For Educators
- Translations
- Staff Picks
- English expand_more expand_less
Word 2010 - Working with Tables
Word 2010 -, working with tables, word 2010 working with tables.

Word 2010: Working with Tables
Lesson 21: working with tables.
/en/word2010/reviewing-documents/content/
Introduction
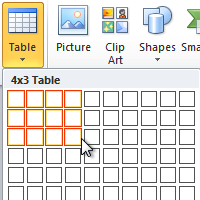
A table is a grid of cells arranged in rows and columns . Tables can be customized and are useful for various tasks such as presenting text information and numerical data. In this lesson, you will learn how to convert text to a table , apply table styles , format tables , and create blank tables .
Inserting and modifying tables
In Word, tables are useful for organizing and presenting data. You can create a blank table, convert text to a table, and apply a variety of styles and formats to existing tables.
Optional: You can download this example for extra practice.
To insert a blank table:
- Place your insertion point in the document where you want the table to appear.
- Select the Insert tab.
- Click the Table command.
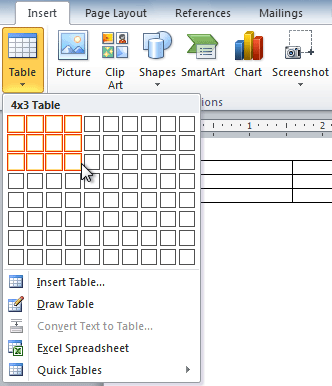
- Click your mouse, and the table appears in the document.
- You can now place the insertion point anywhere in the table to add text.
To convert existing text to a table:
- Select the text you want to convert.
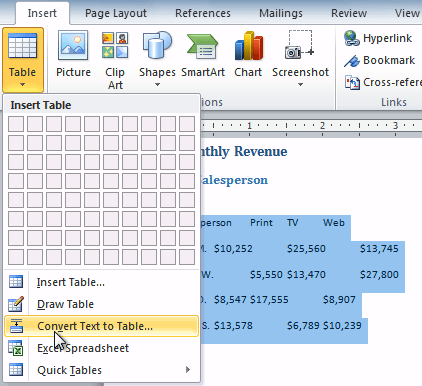
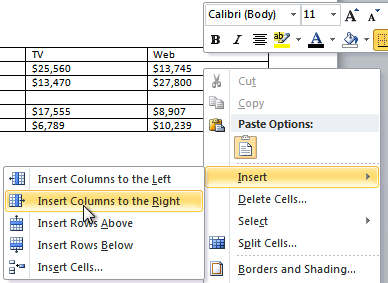
To add a row above an existing row:

- Right-click the mouse. A menu appears.

You can also add rows below the insertion point. Follow the same steps, but select Insert Rows Below from the menu.
To add a column:
- Place the insertion point in a column adjacent to the location where you want the new column to appear.
To delete a row or column:
- Select the row or column.
- Right-click your mouse. A menu will appear.
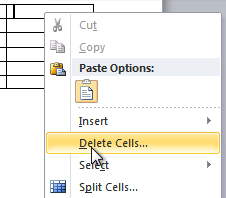
To apply a table style:
- Click anywhere on the table. The Design tab will appear on the Ribbon.
- Select the Design tab and locate the Table Styles .

- Hover the mouse over the various styles to see a live preview.

To change table style options:
Once you've chosen a table style, you can turn various options on or off to change the appearance of the table. There are six options: Header Row , Total Row , Banded Rows , First Column , Last Column , and Banded Columns .
- Click anywhere on the table. The Design tab will appear.

Depending on which table style you're using, certain table style options may have a somewhat different effect. You may need to experiment to get the exact look you want.
To add borders to a table:

- Click the Borders drop-down arrow.
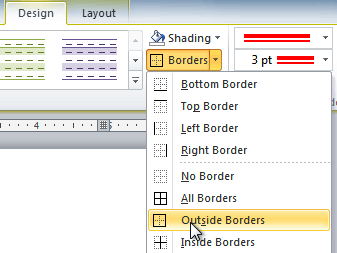
Modifying a table using the Layout tab
When you select a table in Word 2010, Design and Layout tabs appear under Table Tools on the Ribbon. Using commands on the Layout tab, you can make a variety of modifications to the table.
Click the buttons in the interactive below to learn about the different ways you can modify a table with the Layout tab.
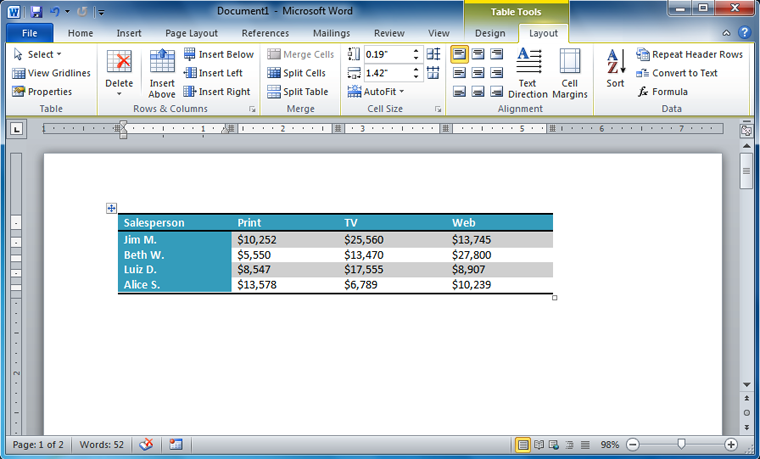
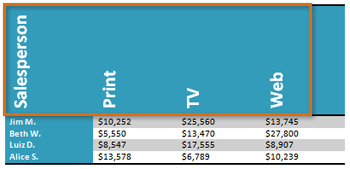
Change Text Direction
Making the text vertical can add style to your table and saves space , allowing you to fit more columns in your table.
Align Cell Text
By changing the alignment of a cell, you can control exactly where the text is located. In the example below, the cell text is aligned to the bottom-right .
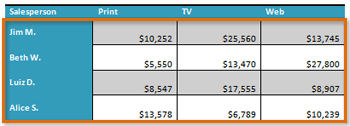
Distribute Rows/Columns
To keep your table looking neat and organized, you may want to distribute the rows or columns equally , which makes them all the same size. You can distribute the rows or columns for the entire table or just a portion of it.
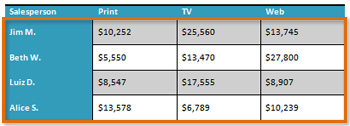
Change Cell Size
You can type a desired row height or column width for your cells. If you prefer, you can click AutoFit , and it will automatically adjust column widths based on the text inside them.

Merge and Split Cells
Some tables require a layout that doesn't conform to the standard grid. In these cases, you may need to merge or split cells.

Add Rows and Columns
You can insert or delete rows and columns in your table. This can be especially useful if you need to add something to the middle of your table.

- Open an existing Word document . If you want, you can use this example .
- Convert some text into a table. If you are using the example, convert the text below By Client .
- Apply a table style , and experiment with the table style options . If you are using the example, see if you can make the table match the By Salesperson table above it.
- Delete a row from the table.
- Insert a blank table with five rows and four columns.
- Add borders to the blank table.
/en/word2010/smartart-graphics/content/
- Skip to main content
- Skip to secondary menu
- Skip to primary sidebar
- Skip to footer
Erin Wright Writing
Writing-Related Software Tutorials
Three Ways to Insert Tables in Microsoft Word
By Erin Wright
This tutorial shows three ways to insert tables in Microsoft Word so you can choose the method that is most appropriate for your content:
- Create a table from the Table menu (best for general use)
- Create a table from the Table dialog box (offers the most sizing options)
- Insert a Quick Table (fastest setup)
Note that you can also draw a custom table and import a table from Excel .
Don’t miss the five tips for working with tables at the bottom of this tutorial:
- How to delete a table
- How to resize an entire table
- How to resize individual rows and columns
- How to add rows and columns
- How to add color to a table
This tutorial is also available as a YouTube video showing all the steps in real time.
Watch more than 250 other writing-related software tutorials on my YouTube channel .
The images below are from Word for Microsoft 365.The steps are the same in Word 2021, Word 2019, and Word 2016 and similar for Word 2013 and Word 2010. However, your interface may look slightly different in those older versions of the software.
Method 1: Create a Table from the Table Menu
This method is appropriate for most users who want to create a basic table for general use.
- Place your cursor where you want to insert the table.
- Select the Insert tab in the ribbon.

- Select the Table button in the Tables group.

- Move your pointer across and down the grid to select the number of cells (organized as rows and columns) needed in your table.
The selected cells will turn orange.

- Click the selected (orange) part of the grid or press Enter on your keyboard to insert the table.
Method 2: Create a Table from the Table Dialog Box
This method provides advanced sizing options.
- Select the Insert tab in the ribbon (see figure 1).
- Select the Table button in the Tables group (see figure 2).
- Select Insert Table from the drop-down menu.

- Enter the number of rows and columns in the Insert Table dialog box.

- Select an AutoFit behavior:
- Fixed column width can be set to Auto or a specific width between 1/100 inch and twenty-two inches using the increment arrows.
- AutoFit to contents adjusts cell sizes to the content.
- AutoFit to Window adjusts the width of the table to the viewer’s Word window or browser window.

- (Optional Step) Check Remember dimensions for new tables if you want to create the same size table in the future.

- Select the OK button to close the Insert Table dialog box and insert your new table.

Method 3: Insert a Quick Table
Quick Tables are prebuilt tables and calendars you can modify for your own use.
- Select Quick Tables from the drop-down menu.

- Select a table from the gallery.

- Add your own content by typing over or deleting the table’s example text.
Now let’s look at some tips for working with tables.
Five Tips for Working with Tables in Word
The following tips cover the basics of working with tables. We will dive into this topic in much greater detail in a separate tutorial.
Tip 1: How to Delete a Table
- Select the table selector, which looks like crossed arrows, to select the entire table. You may have to hover your pointer over the table to reveal the table selector.

- Right-click the table.
- Select Delete Table from the shortcut menu.

Tip 2: How to Resize an Entire Table
- Click and hold the resizing handle in the bottom right of the table. You may need to hover your pointer over the table to reveal the handle.

- Drag the table to the size you want and then release the handle.
Tip 3: How to Resize Individual Rows and Columns
- Hover your pointer over a row or column border until your pointer becomes two lines with two arrows.
Note that the pointer in figure 14 is enlarged to make it easier to see. Your pointer will be smaller.

- Click and hold as you drag the border to resize the row or column.
Tip 4: How to Add Rows and Columns
- Right-click inside a cell.
- Select Insert from the shortcut menu.

- Select the location of your new row or column:
- Insert Columns to the Left
- Insert Columns to the Right
- Insert Rows Above
- Insert Rows Below
- Insert Cells

If you select Insert Cells, a dialog box will appear asking where you want to insert your new cells. Note that regardless of your answer, you will be inserting an entire row or column, not an individual cell.

Tip 5: How to Add Color to a Table
- Select the table selector, which looks like crossed arrows, to select the entire table (see figure 11). You may need to hover your pointer over the table to reveal the table selector.
- Select the Table Design tab in the ribbon. (Note that this tab only appears in the ribbon when a table is selected.)

- Select the down arrow in the Table Styles group.

- Select one of the styles from the gallery.

Alternatively, you can use the shading menu to add custom colors to individual rows and columns.

Pro Tip: For even more customization, add a background image to your table . Then, save your customized table as a template for reuse in future documents, as shown in “ How to Save Tables as Templates in Microsoft Word .”
Related Resources
How to Create and Customize Charts in Microsoft Word
How to Save Tables and Figures as Images in Microsoft Word (PC & Mac)
How to Insert Figure Captions and Table Titles in Microsoft Word
How to Change the Style of Table Titles and Figure Captions in Microsoft Word
How to Update Table and Figure Numbers in Microsoft Word
How to Create and Update a List of Tables or Figures in Microsoft Word
How to Export PDF Tables from Adobe Acrobat to Excel (PC & Mac)
How to Write Table Titles
How to Write Figure Captions for Graphs, Charts, Photos, Drawings, and Maps
How to Reference Tables and Figures in Text
Updated August 27, 2023
- Microsoft Word Tutorials
- Adobe Acrobat Tutorials
- PowerPoint Tutorials
- Writing Tips
- Editing Tips
- Writing-Related Resources
- Accessories
- Entertainment
- PCs & Components
- Wi-Fi & Networks
- Newsletters
- Digital Magazine – Subscribe
- Digital Magazine – Info
- Smart Answers
- Best laptops
- Best antivirus
- Best monitors
- Laptop deals
- Desktop PC deals
When you purchase through links in our articles, we may earn a small commission. This doesn't affect our editorial independence .
How to create and customize tables in Microsoft Word

Creating tables in Microsoft Word used to be so annoying that most people just did it in Excel, then imported it into Word. It’s worth giving Word 2013’s table tools a try, though, because the process is easier, and there are some new graphical options.
Seven ways to create tables
Microsoft now provides five different methods for creating tables: the Graphic Grid, Insert Table, Draw Table, insert a new or existing Excel Spreadsheet table, and Quick Tables, plus an option for converting existing text into a table. To start, open a blank Word document from the Home/New page. Position your cursor in the document where you want the table inserted.
Graphic Grid/Select Table from Graph
Under the Insert tab, click the Table button. The Insert Table dialog box will open, showing a basic grid pattern as well as traditional menu options below it. Place your cursor on the first cell in the grid and slide it down and over until you highlight (for this example) four columns and five rows, then click once.
Notice that once the table is created, a new option called Table Tools appears on the Ribbon bar with two new tabs: Design and Layout. See the Layout and Design section below for details regarding these options.
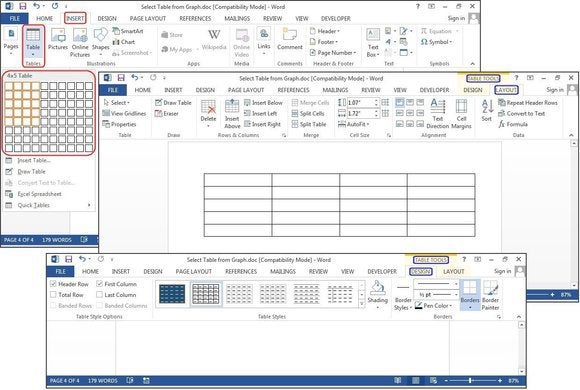
Create a new table using the graphical grid.
Insert Table
Click Insert > Tables > Insert Table from the dropdown menu. In the Insert Table dialog box, enter the number of columns and rows you want in this table (four columns and five rows). In the AutoFit Behavior panel, select Auto , or click the down arrow to choose a specific size. You can also choose AutoFit to Contents (produces narrow columns that expand as you add data) or AutoFit to Window (expands the table to fit the document size). Check the Remember Dimensions for New Tables box if you want the sizes you’re entering now to become your defaults for future tables.
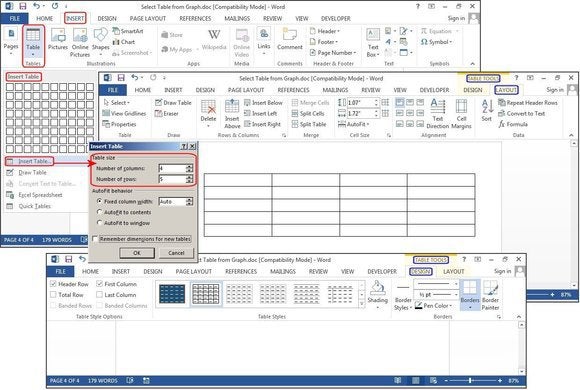
Create a new table using Insert Table.
Click Insert> Tables > Draw Table . The cursor turns into a pencil, which you drag down and across to draw a box. Don’t worry about the exact dimensions; you can modify it any time.
Once the box is created, position the cursor inside the box and draw lines over and down for the columns and rows (one at a time). Don’t worry about crooked lines, either—Word straightens them as you draw.
To add or remove columns and/or rows later, click anywhere inside the table, then select the Design tab under Table Tools. Click the Draw Table button to add or continue drawing lines with your pencil cursor, or click the Eraser button to remove lines with the eraser cursor. To remove a line, just touch the line with the eraser cursor, and the line disappears.
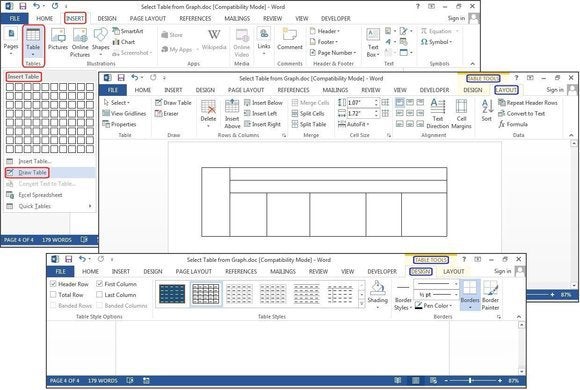
Create a new table using Draw Table.
Excel Spreadsheet (create In Word)
Click Insert > Tables > Excel Spreadsheet . An Excel spreadsheet inserts at your cursor location. You can continue using Excel and its menus and commands, but after you enter your data it converts to a non-editable graphic.
If you want to add, delete, or modify the spreadsheet, right-click anywhere inside the worksheet graphic, select Worksheet Object from the dropdown menu, then click Edit . The original spreadsheet reappears for editing. Notice the top menu has changed to an Excel menu for edits.
Also from the Worksheet Object dropdown menu, you can click Open to open the spreadsheet in Excel, so you can manipulate it in that program. Or click Convert to view a Windows dialog box that lists file-conversion options.
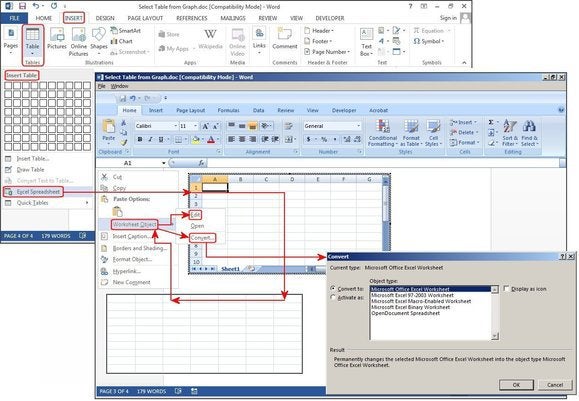
Create a new table using Excel Spreadsheet.
Excel Spreadsheet (copy and paste existing worksheet)
In the old days, Excel spreadsheets had to be imported into Word. Now you can just copy and paste. Open Excel, highlight the spreadsheet, and copy it. Then open Word, position your cursor at the desired location, and select Paste > Keep Source Formatting .
The other options on the Paste dialog menu are Merge Formatting, which changes the text format to match the file into which you pasted the spreadsheet, and Keep Text Only, which pastes the text without the Excel grid, meaning you will likely have to realign your columns with tabs.
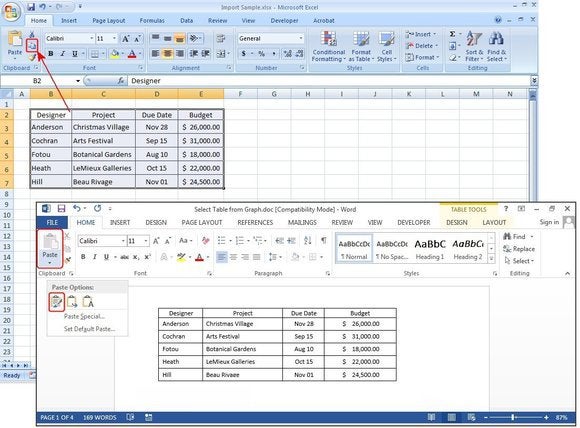
Copy and paste an existing table from Excel.
Quick Tables
Quick Tables are Word’s table templates. In addition to the nine templates provided, you can create your own designs and save them to the Quick Tables Gallery to use later. Click Insert > Tables > Quick Tables . Select a table template from the Quick Tables menu, then modify it to fit your project.
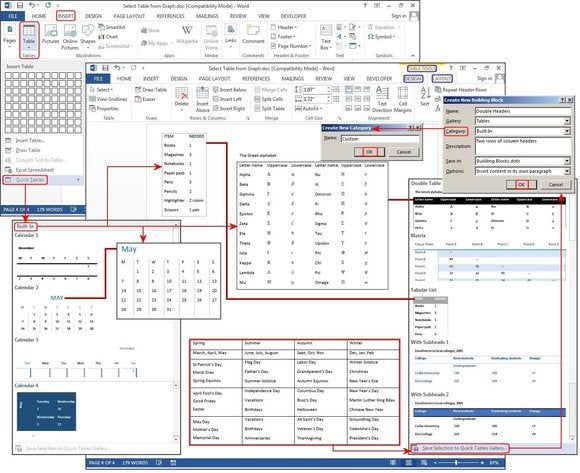
Create a new table using Quick Tables.
Convert Text to Table
The table tools can also make lists a lot easier to customize and even reorganize later. For our example, we’ll turn a classic contact list into a table, using a list of names—first, middle, last—plus the city, state, region, and profession of each person on the list.
For eons, people have used tabs to separate the fields, adding a tab or two to accommodate longer strings of data. But if you do this, when you convert the table to text, it misplaces all the data.
With the Convert Text to Table feature, you can separate the fields (Name, City, State, etc.) with paragraphs, tabs, commas, or other separator character, but use only one separator between each field.
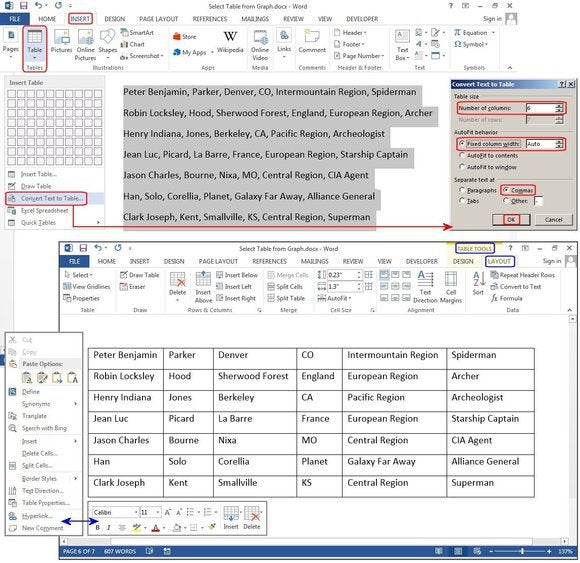
Convert an existing block of text to a table.
Layout and Design
There are three options to modify and/or decorate tables:
1. Use the Table Tools > Design —or— Table Tools > Layout commands on the Ribbon menu.
2. Right-click and use the Shortcut popup menus.
3. Use the keyboard shortcuts, which become visible when you press the ALT key on your keyboard.
All of these methods are fast and easy, but using a combination of all three will always be quicker. For example, use your mouse to highlight, then right-click to copy with your right hand; then arrow down to the new location and press CTRL-V to paste with your left hand.
The Layout tab lets you modify the structure of the table. The menu is fairly self-explanatory, and you can roll your cursor over a feature to get further clarification.
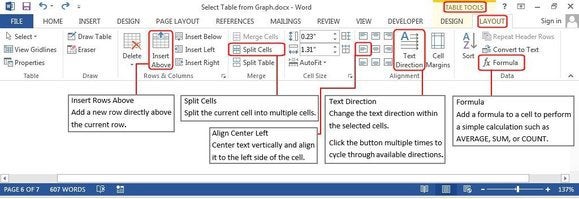
Roll your mouse over each button to view how each feature works.
The dialog boxes below also illustrate each feature. Click Table Tools > Layout > Insert or Delete (from Rows and Columns group) to add or remove them; Merge or Split Cells or Split a Table (from the Merge group); or Text Direction (from the alignment group) to rotate the text inside the table.

Menu options to modify a table structure.
Other features include Table Properties, which provides several options for aligning the table with the text or wrapping text around your table. Select Cell Margins to change the margins inside each cell. With the table still highlighted, click Table Tools > Layout > Data > Sort to sort the table data alphabetically or numerically, just like in Excel. You can sort by column numbers or by column headers, and it provides two sort levels. For example, you can sort by Last Name, then by First Name. The table below is sorted by Last Name.
You can also convert your table back to a text block. Just choose the separator you prefer, so when the table grid disappears, the data isn’t all jumbled together.
You can even insert formulas to calculate your numeric data. I added a Salary column to the table below and entered some dollars, plus a new row at the bottom for the salary totals. To calculate the total salaries, position your cursor in the last row and the last column cell, and click the Formula button under the Data group. In the Formula dialog box type the SUM() formula [or Count() or Average() ] in the Formula field box. If you are unfamiliar with the formulas Word provides, click the down arrow under the Paste Function field, and choose a formula from the list.
Type Above between the parentheses, choose a format under Number Format such as dollars, percent, or general, then click OK . Word calculates the column of numbers and places the calculation in the target cell (where your cursor resides). Review the Formula Format table in the graphic below for the correct commands that tell Word which direction to calculate (these go inside the parentheses).
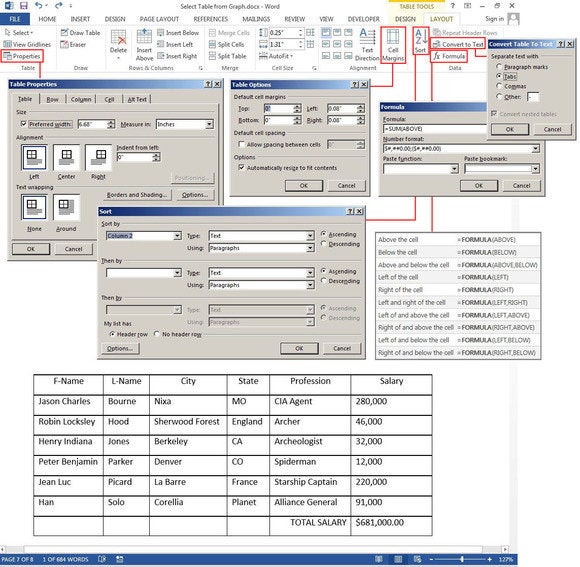
Wrap text around a table, change cell margins, convert table back to text, sort the table data, and/or add formulas.
The Design tab is for adding borders, shading, styles, and customizing the header columns and rows. Highlight your table, then select Table Tools > Design> Table Styles , Shading , Border Styles , Borders , or Border Painter (see the graphic below for ideas). There’s no learning curve, just play with the features and see what happens. If you don’t like a feature you’ve added, just click the Undo button or press CTRL-Z.
There’s also an option to add artwork borders to your pages. Select Table Tools > Design > Borders > Border Painter , and click the Page Border tab in the Borders and Shading dialog box. Click the down arrow in the field box under Art, then choose a border—mostly simple clip art—from the list.
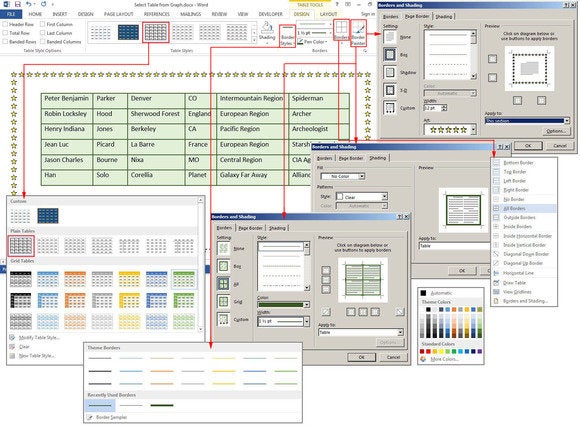
Make your table pop with Table Styles, Shading, Border Styles, Borders, or Border Painter.
The table below uses one of the many preset styles that comes with Word. Select Table Tools > Design > Table Styles , then scroll through the gallery of styles. If you want to change the font or customize the paragraphs inside the table, use the Format Shortcut menu. Right-click anywhere inside the table, and this small menu pops up adjacent to the longer Table Options menu. If the formatting feature you need is not on the Shortcut menu (which is fairly limited), click the Home Tab and select the features you need from the Font or Paragraph group. All of the buttons and groups on the Home tab are available for formatting tables as well as documents. The options are endless.
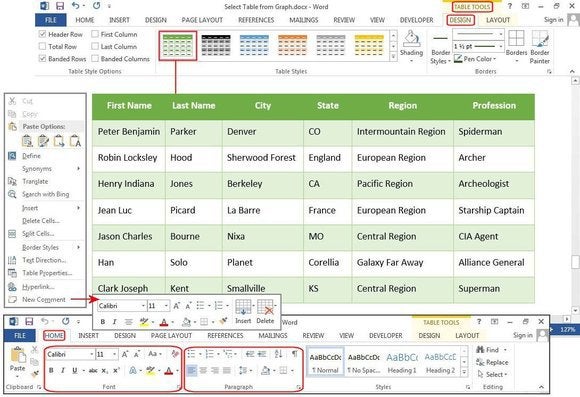
Choose a Table Style with Banded Rows (i.e., every other row is different for easier viewing), then customize the fonts and paragraph spacing.
Stay tuned for more articles on getting the most out of Word 2013.
How to create and modify tables in Word
A table is a collection of information or data, usually represented by horizontal rows and vertical columns . Each column and each row can have a header. Some tables have only column headings or only row headings. The box at the junction of each column and row is a cell that contains data such as text, numeric information, or images. Some cells can be merged or split (see more about formatting tables ). E.g.:

Microsoft Word has many features that make working with tables simple and convenient.
Create a table
There are several ways how to insert or create a table:
- Create a blank table of up to 10 columns and 8 rows ,
- Create a blank table with more than 10 columns or more than 8 rows ,
- Create a blank table manually (Draw a table) ,
- Create a table using predefined templates (Quick Tables) ,
- Create a table from the existing data (Convert Text to Table) ,
- Insert a Microsoft Excel spreadsheet .
To create a blank table in a Word document, do the following:
1. Place your cursor where you want to insert the table.
2. On the Insert tab, in the Tables group, click the Table button:

3. Do one of the following:
Create a blank table of up to 10 columns and 8 rows
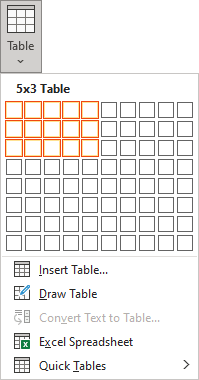
Click on a cell in the grid with the expected number of rows and columns (or press Enter ) to insert an empty table to fit the width of the text (paragraph).
The table has the specified number of single-line text rows in the current paragraph and equal-width columns. E.g., the table of 3 rows and 5 columns:

Create a blank table with more than 10 columns or more than 8 rows
- Create a table with exactly 10 columns or 8 rows, then add as many columns or rows as you need (see below how to customize table ).
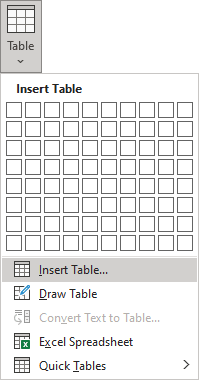
In the Insert Table dialog box:

- In the Table size group, specify the number of columns and rows,
- Select the Fixed column width option to customize width in the appropriate field: select Auto (used by default) or specify width. E.g., 0.75" :

- Select the AutoFit contents option to adjust cell sizes to the document content. E.g.:

- Select the AutoFit to window option to adjust the table's width to the document content width. E.g.:

- Select the Remember dimension for new tables check box if you want to create tables with the same options later. Word will remember your customization.
Create a blank table manually
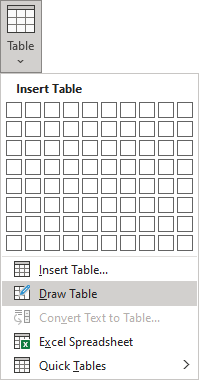
Click anywhere in a document but the table itself by the pencil to stop drawing a table.

- We recommend displaying the rulers or gridlines to help you place the lines correctly.
Create a table using predefined templates
To create a table using predefined Word templates of tables and calendars, do the following:
2. On the Insert tab, in the Tables group, click the Table dropdown list, then select Quick Tables list:
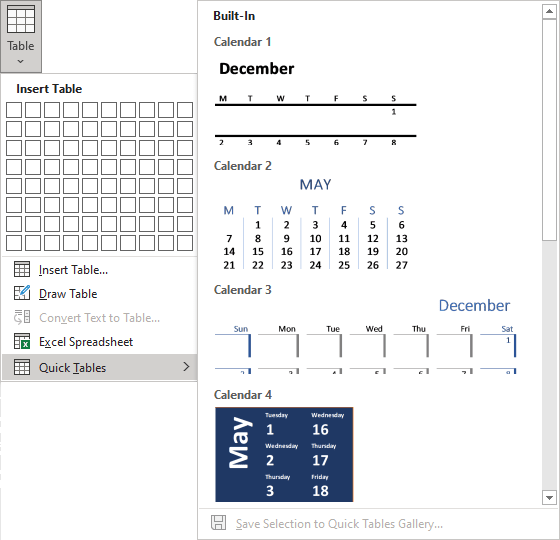
3. From the Quick Tables gallery, select the template you prefer.
For example:

Create a table from the existing data
To create a table from the existing data in a document data (either as regular text or as a tabbed list), do the following:
1. Select the document data you want to shape into a new table.
2. On the Insert tab, in the Tables group, click the Table dropdown list, then select Convert Text to Table... :
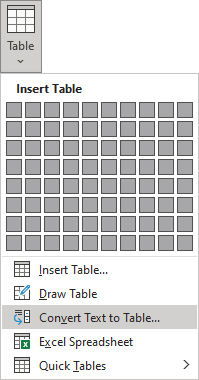
3. In the Convert Text to Table dialog box:

- In the Table size group, specify the number of columns,
- In the AutoFit behavior group, specify whether the width of the columns should be fixed (see details above),
- In the Separate text at group, select the character that separates text into columns in the selected text: paragraph marks , commas , tabs , or some other character.

Insert a Microsoft Excel spreadsheet
Note : It is possible to insert a Microsoft Excel spreadsheet in a document. To do so, on the Insert tab, in the Tables group, click the Table dropdown list, then select Excel Spreadsheet :
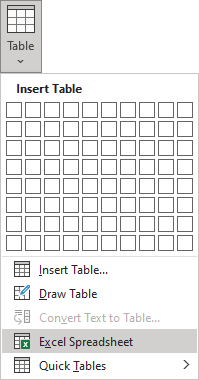
Word opens the Excel spreadsheet where you can enter the data. You can use Excel features such as functions and formulas to create or manipulate the data. Note that it is not a Word table .
Add rows and columns
To add a row and a column to a table, do the following:
1. Position the cursor:
- to a cell in a row above or below which you need to insert a row,
- to a cell in a column left or right which you need to insert a column.
2. Do one of the following:
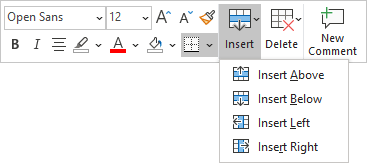
- Click the Insert Above button to insert a row above the row with the cursor,
- Click the Insert Below button to insert a row below the row with the cursor,
- Click the Insert Left button to insert a column left to the column with the cursor,
- Click the Insert Right button to insert a column right to the column with the cursor.
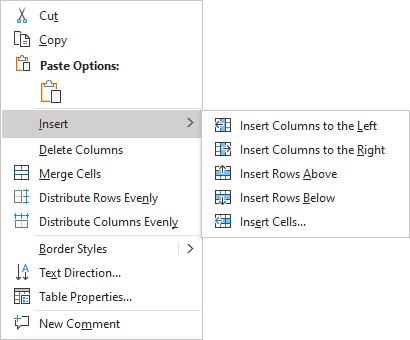
After selecting the option and clicking the OK button, Word adds an entire row or column, not a cell. Word just moves cells according to the selection.
Delete a table element
To delete a table element , do the following:
1. Select the cell, multiple cells, the entire column or multiple columns, the entire row, or multiple rows .
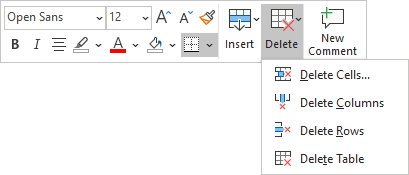
3. Select one of the proposed options:
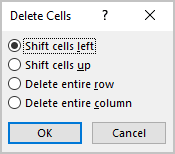
- Delete Columns
- Delete Rows
- Delete Table
Note : You can select the element you want to delete, right-click on the selection and select the appropriate item in the popup menu. For example, if the entire table is selected or the column is selected:
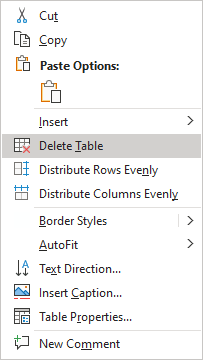
Convert a table into text
To convert a table into text in Word, follow the next steps:
1. Click anywhere in the table.
2. On the Layout tab, in the Format group, click the Convert to Text button:

3. In the Convert Table to Text dialog box, select the charter to separate cells data in the text:

4. Click OK .
Please, disable AdBlock and reload the page to continue
Today, 30% of our visitors use Ad-Block to block ads.We understand your pain with ads, but without ads, we won't be able to provide you with free content soon. If you need our content for work or study, please support our efforts and disable AdBlock for our site. As you will see, we have a lot of helpful information to share.
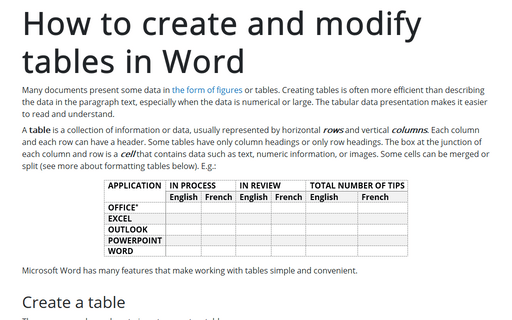
Select and format table elements in Word

Calculations in the table
Article Categories
Book categories, collections.
- Technology Articles
- Software Articles
- Microsoft Products Articles
- Word Articles
Creating and Formatting Tables in Word 2019
Word 2016 for professionals for dummies.

Sign up for the Dummies Beta Program to try Dummies' newest way to learn.
Creating a table in word 2019.
Word provides four ways to create a table:
- Click the Insert tab, click the Table icon, and then highlight the number of rows and columns for your table (up to a maximum of eight rows and ten columns).
- Use the Insert Table dialog box.
- Draw the size and position of the table with the mouse.
- Convert existing text (divided by a delimiter character such as a tab or a comma).
Creating a table by highlighting rows and columns in Word 2019
- Click the Insert tab.
- Move the cursor where you want to insert a table in your document.
A pull-down menu appears.
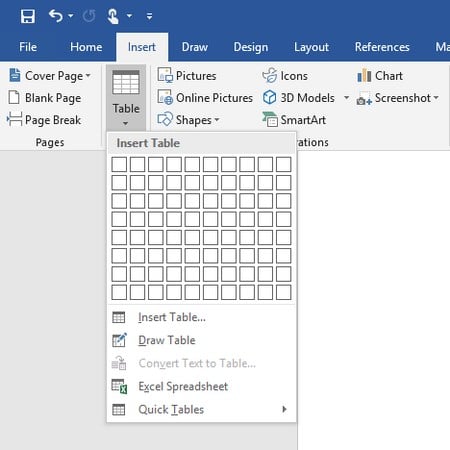
When you highlight rows and columns, Word displays your table directly in your document so you can see exactly what your table will look like.
- Click the left mouse button when you’re happy with the size of your table.
Creating a table in Word 2019 with the Insert Table dialog box
- Move the cursor where you want to insert a table.
The Insert Table dialog box appears.
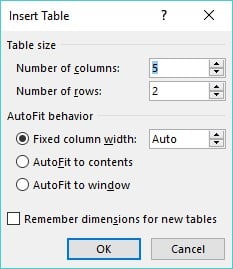
- Click in the Number of Columns text box and type a number between 1 and 63, or click the up or down arrow to define the number of columns.
- Click in the Number of Rows text box and type a number or click the up or down arrow to define the number of rows.
- Fixed Column Width: Defines a fixed size for the column widths, such as 0.3 inches
- AutoFit to Contents: Defines the width of a column based on the width of the largest item stored in that column
- AutoFit to Window: Expands (or shrinks) the table to fit within the current size of the document window
Word draws the table in your document.
Drawing a table can be especially useful when you want to place a table in the middle of a page and create rows and columns of different sizes.
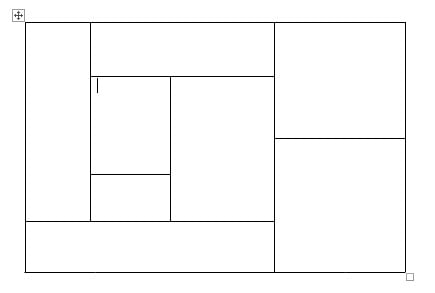
The mouse pointer turns into a Pencil icon.
Word draws a rectangular dotted box to show where your table will appear.
- Release the left mouse button when you’re happy with the size and position of your table.
- To draw vertical lines in your table, move the mouse pointer to the top or bottom of the table, hold down the left mouse button, and drag the mouse up and down.
- To draw horizontal lines in your table, move the mouse pointer to the left or right side of the table, hold down the left mouse button, and drag the mouse right and left to draw.
- Press Esc or double-click to turn the mouse pointer from a Pencil icon back to an I-beam pointer.
If you need to draw new lines on a table later, click anywhere inside that table, and the Table Tools Layout tab appears. Then click the Draw Table icon to turn the mouse pointer into a Pencil icon. Now you can draw new lines in your table.
Creating a table in Word from existing text
- Return (paragraph mark)
- Other characters, such as the # or @ characters
To convert existing text into a table, follow these steps:
- Select the text that you want to convert into a table.
- Click the Table icon. A pull-down menu appears.
The Convert Text to Table dialog box appears.
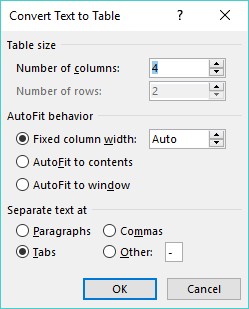
Choose the option that corresponds to the way you divided your text. So if you divided your text by tabs, you would select the Tabs radio button.
Word converts your text into a table.
The Layout tab appears under the Table Tools heading on the far right of the Ribbon.
- Click the Layout tab under the Table Tools heading.
The Convert Table to Text dialog box appears.
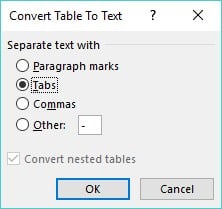
- Select a radio button to define how you want to divide your table into text.
Formatting and Coloring a Table in Word 2019
Selecting all or part of a table in word 2019.
The Table Tools tab appears.

Word highlights your chosen item in the table. At this point, you can choose a command to modify the selected row or column (as when you choose a color or alignment).
Aligning text in a Word table cell
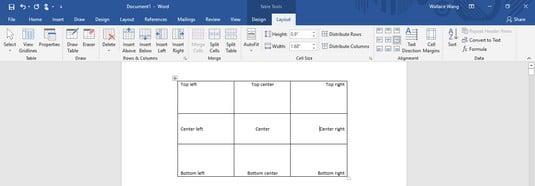
To align one or more cells, follow these steps:
Word aligns your text. If you change the alignment of blank cells, any new text you type in those blank cells will appear according to the alignment you choose.
Choosing a table style in Word 2019
To choose a table style, follow these steps:
- Move the cursor inside the table you want to modify.
- Click the Design tab under the Table Tools tab.
- In the Table Style Options group, select or clear check boxes, such as the Header Row or Last Column check box.
A pull-down menu of styles appears. As you move the mouse pointer over a table style, Word displays a live preview of your table formatted in the selected style.
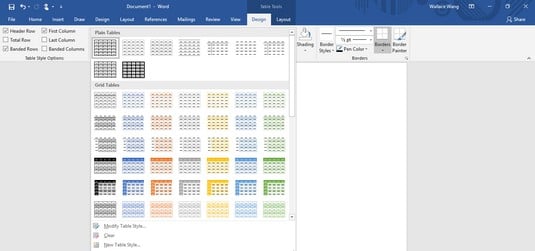
Word formats your table according to the style you chose.
Resizing columns and rows in Word tables
To resize a row or column with the mouse, follow these steps:
The mouse pointer turns into a two-way pointing arrow.
Release the left mouse button when you’re happy with the size of the row or column.
If you select the entire table, you can adjust the width or height of rows and columns for the entire table.
- Click the Layout tab under the Table Tools tab.
- Click the Width text box and type a value (or click the up or down arrow to choose a value).
- Click the Height text box and type a value (or click the up or down arrow to choose a value).
- AutoFit Contents: Shrinks your columns or rows to largest cell
- AutoFit Window: Expands the table to fit the width of the current document window
- Fixed Column Width: Defines a fixed width for all columns

About This Article
This article can be found in the category:.
- How to Add Graphics to Word 2019 Documents
- How to Add Date and Time Information to Word 2019 Documents
- Use Fields in Word 2019 to Add Dynamic Elements
- How to Use Word 2019's Master Document Feature
- How Writers Can Use Word 2019's Outline View
- View All Articles From Category
Subject Explorer
School Subjects
Math & Science
Business & Technology
Electives & Health
Board & Administration
Teaching & Learning
Audio/Video Lectures
Books & Documents
Classifieds
Jobs & Resources
Discussions
Language & Literature
Practice Projects for Microsoft Word
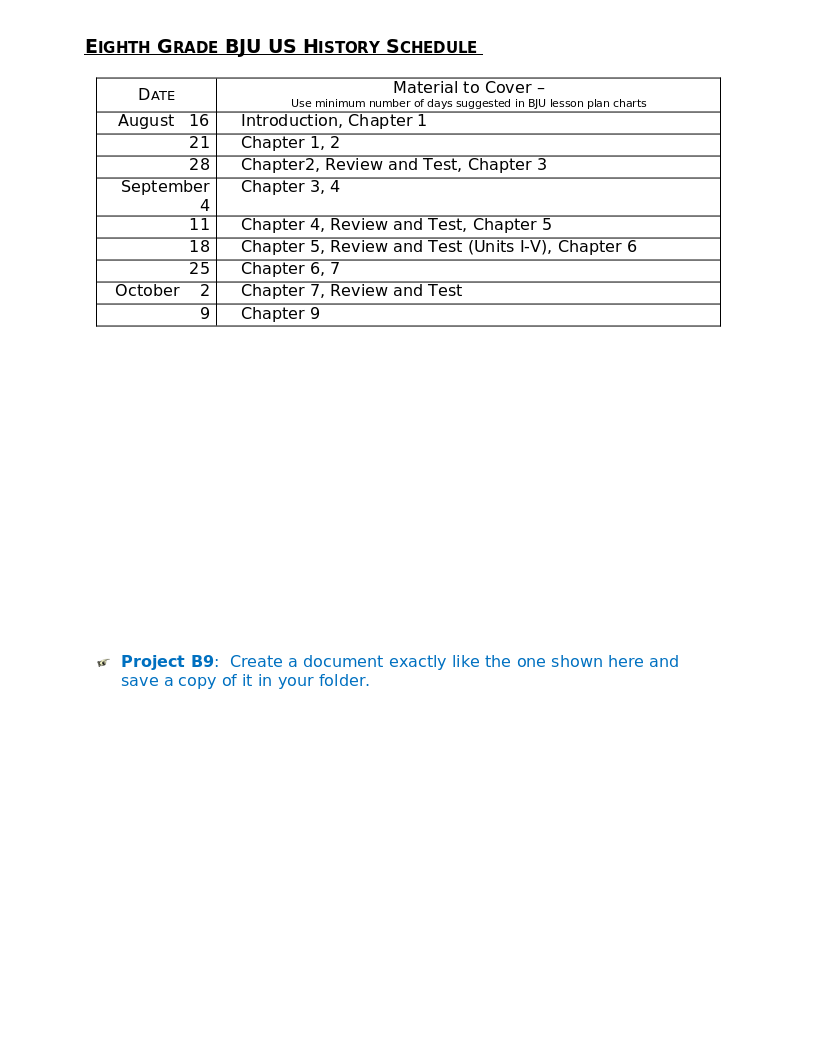
Word 9 Table Practice Document
In this practice project for Word, students create a document with a title and table. The table has two columns that have different font alignment and incluces various fonts. …
Word 8 Formatting Text Practice Document
In this practice project for Word, students create a document using a different size and color font for the title than the rest of the paragraph. …

Word 7 Bullets Practice Document
In this practice project for Word, students create a document with two different types of bullets showing points and subpoints. …
Word 6 Letter Practice Document
In this practice project for Word, students create a letter. Included in the letter is a heading on the right, indented paragraphs, and the closing and signiture near the middle of the document. …
Word 5 Text And Outline Practice Document
In this practice project for Word, students create a document that contains several paragraphs of text and also includes an outline with key points and subpoints. …

Word 4 Modified Text Practice Document
In this practice project for Word, students create a document with the heading on the right, a boldfaced, centered title, and indented paragraphs. The document is double-spaced. …
Word 3 Basic Text Practice Document
In this practice project for Word, students create a document with the heading on the right, a boldfaced title that is centered, and several paragraphs that are indented. …
Word 22 Preset Headings Practice Document
In this practice project for Word, students create a document using the preset headings to create a title bar. The document has different alignment and font, blanks, and a short outline. …
Word 21 Formatting Options Practice Document
In this practice project for Word, students create a document that shows some different effects that can be used with the same font. …
Word 20 Numbered List Practice Document
In this practice project for Word, students create a document that includes a centered title followed by a numbered list. …

Word 2 Heading 2 Practice Document
In this practice project for Word, students create a document that has a centered title, a heading in the upper right corner, and indented paragraphs. …
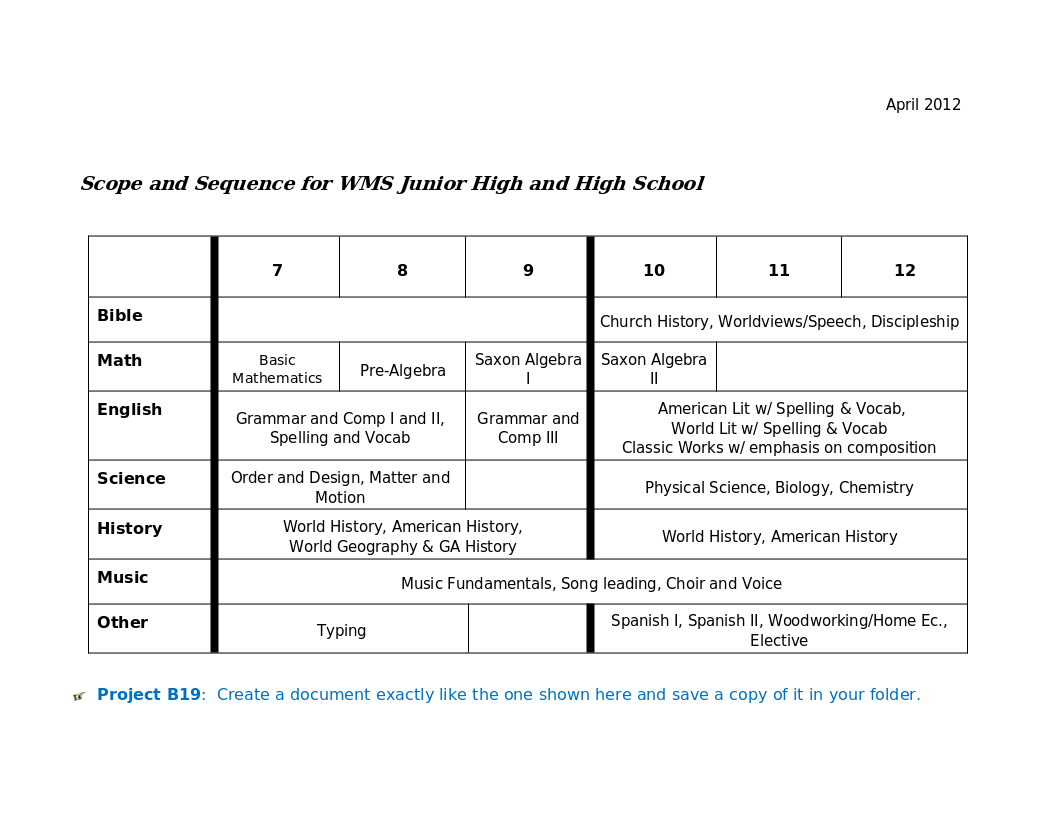
Word 19 Advanced Table Practice Document
In this practice project for Word, students create a document with a table showing a school schedule. The blocks in the table are different sizes and will take individual work within the blocks to …
Word 18 Columns Practice Document
In this practice project for Word, students create a document with a header and two colomns. The columns include boldfaced and italic font and different alignment. …
Word 17 Columns Practice Document
In this practice project for Word, students create a document with two identical columns in landscape orientation. Included in each are indented lines and different alignment and font. …
Word 16 Lesson Notes Handout Practice Document
In this practice project for Word, students create a document like a student handout. This includes an outline with several levels, blanks for students to write on, and different font. …
Word 15 Lesson Notes Practice Document
In this practice project for Word, students create a document with a header and two outlines. Students are asked to use the automatic numbering and outlining features in Word. They must use different …
Word 14 Table Practice Document
In this practice project for Word, students create a scoresheet using a table. Students must use different sizes, colors and styles of font, including different alignment. …
Word 13 Outline Practice Document
In this practice project for Word, students create an outline using the automatic outline in Word, including many levels of subpoints. …
Word 12 Formatting Practice Document
In this practice project for Word, students create a document with a centered title in all capitals, the first letter of each word slightly larger than the rest. Throughout the document the font is …
Word 11 Formatting Practice Document
In this practice project for Word, students create a document similar to a test or quiz. They must include points and subpoints, blanks, boldfaced text, tabs, and spacing. …
Resource Type:
Pass it on:
Leave a Reply

IMAGES
VIDEO
COMMENTS
Learn how to create, modify, and perform calculations on tables in MS Word with this tutorial. Tables are made up of rows and columns that can be used to organize text, numbers, images, and formulas.
Assignment: Create Document with Tables and Images For this assignment, you will format a document with a table and an image. Follow the directions, then submit your assignment. If you get stuck on a step, review this module or previous modules and ask your classmates for help in the discussion forum.
In our complete guide we show you everything from how to make a table in Word, how to edit and format it, how to insert table of contents, and everything else you might need to know.
In this comprehensive tutorial, you'll learn everything you need to know about creating and formatting tables in Microsoft Word. Whether you're a beginner looking to get started or an advanced ...
Using tables in Word can help organize content in different ways. When using Word tables can be used for text and numerical data.
Tables in Word have a contextual ribbon with many options available to reorganize, modify, and format them to match the overall look and feel of the document. In this video, we look at several ...
Learn how to insert, format, and design tables in Word with this comprehensive guide. Find out how to move, select, insert, delete, and repeat table elements with ease.
A table is information arranged in horizontal rows and vertical columns. You can use a table to organise text or numerical data. You can format text in various ways in different parts of a table. When you first insert a table into a document, it appears as a simple grid, with black gridlines defining the rows and colums. The area where a row and column meet is called a cell.
Learn how to create stunning tables in Microsoft Word using the Design tab. In this comprehensive guide, we'll cover everything from basic table formatting to advanced design features, such as ...
You can organize data in a Word document by using tables. Here's how to add and customize tables in Word.
On Microsoft Word, tables are essential formatting tools. Microsoft Office has made it easier to create and format basic tables in Microsoft Word for Office 365, Word 2019, Word 2016, and Word 2013.
Learn how to create a table in Word 2019 with our easy-to-follow guide. Perfect for organizing data and adding structure to your documents.
Using tables in Word can help organize content in different ways. When using Word tables can be used for text and numerical data.
Learn three ways to insert tables in Microsoft Word. Plus, five tips for working with tables, including how to add columns and rows and add color.
Wrangle unruly text into easy-to-read formats using Word 2013's improved tables features.
Download the free course exercise files to follow along ️ https://www.simonsezit.com/adv-word-2019-instructor-files/ In this Microsoft Word tutorial, we t...
To create a table using predefined Word templates of tables and calendars, do the following: 1. Place your cursor where you want to insert the table. 2. On the Insert tab, in the Tables group, click the Table dropdown list, then select Quick Tables list: 3. From the Quick Tables gallery, select the template you prefer.
For this assignment, you will format a document with a table and an image. Follow the directions, then submit your assignment. If you get stuck on a step, review this module or previous modules and ask your classmates for help in the discussion forum. Download the report document and open it in Microsoft Word.
Word 2019: Working with Tables A table is made up of rows and columns. The intersection of a row and column is called a cell. Tables are often used to organize and present information, but they have a variety of uses as well. You can use tables to align numbers and create interesting page layouts.
Creating a table in Word 2019 Tables organize text into rows and columns, which can make the text easy to type, edit, and format while spacing it correctly in your document. Tables organize text into cells, where a cell is the intersection of a row and a column.
In this practice project for Word, students create a document with a table showing a school schedule. The blocks in the table are different sizes and will take individual work within the blocks to …
In this video you can learn tables in Microsoft word. If you make this assignment then you can learn Creating of table, Table Formatting, Table Formula and much more this assignment cover all ...
Assignment: Create Document with Tables and Images For this assignment, you will format a document with a table and an image. Follow the directions below. If you get stuck on a step, review previous lessons and you can make use of some of the skills you learnt in Internet Research to browse the web for some solutions.