
- Science Notes Posts
- Contact Science Notes
- Todd Helmenstine Biography
- Anne Helmenstine Biography
- Free Printable Periodic Tables (PDF and PNG)
- Periodic Table Wallpapers
- Interactive Periodic Table
- Periodic Table Posters
- Science Experiments for Kids
- How to Grow Crystals
- Chemistry Projects
- Fire and Flames Projects
- Holiday Science
- Chemistry Problems With Answers
- Physics Problems
- Unit Conversion Example Problems
- Chemistry Worksheets
- Biology Worksheets
- Periodic Table Worksheets
- Physical Science Worksheets
- Science Lab Worksheets
- My Amazon Books

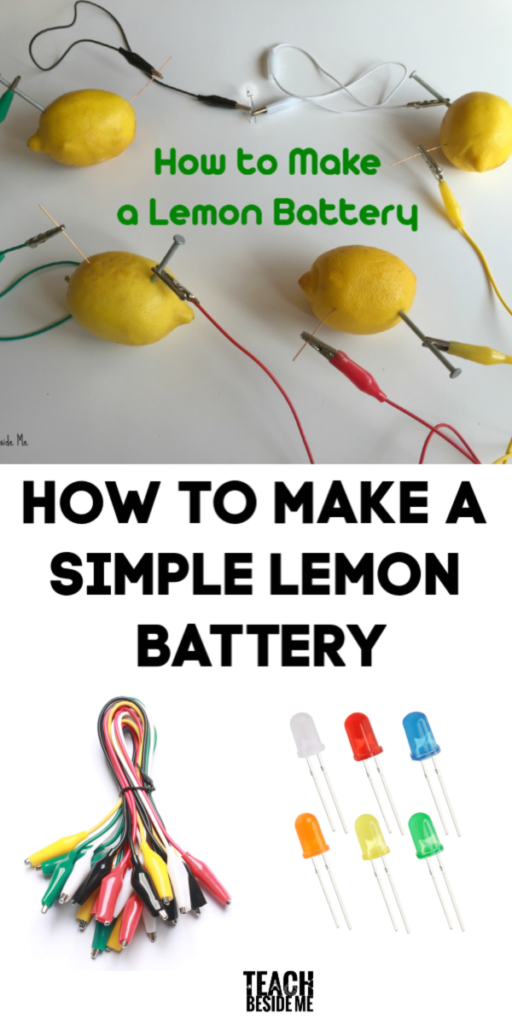
Lemon Battery Experiment

The lemon battery experiment is a classic science project that illustrates an electrical circuit, electrolytes, the electrochemical series of metals, and oxidation-reduction (redox) reactions . The battery produces enough electricity to power an LED or other small device, but not enough to cause harm, even if you touch both electrodes. Here is how to construct a lemon battery, a look at how it works, and ways of turning the project into an experiment.
Lemon Battery Materials
You need a few basic materials for a lemon battery, which are available at a grocery store and hardware store.
- Galvanized nail
- Copper penny, strip, or wire
- Wires or strips of aluminum foil
- Alligator clips or electrical tape
- An LED bulb, multimeter, digital clock, or calculator
If you don’t have a lemon, use any citrus fruit. A galvanized nail is a steel nail that is plated with zinc. The classic project uses copper and zinc because these two metals are inexpensive and readily available. However, you can use any two conductive metals, as long as they are different from each other.
Make a Lemon Battery
- Gently squeeze the lemon or roll it on a table to soften it. This helps the juice flow within the fruit.
- Insert the copper and zinc into the fruit. You want the maximum surface area in the juicy part of the fruit. The lemon peel helps support the metal, but if it is very thick and the metal does not reach the juice, scrape away part of the peel. Ideally, separate the metal pieces by about 2 inches (5 centimeters). Make sure the metals are not touching each other.
- Connect a wire to the galvanized nail using an alligator clip or electrical tape. Repeat the process with the copper item.
- Connect the free ends of the wire to an LED or other small electronic device. When you connect the second wire, the light turns on.
Increase the Power
The voltage of a lemon battery is around 1.3 V to 1.5 V, but it generates very little current. There are two easy ways of increasing the battery’s power.
- Use two pennies and two copper pieces in the lemon. You don’t want any of the metal pieces within the fruit to touch. As before, connect one zinc and one copper piece to the LED. But, wire the other zinc and copper to each other.
- Wire more lemons in series with each other. Insert a nail and copper piece into each nail. Connect the copper of one lemon to the zinc of the next lemon. Connect the nail at the end of the series to the LED and the copper at the end of the series to the LED. If you don’t have lots of lemons, you can cut up one lemon into pieces.

How a Lemon Battery Works
A lemon battery is similar to Volta’s first battery, except he used salt water instead of lemon juice. The zinc and copper are electrodes. The lemon juice is an electrolyte . Lemon juice contains citric acid. While both salts and acids are examples of electrolytes, acids typically do a better job in batteries.
Connecting the zinc and copper electrodes using a wire (even with an LED or multimeter between them) completes an electrical circuit. The circuit is a loop through the zinc, the wire, the copper, and the electrolyte, back to the zinc.
Zinc dissolves in lemon juice, leaving zinc ions (Zn 2+ ) in the juice, while the two electrons per atom move through the wire toward the copper. The following chemical reaction represents this oxidation reaction :
Zn → Zn 2+ + 2e −
Citric acid is a weak acid, but it partially dissociates and leaves some positively charged hydrogen ions (H + ) in the juice. The copper electrode does not dissolve. The excess electrons at the copper electrode combine with the hydrogen ions and form hydrogen gas at the copper electrode. This is a reduction reaction.
2H + + 2e − → H 2
If you perform the project using lemon juice instead of a lemon, you may observe tiny hydrogen gas bubbles forming on the copper electrode.
Try Other Fruits and Vegetables
The key for using produce in a battery is choosing a fruit of vegetable high in acid (with a low pH). Citrus fruits (lemon, orange, lime, grapefruit) contain citric acid. You don’t need a whole fruit. Orange juice and lemonade work fine. Potatoes work well because they contain phosphoric acid. Boiling potatoes before using them increases their effectiveness. Sauerkraut contains lactic acid. Vinegar works because it contains acetic acid.
Experiment Ideas
Turn the lemon battery into an experiment by applying the scientific method . Make observations about the battery, ask questions, and design experiments to test predictions or a hypothesis .
- Experiment with other materials for the electrodes besides a galvanized nail and copper item. Other common metals available in everyday life include iron, steel, aluminum, tin, and silver. Try using a nickel and a penny. What do you think will happen if you use two galvanized nails and no copper, or two pennies and no nails? What happens if you try to use plastic, wood, or glass as an electrode? Can you explain your results?
- If you have a multimeter, explore whether the distance between the electrodes affects the voltage and current of your circuit.
- How big is the effect of adding a second lemon to the circuit? Does it change the voltage? Does it change the current?
- Try making batteries using other foods from the kitchen. Predict which ones you think will work and test them. Of course, try fruits and vegetables. Also consider liquids like water, salt water, milk and juice, and condiments, like ketchup, mustard, and salsa.
The lemon battery dates back to at least 2000 years ago. Archaeologists discovered a battery in Iraq using a clay pot, lemon juice, copper, iron, and tar. Of course, people using this battery did not know about electrochemistry or even what electricity was. The use of the ancient battery is unknown.
Credit for discovery of the battery goes to Italian scientists Luigi Galvani and Alessandro Volta. In 1780, Luigi Galvani demonstrated copper, zinc, and frog legs (acting as an electrolyte) produced electricity. Galvani published his work in 1790. An electrochemical cell is called a galvanic cell in his honor.
Alessandro Volta proved electricity did not require an animal. He used brine-soaked paper as an electrolyte and invented the voltaic pile in 1799. A voltaic pile is a stack of galvanic cells, with each cell consisting of a metal disk, an electrolyte layer, and a disk of a different metal.
- Goodisman, Jerry (2001). “Observations on Lemon Cells”. Journal of Chemical Education . 78(4): 516–518. doi: 10.1021/ed078p516
- Margles, Samantha (2011). “ Does a Lemon Battery Really Work? “. Mythbusters Science Fair Book . Scholastic. ISBN 9780545237451.
- Naidu, M. S.; Kamakshiaih, S. (1995). Introduction to Electrical Engineering . Tata McGraw-Hill Education. ISBN 9780074622926.
- Schmidt, Hans-Jürgen; Marohn, Annette; Harrison, Allan G. (2007). “Factors that prevent learning in electrochemistry”. Journal of Research in Science Teaching . 44 (2): 258–283. doi: 10.1002/tea.20118
- Swartling, Daniel J.; Morgan, Charlotte (1998). “Lemon Cells Revisited—The Lemon-Powered Calculator”. Journal of Chemical Education . 75 (2): 181–182. doi: 10.1021/ed075p181
Related Posts
Lemon Battery Science Experiment
We love building circuits around here. From our very first Circuit Bugs creation to Potato Batteries , we have had a lot of fun over the years experimenting with low voltage experiments and electricity in our elementary science lessons. With summer here, that means lemons and lemonade. It also means it was time for us to create the favourite lemon battery science experiment.
How to Build a Lemon Battery
What you will discover in this article!

Disclaimer: This article may contain commission or affiliate links. As an Amazon Influencer I earn from qualifying purchases. Not seeing our videos? Turn off any adblockers to ensure our video feed can be seen. Or visit our YouTube channel to see if the video has been uploaded there. We are slowly uploading our archives. Thanks!
We often talk around here about the energy in nature and in everything around us. When we can power a light bulb with that energy it suddenly makes it very real for my kids. That energy isn’t just some crazy weird thing that I babble on about, it is this very real power that is showing itself right in front of them.
Normally our circuits are powered by batteries, but one day I convinced the kids we could power a light bulb with nothing but a potato. You should have seen the looks on their faces! Serious side eye was thrown my way.
Then, once they stopped straining their eyeballs, we built a potato battery and it worked! These kinds of science experiments for kids really stick with them. Why? Because it makes things real that they can’t otherwise see. Like the energy in our food.
Plus, when a child starts a science experiment with serious doubts, yet still achieves success, it powers up their curiosity!
So when we went grocery shopping and there was a huge pile of fresh, juicy looking lemons on display the kids asked to buy some for lemonade, but I knew we had another science experiment in our future.
Note: These food based battery experiments produce low voltage and are safe for older, responsible children to do under adult supervision.
How to Build a Lemon Battery Video
Watch as I go through the whole experiment step by step in our video tutorial. If you can’t see the video, please turn off your adblockers as they also block our video feed. Alternatively, you can also find this video on the STEAM Powered Family YouTube Channel .
Lemon Battery Materials
Lemons! You need at least 4 to create enough energy, but why not grab extras and experiment? Copper anode strip plates Zinc anode strip plates Alligator clips with wires (2 per cell, so minimum 8 if you are creating a 4 cell battery) LED light diodes Multimeter Knife and cutting board
Copper and Zinc plates are invaluable in our science experiments, but if you don’t have them, you can use copper pennies (the older the better) and zinc plated (aka galvanized) nails. Copper wire can also be used, and a search of your local hardware store is likely to produce other copper and zinc items you could test in your experiment.
The first step is to roll the lemons. Just like you would if you were about to eat or juice them. This releases the juices inside and we want our lemons as juicy as possible.
Start with one lemon and make a small cut through the peel on either end. It is very important that you place these far enough apart that the electrodes don’t touch.
Insert a copper plate on one side and a zinc plate on the other side.
Now using your multimeter test your energy levels.
We have energy!

Now it is time to start adding more cells (lemons) to our battery.
Repeat the above steps on a second lemon. Once you are finished use an alligator clip to connect the zinc plate on the first lemon to the copper plate on the second lemon.
Test your energy level with 2 cells (you will test by touching the copper plate on the first lemon and zinc on the second). Remember you are completing the circuit.
Now repeat the steps to add a third and fourth cell.
At 4 cells we are now registering more energy than 2 AA batteries, which we tested in our Potato Cell experiment .

Now it is time to hook up our light bulb!
Voila! Light!

The goal of making a lemon battery is to turn chemical energy into electrical energy, creating enough electricity to power a small LED light. You can also use limes, oranges, potatoes , pumpkins/squash , or other acidic foods.
How A Lemon Battery Works
How does a lemon battery work? The science behind how food can power a light bulb is really fascinating. Food has energy. With a lemon battery we are capturing that energy and using it to light up a LED. To do this we need electrodes to capture the energy from our electrolyte.
The zinc and copper plates are called electrodes, and the lemon juice is our electrolyte.
All batteries have a “+” (known as the cAll batteries have a “+” (known as the cathode) and a “-” (known as the anode) terminal. In our lemon battery, the copper plate is our positive cathode and the zinc plate the negative anode. The zinc metal (our negative anode) reacts with the acidic lemon juice (mostly from citric acid) to produce zinc ions (Zn2+) and electrons (2 e-).
Electric current is created by the flow of atomic particles called electrons. Conductors are materials that allow electrons (and the electrical current) to flow through them. Electrons flow from the negative to the positive terminal.
So in our experiment electrons are flowing from our zinc plate, through the lemon juice to the copper plate. From there it goes into our alligator clip, along the wire, into the zinc plate on the next lemon, where it picks up more energy as it travels through that cell. It continues on, building energy with each additional cell we add. Until finally we have enough voltage to power a light bulb.
Volts (or voltage) is a measurement of the force moving the electrons through our lemon battery. The higher the voltage the more power the battery has, but higher voltage also means greater danger. Always remember to be careful and safe around electricity. Thankfully our lemon battery is very low voltage.

Troubleshooting
There are a number of things that can cause issues with your Lemon Battery.
First, make sure none of your electrodes are touching anything other that lemon and alligator clips. Also, ensure your alligator clips are placed near the peel of the lemon.
Did you roll your lemons? You want them juicy for this experiment to work.
Did you mix up any of your connections? Remember you always want to link “+” to “-“. On an standard LED light bulb the longer pin is the positive connection.
Does your LED bulb work? Test it on a coin battery to ensure your bulb works. It may be you have a faulty bulb.
Another area that can cause problems is the quality of your copper and zinc. You want your copper and zinc to be as pure as possible so it can conduct the electrons without any interference. This is one of the reasons I suggest investing in proper plates, so you know the quality of your materials when conducting experiments.
Finally, these food based batteries dimly light up the LED. If you hook your LED up to a regular battery, it will glow much brighter.
More Fruit Battery Experiments
So now we have made both a lemon battery and a potato battery, which one is better? Both were able to light up our LED light bulbs, so in that sense they are both successful. However, the potato battery was definitely a lot more work. So if you are looking for a quicker experiment, the lemon battery is faster and easier. However, both have significant opportunities for learning and would make great science fair projects. Why not do both yourself and see what you think?
And in the fall, don’t forget to make a battery with pumpkins and squash ! The concept is similar to Lemon Batteries but with a Autumn/Halloween theme.
Want to dig in more? Try this experiment with other citrus fruit such as oranges or lime or grapefruit. You can also combine a variety of fruits to see which combination makes the best fruit battery.
How to Reuse Lemon Battery Cells
This lemon science project is a ton of fun but once you are done, what can you do with the lemons? It seems like such a waste to throw them out. We have two really cool projects to do next with your lemons!
Check out the gorgeous lemon volcano we created here after building our lemon batterie s!

Another great project with these lemons is to make Lemon Oobleck for a fun, summery sensory project.

More Electricity Experiments

5 Days of Smart STEM Ideas for Kids
Get started in STEM with easy, engaging activities.
Fun Lemon Battery Science Fair Experiment for Kids
Please enable JavaScript
We all heard of making lemonade out of lemons and that when things go wrong, if you know to Think in The Right Way then you can make something good come out of a sour situation. But how can you make a BATTERY out of Lemons?!
Most of us know what Lemons look like; A Lemon is a yellow, oval, thick skinned and fragrant citrus fruit said to originate from India and is commonly grown in the Middle East .
Lemons are a good source of Vitamin C, which is important to boost our immune system in order to fight sickness. Lemons are used in aromatherapy, but they are not just healthy for you, they are also used for culinary purposes; lemon juice, lemon cakes, lemon cookies, a tarty lemon pie, lemon ice cream and in food preparations like Tahini, Hummus, salads and many other dishes in many countries around the world.
Lemons can also provide a lot of fun for your kids, even if they hate drinking lemon juice. One of the interesting things you can do with your kids and a few lemons, is a fun lemon battery science fair experiment ! It is an easy, low cost and fun educational activity to do at home or at school. Try this fun lemon science experiment with your kids to teach kids about electrical circuits!
How to Make a Battery from Lemons
What you need for the Lemon Battery Science Fair Experiment:
TIP: The power from one single lemon will not be strong enough to light a bulb or be used as a battery. You will need to connect several lemons together with metal wires for enough power or electricity to light a bulb from a lemon battery. Minimum two lemons will create a battery but 3 are better. See what happens if you add more lemons. What will the volt meter show? How strong will the bulb glow?
Fun Facts about Lemons
Lemon battery science fair experiment video for kids.

Lemon and Potato Battery Experiment
Learn how to generate electricity from common fruit or vegetables.
Posted by Admin / in Energy & Electricity Experiments
Is it possible to produce electricity from common fruit or vegetables? Fruits and vegetables require energy from the sun to grow and produce a harvest. Is it possible that some of the sun's energy is stored in the produce for our use? We know that by eating fruits and vegetables our body can convert this food to energy. Is it possible to directly generate electricity from a piece of fruit or a vegetable. This lemon battery and potato battery science experiment tests this theory.
Materials Needed
- Copper strip or rod
- Zinc strip or zinc-coated bolt
- Circuit wire or alligator clips with wire
EXPERIMENT STEPS

Step 1: Cut 2 small slits in the skin of both the lemon and the potato. Make the slits are a few inches apart.

Step 2: Push the copper and zinc strips into the slits in each piece of produce. Make sure the rods do not touch each other.

Step 3: Connect an electrical wire to the end of each metal strip. Alligator clips make this step easy.

Step 4: Measure the voltage drop between the two wires attached to the metal strips on the lemon and the potato. This is the amount of voltage being produced by each piece of produce. Compare the difference in the amount of voltage produced by a lemon and a potato. What do you notice? How long will the fruit and vegetable generate voltage?
Science Learned
The lemon and the potato act like a low-power battery. This experiment shows how a wet cell battery works. Chemicals in the fruit or vegetable create a negative charge in the zinc strip. Electrons move into the zinc strip and travel up the wire attached. The electrons then travel through the voltmeter which measures the voltage drop and end up in the copper strip which becomes the positive end of the circuit. Pardon the pun, but from this experiment we can say that it is possible to "produce electricity".
Oberlin College: Demonstration of lemon battery powering a buzzer .
U.S. Dept. of Energy: Calculating Lemon Battery Power Q&A
- About the author
- Back to Experiment
Please select the social network you want to share this page with:
We like you too :)
Thanks for taking time to give us feedback!
- Energy & Electricity experiments
- science experiments for kids
- lemon and potato battery experiment
- lemon battery experiment
- fruit battery
- potato battery experiment/a>
- vegetable battery

posted by Admin
- previous experiment
- next experiment

How to Make a Simple Battery
in Energy and Electricity Experiments
Make a simple battery using coins and other common items.

Solar Energy Experiment for Kids
Teach kids how light is used to generate electricity in this solar energy experiment.

Beginner Electronics Experiment For Kids
This experiment is a good starting point for kids to begin learning about electronics.

LED Solar Circuit Experiment
Learn how to make an electrical circuit to power an LED using solar power.

How to Make an Electromagnet
Test the relationship between electricity and magnetism by making an electromagnet.

Power a Light with Static Electricity
Use static electricity to power a light bulb!
Lemon Battery Experiment
This post may contain affiliate links.

Have you ever tried the lemon battery experiment? Well if not, it’s time to give it a try! Here I will show you how a lemon can light up a light bulb or even a small clock!
Lemon batteries are an experiment that has been around for a while, but it is always such a delight to see it in action! Kids just love it. I’ll show you how to build your own lemon battery today. This is an awesome science project for kids, or great for any STEM project!
Science has always been more of a boy field, but more and more girls are becoming increasingly interested in science. Did you know that only 1 in 1,000 girls pursue a STEM career? Hopefully we can soon change that! This is a fun way to start them on the path and get young girls interested.
My daughter loves learning about all kinds of science fields from nature to electricity to coding, but I would say leans more toward artistic careers for the future. However, I love doing science experiments with her to help her see how great science can be. This lemon battery is a great one to start with if you have kids expressing an interest in STEM projects.

STEM, if you are not familiar stands for Science, Technology, Engineering, and Math. We received a free STEM themed box from Green Works teaching us how to create this project, but it is easy to recreate on your own!

Supplies to Make a Lemon Battery:
Small LED Light Bulb (LED= light-emitting diode) 4 Lemons Alligator Clips Zinc nails, a zinc strip or a galvanized nail (can be easily found at a hardware store) Copper Wire, a copper strip, or copper coin- pennies work great
Try also this fruit powered digital clock !

How to Make a Lemon Battery:
The first step is to roll the lemons on a hard surface to break apart the juice pockets in the lemon cells. Get ready to make some lemon power!
In each of the 4 lemons, make 2 small slits with a knife and place a nail in one side and piece of copper wire or a copper penny on the other side.
Connect the nail on the first lemon to the copper wire or copper pennies on the second lemon. Continue this and connect them all in a circle except for the first and last ones.
On these two last lemons, connect one alligator clip to a nail and to part of the LED bulb and the other to a copper wire and to the other part of the light. This will complete the electrical current and light up the light!! Be sure to match up the positive electrode and the negative electrode correctly. If you don’t the battery will not work properly.
Connect a multimeter to test the voltage. Will the volts be higher if you make the chain longer and add more lemons?

How Does the Lemon Battery Work?
A battery generates electricity by passing electrons between two. different metals (one that is positively charged and one that is negatively charged). These electrons create an electrical current as they pass through a solution with molecules that will move the charged particles back and forth between the two different metals. In this instance, the solution is the lemon juice.
The lemon battery is made with two different metals: copper wire (you could also do it with a penny) and a galvanized (or zinc coated) nail. The lemon has citric acid in the juice. The zinc and copper are the electrodes and the lemon juice is the electrolyte. A chemical reaction happens that is called oxidation-reduction, where there is a transfer of electrons. The zinc is oxidized inside the lemon, some of its electrons are transferred to the copper to reach a lower energy state. The energy released creates the power, lighting up the bulb. The wires allow this transfer of energy.
Try a different kind of fruit battery~ Do other citrus fruits work, too? Will limes, grapefruit or oranges work just as well?
Did you enjoy this lemon science project? Try some of my other fun science experiments and activities!
Check out some more of our cool STEM activities & Science Fair Projects .
See More Electricity Experiments:
Science Art: Conductive Paint Circuits Christmas STEM: Gingerbread House Paper Circuits EASY Play Dough Circuits Building Electric Circuits: STEM Challenge Cards Origami Firefly Paper Circuits
Former school teacher turned homeschool mom of 4 kids. Loves creating awesome hands-on creative learning ideas to make learning engaging and memorable for all kids!
Similar Posts
Starting a summer nature school.

Leap Frog LeapReader Review

Shark Life Cycle Spinner

Submarine Science: Papa’s Mechanical Fish

Sound Experiment: Buzzing Bug Noisemaker Toys

Math Art: Symmetrical Pattern Coloring Cards
One comment.
Very awesome! I think my 8 year old would enjoy making a battery out of lemons!
Electricity
Home » Resources » Ages 9-11 » Electricity

Main Focus: What is electricity? & Making a lemon battery
In this science experiment, your KS2 class will build a lemon battery also known as voltaic cell. They may already have tested a range of materials and decided if they are conductive or insulating. If so, they can use this knowledge to help in this experiment.
What is electricity?
This is not an easy question to answer! Electricity is all around us and it is hard to escape it even in nature! It powers technology like our lights, mobile phones, computers, ovens and televisions. Our body relies on electric impulses to ensure that our heart and brain function. We feel the zap of static electricity when we touch something that has been ‘charged’ and we see lightning in nature which is also electricity!

Main Focus: Earth Battery
This is a fantastic experiment that will blow your KS2 class’s minds! Your Year 5 and Year 6 class will read the science behind what a battery is a how it generates power.
A battery is a source of energy which provides a push, or a voltage of energy to get the current flowing in a circuit. Batteries provide handy and convenient power supplies from cells as small as a fingernail to those as large as a desk. They power many of our everyday items such as mobile phones, watches, cars, calculators and even hearing aids and pacemakers.
But did you know you can make a battery using soil?
Rich damp soil rich in microorganisms or compost can be used as a medium to generate electrical power in microbial fuel cells (MFCs). This means that soil can be used to convert chemical energy from soil organic compounds into electricity.

Main Focus: Potato Powered Clock
What’s not to love about potatoes? They can be mashed, chipped, baked and roasted. But did you know they can also be made into a clock? That’s right, a potato can be used as a battery to power a simple clock.
This is a brilliant experiment for your KS2 class to complete during their topic on electricity. We have included an instructions sequencing activity, cloze activity of key vocabulary and resource to support and record your experiment. As well as those mentioned, we have a resource explaining the science behind the experiment so your Year 5 and Year 6 class can develop their understanding.
A potato battery is called an electrochemical battery, or an electrochemical cell. An electrochemical cell is a cell in which chemical energy is converted to electric energy by a spontaneous electron transfer. In this potato powered clock experiment, the acid within the potato reacts with positive and negative metal electrodes also called conductors. Here, the electrodes are the galvanized zinc nail and the copper wire. The potato flesh acts as a hedge between the zinc in the nail and the copper in the wire. To make the electron transfer take place, two different types of metal must be used.

Main Focus: Making a steady hand game
This activity is linked to circuits and shows your children what a circuit is in a fun way.
In this activity, your KS2 class will make a game where they will have to move a wire ring around a ‘bendy’ course without touching the sides.
To make the game, your class must create an electric circuit with a break or a gap in the circuit. This will ensure that the circuit is kept ‘open’ and the LED cannot illuminate.
The aim of the game is to pass the wire ring the whole way around the course without completing the circuit. If your kids do allow the wires to touch, you will close the circuit, allow electricity to flow around the circuit and a light will show indicating that you have lost the game.
Your class must read the instructions carefully before creating their game.

Main Focus: Vocabulary and Terminology
In this activity, your class will use the word bank to use and apply what they have learnt about electricity.
They will show their understanding bu adding in the vocabulary to complete the sentences.
We have differentiated this science resource to cater for Year 5 and Year 6, KS2 classes.
Your class will explore the following vocabulary…
buzzers, solar, insulators, terminal, rechargeable batteries, conductors, non-renewable, direction, chemical, glass, source, positive, covering, batteries shock, gas, mains, iron and complete.

Main Focus: Creating an Electroscope
An electroscope is an early scientific instrument used to detect the presence of electrical charge on an item. It detects electrical charge by the movement of a test object due to the Coulomb electrostatic force on it. The electroscope usually consists of a pair of thin gold leaves suspended from an electrical conductor (wire) that leads to the outside of an insulating container. When you put an electroscope near other statically charged objects, the leaves or charge strips, will move depending on whether they are attracted to or repelled by an item or appliance such as a TV. Like charges repel each other while opposite charges attract each other.
In this experiment your class will make a simple electroscope. As they move a charged item close to the electroscope, electrical charges are detected by the tin foil leaf which then move either towards or away from the item depending on the charge. This means that they can tell if the item is positively charged or negatively charged.

Main Focus: Design a moving STEMhive Bot
Electricity can be stored in batteries and can then be converted into heat, movement and light.
In this experiment you will make a little StemHive Bot that uses a battery to power a motor which will vibrate due to an offset in balance. As it jiggles around on a piece of paper it draws fun, interesting designs using pens.

Main Focus: Static Electricity Investigations
Have you ever noticed your hair standing on end when you rub it against a balloon? Or sometimes you might hear a zap or see a spark when you pull on a jumper? This is known as static electricity. Static electricity is a stationary electric charge produced by friction when two objects rub together.
The experiments in this activity will allow your class to observe and experience the power of static electricity in a range of ways…
The balloon experiment, bending water experiment and separating salt and pepper experiment.

Main Focus: Experiment Templates
Download the templates for the science experiment above to look at predictions, observations and explanations.

Main Focus: Electrifying Gloop Experiment
This is a great experiment to create electrifying gloop with your 9-11 year old kids. Once your class have followed our instructions to create the gloop, they will record their observations being guided by our key questions and points.
If you mix equal parts of corn flour and oil, you will create a non- Newtonian fluid, which has a neutral charge. This fluid which we will call ‘gloop’ has a neutral charge. This is because of the oil in it. It also is very lightweight. The cornstarch has a positive charge. When this lightweight gloop is poured, the negatively charged object (the balloon) is still able to attract the gloop. This is because by pouring it, the bonds that hold the molecules together are not able to adhere to each other as well and this allows it to move freely as a liquid. When you pour it, it begins to behave in interesting ways! You will see that the positive charge in the corn flour is attracted to the negatively charged balloon.
IMAGES
VIDEO
COMMENTS
This activity include clear and concise instructions for how to make your lemon battery, materials that you will need, as well as helpful images to guide your students through each step. You can do this lemon battery experiment anywhere – as long as you have the correct equipment.
Use a lemon battery to power a small electrical device, like an LED. The lemon battery experiment is a classic science project that illustrates an electrical circuit, electrolytes, the electrochemical series of metals, and oxidation-reduction (redox) reactions .
Build a fully functional lemon battery and use it to learn about electricity as you power a light bulb in this science experiment for kids.
How to Make a Battery from Lemons. Here’s how you can make your own homemade lemon battery that’s strong enough to light a bulb. This fun lemon battery science fair experiment creates what is called a wet cell battery; normal batteries are dry cells. Image of Normal Batteries or Dry Cell Batteries.
The lemon and the potato act like a low-power battery. This experiment shows how a wet cell battery works. Chemicals in the fruit or vegetable create a negative charge in the zinc strip.
Here I will show you how a lemon can light up a light bulb or even a small clock! Lemon batteries are an experiment that has been around for a while, but it is always such a delight to see it in action! Kids just love it. I’ll show you how to build your own lemon battery today.
You will need - 1 lemon, 1 coin, 1 zinc nail. Insert a coin into the side of a lemon. Push on of the nails into the other side of the lemon. Make sure the coin and nail don't touch. This is a single battery cell.
Battery Science Activity: Investigate how to make a simple battery out of a coin, a lemon and aluminum foil.
In this science experiment, your KS2 class will build a lemon battery also known as voltaic cell. They may already have tested a range of materials and decided if they are conductive or insulating. If so, they can use this knowledge to help in this experiment.
A fab experiment for KS2 pupils, our lovely lemon battery experiment display posters is a fun and hands-on activity to explore electricity with your class.