Caffeine Science Fair Projects
List of Ideas
- Projects & Experiments
- Chemical Laws
- Periodic Table
- Scientific Method
- Biochemistry
- Physical Chemistry
- Medical Chemistry
- Chemistry In Everyday Life
- Famous Chemists
- Activities for Kids
- Abbreviations & Acronyms
- Weather & Climate
- Ph.D., Biomedical Sciences, University of Tennessee at Knoxville
- B.A., Physics and Mathematics, Hastings College
Caffeine is a naturally occurring stimulant that is found in many foods, beverages, and drugs. You can explore the effects of caffeine with your science fair project.
- How does caffeine affect your pulse rate or body temperature or respiration (breathing) rate? You can test the effect of a cup of coffee, caffeine pill, cola, or energy drink.
- How does caffeine affect your typing speed? typing accuracy?
- Does caffeine really increase the effectiveness of other pain relievers?
- What effect does the presence of caffeine have on other organisms, such as daphnia, zebrafish embryo development, fruit fly activity or behavior or mutation rate, etc.
- Does watering a plant with water containing caffeine have an effect on the plant? Does watering seeds with caffeinated water affect germination?
- Does the method of preparing coffee (or tea) affect the total amount of caffeine in the beverage? If so, which method results in a beverage with the most/least caffeine?
More Science Fair Project Ideas
- Science Fair Project Pictures
- College Science Fair Projects
- Middle School Science Fair Project Ideas
- 5th Grade Science Fair Projects
- 8th Grade Science Fair Project Ideas
- Magnetism Science Fair Projects
- Sports Science Fair Project Ideas
- Why Do a Science Fair Project?
- Crystal Science Fair Projects
- 7th Grade Science Fair Projects
- Science Fair Experiment Ideas: Food and Cooking Chemistry
- Science Fair Project Help
- 3rd Grade Science Fair Projects
- Chemistry Science Fair Project Ideas
- Science Fair Project Ideas
- Materials Science Fair Projects
- Grades 6-12
- School Leaders
Have you gotten your free poster delivered? ✨

72 Easy Science Experiments Using Materials You Already Have On Hand
Because science doesn’t have to be complicated.

If there is one thing that is guaranteed to get your students excited, it’s a good science experiment! While some experiments require expensive lab equipment or dangerous chemicals, there are plenty of cool projects you can do with regular household items. We’ve rounded up a big collection of easy science experiments that anybody can try, and kids are going to love them!
Easy Chemistry Science Experiments
Easy physics science experiments, easy biology and environmental science experiments, easy engineering experiments and stem challenges.

1. Taste the Rainbow
Teach your students about diffusion while creating a beautiful and tasty rainbow! Tip: Have extra Skittles on hand so your class can eat a few!
Learn more: Skittles Diffusion

2. Crystallize sweet treats
Crystal science experiments teach kids about supersaturated solutions. This one is easy to do at home, and the results are absolutely delicious!
Learn more: Candy Crystals
3. Make a volcano erupt
This classic experiment demonstrates a chemical reaction between baking soda (sodium bicarbonate) and vinegar (acetic acid), which produces carbon dioxide gas, water, and sodium acetate.
Learn more: Best Volcano Experiments
4. Make elephant toothpaste
This fun project uses yeast and a hydrogen peroxide solution to create overflowing “elephant toothpaste.” Tip: Add an extra fun layer by having kids create toothpaste wrappers for plastic bottles.

5. Blow the biggest bubbles you can
Add a few simple ingredients to dish soap solution to create the largest bubbles you’ve ever seen! Kids learn about surface tension as they engineer these bubble-blowing wands.
Learn more: Giant Soap Bubbles

6. Demonstrate the “magic” leakproof bag
All you need is a zip-top plastic bag, sharp pencils, and water to blow your kids’ minds. Once they’re suitably impressed, teach them how the “trick” works by explaining the chemistry of polymers.
Learn more: Leakproof Bag

7. Use apple slices to learn about oxidation
Have students make predictions about what will happen to apple slices when immersed in different liquids, then put those predictions to the test. Have them record their observations.
Learn more: Apple Oxidation
8. Float a marker man
Their eyes will pop out of their heads when you “levitate” a stick figure right off the table! This experiment works due to the insolubility of dry-erase marker ink in water, combined with the lighter density of the ink.
Learn more: Floating Marker Man

9. Discover density with hot and cold water
There are a lot of easy science experiments you can do with density. This one is extremely simple, involving only hot and cold water and food coloring, but the visuals make it appealing and fun.
Learn more: Layered Water

10. Layer more liquids
This density demo is a little more complicated, but the effects are spectacular. Slowly layer liquids like honey, dish soap, water, and rubbing alcohol in a glass. Kids will be amazed when the liquids float one on top of the other like magic (except it is really science).
Learn more: Layered Liquids

11. Grow a carbon sugar snake
Easy science experiments can still have impressive results! This eye-popping chemical reaction demonstration only requires simple supplies like sugar, baking soda, and sand.
Learn more: Carbon Sugar Snake
12. Mix up some slime
Tell kids you’re going to make slime at home, and watch their eyes light up! There are a variety of ways to make slime, so try a few different recipes to find the one you like best.

13. Make homemade bouncy balls
These homemade bouncy balls are easy to make since all you need is glue, food coloring, borax powder, cornstarch, and warm water. You’ll want to store them inside a container like a plastic egg because they will flatten out over time.
Learn more: Make Your Own Bouncy Balls

14. Create eggshell chalk
Eggshells contain calcium, the same material that makes chalk. Grind them up and mix them with flour, water, and food coloring to make your very own sidewalk chalk.
Learn more: Eggshell Chalk

15. Make naked eggs
This is so cool! Use vinegar to dissolve the calcium carbonate in an eggshell to discover the membrane underneath that holds the egg together. Then, use the “naked” egg for another easy science experiment that demonstrates osmosis .
Learn more: Naked Egg Experiment
16. Turn milk into plastic
This sounds a lot more complicated than it is, but don’t be afraid to give it a try. Use simple kitchen supplies to create plastic polymers from plain old milk. Sculpt them into cool shapes when you’re done!

17. Test pH using cabbage
Teach kids about acids and bases without needing pH test strips! Simply boil some red cabbage and use the resulting water to test various substances—acids turn red and bases turn green.
Learn more: Cabbage pH

18. Clean some old coins
Use common household items to make old oxidized coins clean and shiny again in this simple chemistry experiment. Ask kids to predict (hypothesize) which will work best, then expand the learning by doing some research to explain the results.
Learn more: Cleaning Coins

19. Pull an egg into a bottle
This classic easy science experiment never fails to delight. Use the power of air pressure to suck a hard-boiled egg into a jar, no hands required.
Learn more: Egg in a Bottle
20. Blow up a balloon (without blowing)
Chances are good you probably did easy science experiments like this when you were in school. The baking soda and vinegar balloon experiment demonstrates the reactions between acids and bases when you fill a bottle with vinegar and a balloon with baking soda.
21 Assemble a DIY lava lamp
This 1970s trend is back—as an easy science experiment! This activity combines acid-base reactions with density for a totally groovy result.

22. Explore how sugary drinks affect teeth
The calcium content of eggshells makes them a great stand-in for teeth. Use eggs to explore how soda and juice can stain teeth and wear down the enamel. Expand your learning by trying different toothpaste-and-toothbrush combinations to see how effective they are.
Learn more: Sugar and Teeth Experiment
23. Mummify a hot dog
If your kids are fascinated by the Egyptians, they’ll love learning to mummify a hot dog! No need for canopic jars , just grab some baking soda and get started.
24. Extinguish flames with carbon dioxide
This is a fiery twist on acid-base experiments. Light a candle and talk about what fire needs in order to survive. Then, create an acid-base reaction and “pour” the carbon dioxide to extinguish the flame. The CO2 gas acts like a liquid, suffocating the fire.

25. Send secret messages with invisible ink
Turn your kids into secret agents! Write messages with a paintbrush dipped in lemon juice, then hold the paper over a heat source and watch the invisible become visible as oxidation goes to work.
Learn more: Invisible Ink
26. Create dancing popcorn
This is a fun version of the classic baking soda and vinegar experiment, perfect for the younger crowd. The bubbly mixture causes popcorn to dance around in the water.

27. Shoot a soda geyser sky-high
You’ve always wondered if this really works, so it’s time to find out for yourself! Kids will marvel at the chemical reaction that sends diet soda shooting high in the air when Mentos are added.
Learn more: Soda Explosion

28. Send a teabag flying
Hot air rises, and this experiment can prove it! You’ll want to supervise kids with fire, of course. For more safety, try this one outside.
Learn more: Flying Tea Bags

29. Create magic milk
This fun and easy science experiment demonstrates principles related to surface tension, molecular interactions, and fluid dynamics.
Learn more: Magic Milk Experiment

30. Watch the water rise
Learn about Charles’s Law with this simple experiment. As the candle burns, using up oxygen and heating the air in the glass, the water rises as if by magic.
Learn more: Rising Water

31. Learn about capillary action
Kids will be amazed as they watch the colored water move from glass to glass, and you’ll love the easy and inexpensive setup. Gather some water, paper towels, and food coloring to teach the scientific magic of capillary action.
Learn more: Capillary Action

32. Give a balloon a beard
Equally educational and fun, this experiment will teach kids about static electricity using everyday materials. Kids will undoubtedly get a kick out of creating beards on their balloon person!
Learn more: Static Electricity

33. Find your way with a DIY compass
Here’s an old classic that never fails to impress. Magnetize a needle, float it on the water’s surface, and it will always point north.
Learn more: DIY Compass
34. Crush a can using air pressure
Sure, it’s easy to crush a soda can with your bare hands, but what if you could do it without touching it at all? That’s the power of air pressure!

35. Tell time using the sun
While people use clocks or even phones to tell time today, there was a time when a sundial was the best means to do that. Kids will certainly get a kick out of creating their own sundials using everyday materials like cardboard and pencils.
Learn more: Make Your Own Sundial
36. Launch a balloon rocket
Grab balloons, string, straws, and tape, and launch rockets to learn about the laws of motion.

37. Make sparks with steel wool
All you need is steel wool and a 9-volt battery to perform this science demo that’s bound to make their eyes light up! Kids learn about chain reactions, chemical changes, and more.
Learn more: Steel Wool Electricity
38. Levitate a Ping-Pong ball
Kids will get a kick out of this experiment, which is really all about Bernoulli’s principle. You only need plastic bottles, bendy straws, and Ping-Pong balls to make the science magic happen.

39. Whip up a tornado in a bottle
There are plenty of versions of this classic experiment out there, but we love this one because it sparkles! Kids learn about a vortex and what it takes to create one.
Learn more: Tornado in a Bottle

40. Monitor air pressure with a DIY barometer
This simple but effective DIY science project teaches kids about air pressure and meteorology. They’ll have fun tracking and predicting the weather with their very own barometer.
Learn more: DIY Barometer

41. Peer through an ice magnifying glass
Students will certainly get a thrill out of seeing how an everyday object like a piece of ice can be used as a magnifying glass. Be sure to use purified or distilled water since tap water will have impurities in it that will cause distortion.
Learn more: Ice Magnifying Glass

42. String up some sticky ice
Can you lift an ice cube using just a piece of string? This quick experiment teaches you how. Use a little salt to melt the ice and then refreeze the ice with the string attached.
Learn more: Sticky Ice

43. “Flip” a drawing with water
Light refraction causes some really cool effects, and there are multiple easy science experiments you can do with it. This one uses refraction to “flip” a drawing; you can also try the famous “disappearing penny” trick .
Learn more: Light Refraction With Water
44. Color some flowers
We love how simple this project is to re-create since all you’ll need are some white carnations, food coloring, glasses, and water. The end result is just so beautiful!

45. Use glitter to fight germs
Everyone knows that glitter is just like germs—it gets everywhere and is so hard to get rid of! Use that to your advantage and show kids how soap fights glitter and germs.
Learn more: Glitter Germs

46. Re-create the water cycle in a bag
You can do so many easy science experiments with a simple zip-top bag. Fill one partway with water and set it on a sunny windowsill to see how the water evaporates up and eventually “rains” down.
Learn more: Water Cycle

47. Learn about plant transpiration
Your backyard is a terrific place for easy science experiments. Grab a plastic bag and rubber band to learn how plants get rid of excess water they don’t need, a process known as transpiration.
Learn more: Plant Transpiration

48. Clean up an oil spill
Before conducting this experiment, teach your students about engineers who solve environmental problems like oil spills. Then, have your students use provided materials to clean the oil spill from their oceans.
Learn more: Oil Spill

49. Construct a pair of model lungs
Kids get a better understanding of the respiratory system when they build model lungs using a plastic water bottle and some balloons. You can modify the experiment to demonstrate the effects of smoking too.
Learn more: Model Lungs

50. Experiment with limestone rocks
Kids love to collect rocks, and there are plenty of easy science experiments you can do with them. In this one, pour vinegar over a rock to see if it bubbles. If it does, you’ve found limestone!
Learn more: Limestone Experiments

51. Turn a bottle into a rain gauge
All you need is a plastic bottle, a ruler, and a permanent marker to make your own rain gauge. Monitor your measurements and see how they stack up against meteorology reports in your area.
Learn more: DIY Rain Gauge

52. Build up towel mountains
This clever demonstration helps kids understand how some landforms are created. Use layers of towels to represent rock layers and boxes for continents. Then pu-u-u-sh and see what happens!
Learn more: Towel Mountains

53. Take a play dough core sample
Learn about the layers of the earth by building them out of Play-Doh, then take a core sample with a straw. ( Love Play-Doh? Get more learning ideas here. )
Learn more: Play Dough Core Sampling

54. Project the stars on your ceiling
Use the video lesson in the link below to learn why stars are only visible at night. Then create a DIY star projector to explore the concept hands-on.
Learn more: DIY Star Projector

55. Make it rain
Use shaving cream and food coloring to simulate clouds and rain. This is an easy science experiment little ones will beg to do over and over.
Learn more: Shaving Cream Rain
56. Blow up your fingerprint
This is such a cool (and easy!) way to look at fingerprint patterns. Inflate a balloon a bit, use some ink to put a fingerprint on it, then blow it up big to see your fingerprint in detail.

57. Snack on a DNA model
Twizzlers, gumdrops, and a few toothpicks are all you need to make this super-fun (and yummy!) DNA model.
Learn more: Edible DNA Model
58. Dissect a flower
Take a nature walk and find a flower or two. Then bring them home and take them apart to discover all the different parts of flowers.

59. Craft smartphone speakers
No Bluetooth speaker? No problem! Put together your own from paper cups and toilet paper tubes.
Learn more: Smartphone Speakers

60. Race a balloon-powered car
Kids will be amazed when they learn they can put together this awesome racer using cardboard and bottle-cap wheels. The balloon-powered “engine” is so much fun too.
Learn more: Balloon-Powered Car

61. Build a Ferris wheel
You’ve probably ridden on a Ferris wheel, but can you build one? Stock up on wood craft sticks and find out! Play around with different designs to see which one works best.
Learn more: Craft Stick Ferris Wheel
62. Design a phone stand
There are lots of ways to craft a DIY phone stand, which makes this a perfect creative-thinking STEM challenge.
63. Conduct an egg drop
Put all their engineering skills to the test with an egg drop! Challenge kids to build a container from stuff they find around the house that will protect an egg from a long fall (this is especially fun to do from upper-story windows).
Learn more: Egg Drop Challenge Ideas

64. Engineer a drinking-straw roller coaster
STEM challenges are always a hit with kids. We love this one, which only requires basic supplies like drinking straws.
Learn more: Straw Roller Coaster

65. Build a solar oven
Explore the power of the sun when you build your own solar ovens and use them to cook some yummy treats. This experiment takes a little more time and effort, but the results are always impressive. The link below has complete instructions.
Learn more: Solar Oven

66. Build a Da Vinci bridge
There are plenty of bridge-building experiments out there, but this one is unique. It’s inspired by Leonardo da Vinci’s 500-year-old self-supporting wooden bridge. Learn how to build it at the link, and expand your learning by exploring more about Da Vinci himself.
Learn more: Da Vinci Bridge
67. Step through an index card
This is one easy science experiment that never fails to astonish. With carefully placed scissor cuts on an index card, you can make a loop large enough to fit a (small) human body through! Kids will be wowed as they learn about surface area.

68. Stand on a pile of paper cups
Combine physics and engineering and challenge kids to create a paper cup structure that can support their weight. This is a cool project for aspiring architects.
Learn more: Paper Cup Stack

69. Test out parachutes
Gather a variety of materials (try tissues, handkerchiefs, plastic bags, etc.) and see which ones make the best parachutes. You can also find out how they’re affected by windy days or find out which ones work in the rain.
Learn more: Parachute Drop

70. Recycle newspapers into an engineering challenge
It’s amazing how a stack of newspapers can spark such creative engineering. Challenge kids to build a tower, support a book, or even build a chair using only newspaper and tape!
Learn more: Newspaper STEM Challenge

71. Use rubber bands to sound out acoustics
Explore the ways that sound waves are affected by what’s around them using a simple rubber band “guitar.” (Kids absolutely love playing with these!)
Learn more: Rubber Band Guitar

72. Assemble a better umbrella
Challenge students to engineer the best possible umbrella from various household supplies. Encourage them to plan, draw blueprints, and test their creations using the scientific method.
Learn more: Umbrella STEM Challenge
Plus, sign up for our newsletters to get all the latest learning ideas straight to your inbox.

You Might Also Like

Magic Milk Experiment: How-To Plus Free Worksheet
This classic experiment teaches kids about basic chemistry and physics. Continue Reading
Copyright © 2024. All rights reserved. 5335 Gate Parkway, Jacksonville, FL 32256
| =Project =Experiment |
| Phasor-FLIM Analysis of Metabolic Effects of Caffeine and Cisplatin on a Triple-Negative Breast Cancer Cell Line ] ] ] ] ] ] ] ] ] ] ] ] ] ] ] ] ] ] ] ] ] ] |
| Discovering the effects of "performance boosting" energy drinks and coffee on the ability of a mouse to transverse a maze. ] ] ] ] |
| Which of coffee, beets, spinach, mustard, or blueberries make the best dye. ] ] ] ] |
| Dtermine if caffeine would spur the growth of kangkong (Ipomoea aquatica Torsk). ] ] ] |
| The caffeine amount in different brand tea bags ] ] ] |
| Investigate the use of duckweeds, Lemna minor and Spirodela polyrhizza, in phytoremediation in removing acetaminophen, caffeine and estradiol safely from contaminated water. ] ] ] ] |
| How caffeine influences teenager performance during a complex test. ] ] |
| =Resource |
| Science Fair Projects Resources ] ] ] ] ] |
| | |
| |
| |

The Bulletproof Coffee Experiments
Wed, Aug 17, 2016
Est. Reading Time min
Coffee is extremely popular. In fact, coffee is the number #1 consumed drink in Canada and people worldwide have been drinking it for over 500 years. That's because coffee contains caffeine , a stimulant that makes you feel more energetic and alert. You feel that way because caffeine gets inside your brain and into your nerve cells, where it sticks to a protein. When caffeine is attached, the protein can't do its normal job, which is to make you feel drowsy. So, in binding to one type of protein, the simple little caffeine molecule causes sweeping changes to your brain's chemistry.
The caffeine in coffee can make you feel energetic and more alert, which is a great way to feel, especially first thing in the morning. However, these desirable effects are are somewhat short-lived and can be unpredictable. Caffeine consumption can also make you feel unwell and can cause health problems. For example, coffee can cause your heart rate to increase, also you might experience heartburn and/or anxiety and restlessness.
Wouldn’t it be nice if coffee drinkers could reap all the benefits of a caffeine boost, without any of the side effects? If only there was some life-hack for this. Well, there might be a recipe for such a thing and Science World bloggers, Alex and Elizabeth love coffee enough to find out!
Waving the flag of science, so-called “biohackers” want to revolutionize the average cuppa Joe into a carefully constructed chemical cocktail of brain-boosting awesomeness called “bulletproof coffee.”
If you haven't heard of the bulletproof coffee trend, the story goes something like this: founder and biohacker, Dave Asprey, staggers into a Tibetan guest house, is magically revived by yak butter tea and returns to found a startup company in the US that mixes quality coffee with grass-fed butter and a special blend of oils. If your skeptic alarm starts ringing at this, join the club with me and most of mainstream science .
While some biohackers use themselves as lab rats and experiment with chemicals that have unknown and potentially dangerous consequences , as biohacker newbies, we decided on the safe and scientifically sound route. We chose a recipe that includes theanine (a relaxant naturally found in green tea), clarified butter and coconut oil instead of more chemically adventurous variations.
|
|
|
| Coffee (approx. 100mg caffeine) | Coffee (approx. 100mg caffeine) |
Elizabeth's first thought was that "the combination is a strange idea. Theanine is a relaxing ingredient and coffee is a stimulant." Surely, then, they will just cancel each other out? Well, it's interesting. There is some evidence to suggest that a mix of caffeine and theanine will improve focus more than caffeine alone, while at the same time it may reduce side effects like anxiety and increased blood pressure. This is what business people mean when they talk about "synergy"—bringing things together so that the whole is greater than the sum of its parts.
Following a tentative first sip, we both agreed that the coffee tasted pretty good (it has butter in it, after all). After a small mug of bulletproof coffee, we went back to our desks and waited for the effects to kick in.
From the diary we kept of the hours that followed, it’s fair to say we both had a typical caffeine reaction. Elizabeth summed it up well: "my energy peaked, I felt a mood shift to a lighter state of mind, I began to talk and think a lot faster."
Not everything was the same, though. Elizabeth, a person who describes herself as "sensitive" to caffeine jitters, reported, "I didn't feel too anxious or scattered".
My experience was similar. I found it much easier to ignore distractions and focus on the tasks I needed to do. We both had the impression that the effects lasted longer than if we'd had a plain coffee. Though it's hard to say why that would be (perhaps the fats take longer to digest and so we were consuming caffeine for longer?). Needless to say, both of us shared a positive experience and felt that we should try another test.
One week later, we still like the taste (like I said, butter is delicious!). Some of the other effects were similar to last time, too. I reported the same “caffeine peak without the jitteriness” and Elizabeth became “similarly chatty, very patient with people and able to pay very close attention to them”.
But, that’s where things veered away from test #1, for both of us. Elizabeth said she felt “over-stimulated, like there were too many things to focus on”, which is a classic symptom of coffee jitters.
Like Elizabeth, I had a bunch of tasks to focus on that involved running around and re-prioritizing things on the fly. I didn’t register any increase in focus this time, commenting in the bulletproof diary that “I don’t feel that the drink helped with these tasks, but it certainly didn’t hinder them.”
Conclusions
In scientific terms, two tests are not enough to draw any real conclusions. For me and Elizabeth at least, we found that DIY bulletproof coffee is not the magic solution to productivity problems at work we had secretly hoped it would be. This finding isn’t all that surprising given the brain chemistry underlying “how you feel” is hugely complicated, with many variables.
Perhaps Elizabeth’s jitters came from a reduced tolerance to caffeine after a recent attempt to reduce the amount of coffee she drank? Maybe I didn’t feel the increase in focus in the second test because the type of task I was doing was so different? It’s hard to say for sure.
What I am certain of is that was way, way too much butter to have in my life! I’ve since had 3 plain coffees with added theanine and found no difference in the effects between this and bulletproof coffee. After a bit of online reading it turns out that nutritionists think that butter might only help people on high-fat, low-carbohydrate diets and is not recommended for people like me, who love their carbs. Still, if I really need to focus on a task at work, I might slip 225mg of theanine into my coffee.
Safe to say, for now, your Double-Double isn't going anywhere!
Fascinated by the inner-workings of the human brain? You might be interested in reading about Why We Dream or What It Means To Take On Someone Else’s Perspective .
About the sticker
Artist: Jeff Kulak
Jeff is a senior graphic designer at Science World. His illustration work has been published in the Walrus, The National Post, Reader’s Digest and Chickadee Magazine. He loves to make music, ride bikes, and spend time in the forest.
Comet Crisp
T-Rex and Baby
Artist: Michelle Yong
Michelle is a designer with a focus on creating joyful digital experiences! She enjoys exploring the potential forms that an idea can express itself in and helping then take shape.
Buddy the T-Rex
Science Buddies
Artist: Ty Dale
From Canada, Ty was born in Vancouver, British Columbia in 1993. From his chaotic workspace he draws in several different illustrative styles with thick outlines, bold colours and quirky-child like drawings. Ty distils the world around him into its basic geometry, prompting us to look at the mundane in a different way.
Western Dinosaur
Time-Travel T-Rex
We believe that now, more than ever, the world needs people who care about science. Help us fund the future and next generation of problem solvers, wonder seekers, world changers and nerds.
- Most Recent
- Free Silly Handwriting
- Easy Sub Plans Template
- Sprinkle Topped Shop
- My TpT Shop
- Amazon Favorites
- Free Video Series
The Sprinkle Topped Teacher

7 Easy Scientific Method Experiments
Kids’ natural curiosity never fails to amaze me. Their imaginations and observation skills run wild, especially at the elementary level. And the classroom is the perfect place to explore and exercise their curious minds!
When it comes to introducing younger students to scientific concepts like drawing observations and conclusions, the scientific method is a great place to start. It doesn’t have to be anything crazy. I’ve seen some pretty intense resources that teach the scientific method for kids, and they’ve been anything but kid friendly!
My preferred way to teach science is to boil the scientific method down to these 5 steps:
- Asking a research question
- Making a hypothesis
- Doing the experiment
- Taking observations
- Writing a conclusion
Keeping the scientific method for kids simple lets them explore their world without confusing them too much. When it comes to science concepts, we want to ease younger students in — not overwhelm them. This helps kids build a love of science that will last their whole lives!
With all that being said, I’ve gathered my favorite easy scientific method experiments for younger students into one bundle for you! These 7 Easy Science Experiments to Teach the Scientific Method are amazing because they all follow the same framework. This helps students know what to expect when it’s time to experiment and keeps your curriculum cohesive. Once we do one or two, my class gets into a nice groove and doesn’t need much direction on my part.
Plus, each of these experiments are available in a digital format, so they’re perfect for in-person or distance learning! And since they are so easy for students to follow, students will have no problem completing them at home.
What are the 7 easy scientific method experiments?
I’m glad you asked! Here is everything that is included in the scientific method for kids bundle:
1. Rainbow Milk Experiment
In the Rainbow Milk Magic Experiment, students will combine milk, dish soap, and food coloring to learn all about why the colors begin to swirl and look as if they are exploding into a rainbow. This is such a simple science experiment that works great with students of any age!

2. Tornado in a Bottle Experiment
This Tornado in a Bottle Experiment is the perfect way to teach the scientific method to kids. Students will practice measuring to fill a water bottle, then add dish soap and of course some glitter! They will then create a vortex to simulate a tornado and learn all about tornadoes.

3. Fingerprint Science Experiment
In the Fingerprint Science Experiment, students will become detectives and investigate their fingerprints while learning about the scientific method! This STEM fingerprint science experiment will cover the three types of fingerprints and super fun facts about fingerprints in humans and animals.

4. Marshmallow Toothpick Tower Science Experiment
The Marshmallow Toothpick Tower Science Experiment teaches students about building structures. They get to build their own masterpieces with marshmallows and toothpicks. As a bonus, this one ends in a tasty snack that students can enjoy!

5. Coffee Filter Digital Science Experiment
Students will learn about pigment and chromatography through this engaging experiment. They will get to draw a picture on a coffee filter using markers and observe what happens when it is sprayed with water. This is a fantastic way to introduce students to the concept of chemistry!

6. Slime Experiment
What kid doesn’t love slime?! This fun experiment lets them make their own with just a few household supplies. I love using this one during Halloween — it’s got the perfect spooky vibe!

7. Clean a Dirty Penny Science Experiment
Students love to collect and bring in a dirty penny for this science experiment. Students discover which cleaning solution works best to clean it and why using the scientific method! All you need are pennies, water, dish soap, salt, and vinegar. It’s a great option for Presidents’ Day, too!

What’s included in each scientific method for kids experiment?
I recently edited this bundle of experiments to include a table of contents, digital versions on Google Slides, and some great teacher tips to help your experiments run smoothly and make life easier for you. Each experiment includes…
● Explanation of the experiment, great for parents to follow at home!
● Guiding Question and Hypothesis
● Experiment (Picture and written)
● Observations (Picture and written)
● Conclusion
● The science behind the experiment explained (includes fill in the blank option as well)
There you have it: everything you need to teach the scientific method to your students or a child at home!
Teaching the scientific method to kids doesn’t have to be complicated. It’s best to stick to 5 steps and use the same experimental format to keep science lessons cohesive. My 7 Easy Science Experiments to Teach the Scientific Method are an amazing option for anyone looking to introduce students to key STEM concepts!
How often do you experiment in your classroom? What’s your favorite experiment to do? I’d love to hear your thoughts!
Share this:
You may also like, 3 digital science lessons for elementary students, free 1st grade math warm-ups, fingerprint science project for kids, 2nd grade fractions activity, number search puzzle for fun multiplication and division practice.
Choose an Account to Log In

Notifications
Science project, the effect of caffeine on plant growth.

2011 VIRTUAL SCIENCE FAIR ENTRY
To explore the effect of caffein on plant growth, I planted, germinated, and grew mung beans. I introduced caffeine into the soil of some plants and evaluated the effects of caffeine on the experimental plants in comparison to the control plants that were not exposed to caffeine. Results showed that caffeine help mung beans grow faster with soil sprinkled with caffeine.
Difficulty of the Project
Safety issues, time taken to complete the project.
- 1 packet of mung beans
- 3 gardening pots
- Enough soil to fill the 3 pots
- Gardening utensils
- Caffeine tablets
- Coffee powder
- 1 measuring cylinder
- 1 digital weighing scale
- 1 black marker
Introduction
Some plants seem to benefit and grow faster when caffeine is added to the soil, while others seem to become stunted or grow slower. There are also some plants that are not affected by the presence of caffeine in the soil. Caffeine can be introduced to the soil by sprinkling grounded coffee over the soil, adding leftover coffee to the pot or watering with a caffeine solution made by dissolving a caffeine tablet in water. The grounded coffee is actually organic matter and will help in adding nutrients to the soil. It will also attract worms that feed on the grounded coffee and at the same time help to aerate the soil.
Experimental Procedure
- The independent variable is the solution used to water the plants – water, caffeine solution and a coffee mixture. The dependent variable is the growth of the mug bean plants. This is determined by measuring the height of the plants every day using a ruler. The constants (control variables) are the size of the pot, the concentration of caffeine and coffee, the amount of sunlight, the temperature of the environment (which will remain at room temperature) and the amount of water added daily.
- Fill the 3 pots with equal amounts of soil. Plant ten mug beans in each pot and allow them to germinate. Additional seeds can be placed in the pots in case some of the seeds do not germinate; the additional plants can be removed later.
- For the first 5 days, water the 3 pots with tap water only. Allow the seeds to germinate for the first 5 days.
- After 5 days, measure the height of the 10 plants in each pot. Add up the individual heights and divide by 10 to obtain the average height. Record the average heights in a table, as shown below.
- Prepare the caffeine solution by dissolving 10g of caffeine tablets in 100ml of water in a beaker. Label the beaker ‘caffeine’. Similarly, add 10g of coffee to 100ml of water in another beaker and label it ‘coffee’.
- Label the 3 pots ‘water’, ‘caffeine’ or ‘coffee’. Over the next 10 days, water the pots once a day with 100ml water, caffeine solution or coffee mixture, according to the labels on the pots.
- Measure and calculate the average height of the mung bean plants every day for the next 10 days. Record all calculations in a table.
The results of the experiment were, mung beans grew faster in soil with caffeine.
The hypothesis that mung beans watered using a coffee mixture will grow the fastest has been proven to be true. The effect of caffeine on plant growth is still a subject under study. Using grounded coffee in garden lawns is a common practice to make plants grow faster. However, coffee also contains other ingredients like potassium and phosphorous, which are known to enhance plant growth. Experiments on plant growth using only caffeine have resulted in the plant leaves becoming wrinkled, turning brownish and exhibiting retarded growth.
Related learning resources
Add to collection, create new collection, new collection, new collection>, sign up to start collecting.
Bookmark this to easily find it later. Then send your curated collection to your children, or put together your own custom lesson plan.
Sciencing_Icons_Science SCIENCE
Sciencing_icons_biology biology, sciencing_icons_cells cells, sciencing_icons_molecular molecular, sciencing_icons_microorganisms microorganisms, sciencing_icons_genetics genetics, sciencing_icons_human body human body, sciencing_icons_ecology ecology, sciencing_icons_chemistry chemistry, sciencing_icons_atomic & molecular structure atomic & molecular structure, sciencing_icons_bonds bonds, sciencing_icons_reactions reactions, sciencing_icons_stoichiometry stoichiometry, sciencing_icons_solutions solutions, sciencing_icons_acids & bases acids & bases, sciencing_icons_thermodynamics thermodynamics, sciencing_icons_organic chemistry organic chemistry, sciencing_icons_physics physics, sciencing_icons_fundamentals-physics fundamentals, sciencing_icons_electronics electronics, sciencing_icons_waves waves, sciencing_icons_energy energy, sciencing_icons_fluid fluid, sciencing_icons_astronomy astronomy, sciencing_icons_geology geology, sciencing_icons_fundamentals-geology fundamentals, sciencing_icons_minerals & rocks minerals & rocks, sciencing_icons_earth scructure earth structure, sciencing_icons_fossils fossils, sciencing_icons_natural disasters natural disasters, sciencing_icons_nature nature, sciencing_icons_ecosystems ecosystems, sciencing_icons_environment environment, sciencing_icons_insects insects, sciencing_icons_plants & mushrooms plants & mushrooms, sciencing_icons_animals animals, sciencing_icons_math math, sciencing_icons_arithmetic arithmetic, sciencing_icons_addition & subtraction addition & subtraction, sciencing_icons_multiplication & division multiplication & division, sciencing_icons_decimals decimals, sciencing_icons_fractions fractions, sciencing_icons_conversions conversions, sciencing_icons_algebra algebra, sciencing_icons_working with units working with units, sciencing_icons_equations & expressions equations & expressions, sciencing_icons_ratios & proportions ratios & proportions, sciencing_icons_inequalities inequalities, sciencing_icons_exponents & logarithms exponents & logarithms, sciencing_icons_factorization factorization, sciencing_icons_functions functions, sciencing_icons_linear equations linear equations, sciencing_icons_graphs graphs, sciencing_icons_quadratics quadratics, sciencing_icons_polynomials polynomials, sciencing_icons_geometry geometry, sciencing_icons_fundamentals-geometry fundamentals, sciencing_icons_cartesian cartesian, sciencing_icons_circles circles, sciencing_icons_solids solids, sciencing_icons_trigonometry trigonometry, sciencing_icons_probability-statistics probability & statistics, sciencing_icons_mean-median-mode mean/median/mode, sciencing_icons_independent-dependent variables independent/dependent variables, sciencing_icons_deviation deviation, sciencing_icons_correlation correlation, sciencing_icons_sampling sampling, sciencing_icons_distributions distributions, sciencing_icons_probability probability, sciencing_icons_calculus calculus, sciencing_icons_differentiation-integration differentiation/integration, sciencing_icons_application application, sciencing_icons_projects projects, sciencing_icons_news news.
- Share Tweet Email Print
- Home ⋅
- Science ⋅
- Biology ⋅
How to Experiment with Coffee Filters to Explain How a Kidney Works

Easy Kidney Science Projects
Our kidneys help keep us healthy by removing toxins from our blood: The renal artery brings blood into the kidneys which then process the blood, removing any unwanted substances and eliminating the waste in the urine. The kidneys then return the processed blood to the body through the renal vein. Health professionals, educators and students can use everyday kitchen equipment to create a simple experiment that clearly demonstrates the basic workings of the kidneys.
Mix 1/2 spoonful of crushed chalk with 1/2 cup of water in a clear glass jar. Add a few drops of food coloring to the water. The chalk will represent toxins present in the blood, while the water will represent the blood.
Place a coffee filter over the top of the second jar and secure it with a rubber band. The filter will represent the kidneys that filter the toxins from the blood.
Pour the chalk/water mixture through the coffee filter into the second jar.
Observe how the filter traps the chalk as the colored water drips into the second jar. This helps illustrate how blood circulates through the kidneys, which then trap the toxins before returning the purified blood to the body's circulatory system.
Things You'll Need
Related articles, five major organ systems of the body, hands-on science activities on blood, lymphatic system science activities, how to test for acidity with litmus paper, how to make a water filter using sand & rocks, human heart science projects, excretory system science project ideas, how to neutralize food coloring in water, top ten facts about the human bladder, functions of human organs, what color would a tester ph paper turn if is dipped..., what are the functions of the cecum, facts about the spleen, how to hydrolyze starch with heat & hydrochloric acid, how to separate blue food coloring from water, examples of diffusion in organs, how to make a 1% sucrose solution, what part of the nephron is responsible for the reabsorption....
- Ann Arbor News: Ann Arbor Boy's Science Project
About the Author
Laurie Rappeport is a writer and blogger with more than 10 years of experience. Her areas of expertise are in education, child development, travel, pets, nutrition and health for Demand Studios and a major travel website. Rappeport holds a Master of Arts degree from Wayne State University.
Photo Credits
Jupiterimages/Photos.com/Getty Images
Find Your Next Great Science Fair Project! GO
Science Project: Coffee
Here’s the scoop on coffee’s flavor: the taste comes from compounds locked into roasted coffee beans. Add hot water, and those flavors escape into your pot—but not all flavors come out at the same time, says Harold McGee, food science writer and author of On Food and Cooking . For example, sour flavors, acids, come first and the plant carbohydrates responsible for coffee’s body come later. Taste for yourself with this counter-top chemistry experiment.
video by Jenny Woodward; co-produced by Flora Lichtman
Meet the Producer
About jenny woodward.
Jenny Woodward is a director, editor, and video producer based in New York. She grew up in Madison Wisconsin, and has a background in art direction, photography, graphic design, illustration, theater and technology.
Can't find the email?
Please check your spam or junk folder
You can also add [email protected] to your safe senders list to ensure you never miss a message from us.
20 Awesome Science Experiments You Can Do Right Now At Home
Complete the form below and we will email you a PDF version
Cancel and go back
IFLScience needs the contact information you provide to us to contact you about our products and services. You may unsubscribe from these communications at any time.
For information on how to unsubscribe, as well as our privacy practices and commitment to protecting your privacy, check out our Privacy Policy
Complete the form below to listen to the audio version of this article
Advertisement
Subscribe today for our Weekly Newsletter in your inbox!

Morenike Adebayo
Guest Author
DOWNLOAD PDF VERSION

We can all agree that science is awesome. And you can bring that awesomeness into your very own home with these 20 safe DIY experiments you can do right now with ordinary household items.
1. Make Objects Seemingly Disappear Refraction is when light changes direction and speed as it passes from one object to another. Only visible objects reflect light. When two materials with similar reflective properties come into contact, light will pass through both materials at the same speed, rendering the other material invisible. Check out this video from BritLab on how to turn glass invisible using vegetable oil and pyrex glass.
2. Freeze Water Instantly When purified water is cooled to just below freezing point, a quick nudge or an icecube placed in it is all it takes for the water to instantly freeze. You can finally have the power of Frozone from The Incredibles on a very small scale! Check out the video on this "cool" experiment.
3. Create Oobleck And Make It Dance To The Music Named after a sticky substance in a children’s book by Dr Seuss , Oobleck is a non-Newtonian fluid, which means it can behave as both a solid and a liquid. And when placed on a sound source, the vibrations causes the mixture to gloopily dance. Check out these instructions from Housing A Forest on how to make this groovy fluid funk out in every way.
4. Create Your Own Hybrid Rocket Engine With a combination of a solid fuel source and a liquid oxidizer, hybrid rocket engines can propel themselves. And on a small scale, you can create your own hybrid rocket engine, using pasta, mouthwash and yeast. Sadly, it won’t propel much, but who said rocket science ain’t easy? Check out this video from NightHawkInLight on how to make this mini engine.
5. Create "Magic Mud" Another non-Newtonian fluid here, this time from the humble potato. "Magic Mud" is actually starch found in potatoes. It’ll remain hard when handled but leave it alone and it turns into a liquid. Make your own “Magic Mud” with this video.
6. Command The Skies And Create A Cloud In A Bottle Not quite a storm in a teacup, but it is a cloud in a bottle. Clouds up in the sky are formed when water vapor cools and condenses into visible water droplets. Create your own cloud in a bottle using a few household items with these wikiHow instructions .
7. Create An Underwater Magical World First synthesized by Adolf van Baeyer in 1871, fluorescein is a non-toxic powder found in highlighter pens, and used by NASA to find shuttles that land in the sea. Create an underwater magical world with this video from NightHawkInLight .
9. Make Your Own Lava Lamp Inside a lava lamp are colored bubbles of wax suspended in a clear or colorless liquid, which changes density when warmed by a heating element at the base, allowing them to rise and fall hypnotically. Create your own lava lamp with these video instructions.
10. Create Magnetic Fluid A ferrofluid is a liquid that contains nanoscale particles of metal, which can become magnetized. And with oil, toner and a magnet , you can create your own ferrofluid and harness the power of magnetism!
12. Make Waterproof Sand A hydrophobic substance is one that repels water. When sand is combined with a water-resistant chemical, it becomes hydrophobic. So when it comes into contact with water, the sand will remain dry and reusable. Make your own waterproof sand with this video .
13. Make Elephant's Toothpaste Elephant’s toothpaste is a steaming foamy substance created by the rapid decomposition of hydrogen peroxide, which sort of resembles giant-sized toothpaste. Make your own elephant’s toothpaste with these instructions.
14. Make Crystal Bubbles When the temperature falls below 0 o C (32 o F), it’s possible to freeze bubbles into crystals. No instructions needed here, just some bubble mix and chilly weather.
15. Make Moving Liquid Art Mixing dish soap and milk together causes the surface tension of the milk to break down. Throw in different food colorings and create this trippy chemical reaction.
16. Create Colourful Carnations Flowers absorb water through their stems, and if that water has food coloring in it, the flowers will also absorb that color. Create some wonderfully colored flowers with these wikiHow instructions .
17. "Magically" Turn Water Into Wine Turn water into wine with this video by experimenter Dave Hax . Because water has a higher density than wine, they can switch places. Amaze your friends with this fun science trick.
18. Release The Energy In Candy (Without Eating It) Dropping a gummy bear into a test tube with potassium chlorate releases the chemical energy inside in an intense chemical reaction. That’s exactly what's happening when you eat candy, kids.
19. Make Water "Mysteriously" Disappear Sodium polyacrylate is a super-absorbent polymer, capable of absorbing up to 300 times its own weight in water. Found in disposable diapers, you can make water disappear in seconds with this video .
20. Create A Rainbow In A Jar Different liquids have different masses and different densities. For example, oil is less dense than water and will float on top of its surface. By combining liquids of different densities and adding food coloring, you can make an entire rainbow in a jar with this video .
There you have it – 20 experiments for you to explore the incredible world of science!
ARTICLE POSTED IN
experiment,
fluorescein,
rocket engine,
hydrogen peroxide,
sodium acetate,
ferrofluid,
More Space and Physics Stories
link to article

Unexplained Pulsing Sounds Coming From Starliner Docked To The ISS

Does The Universe Have A Center And If So Where Is It?

Meet The Gallium Anomaly – An (Old) New Challenge To All Known Physics

When Was The First Fire On Earth?

Killer Whale Pirates, Hunting Aliens, And Flying Spaghetti Monsters

How Can Insects Help Us Solve Crimes?
45 Easy Science Experiments for Kids
Hello, STEM! These simple DIY activities can be done at home or in school.

We've been independently researching and testing products for over 120 years. If you buy through our links, we may earn a commission. Learn more about our review process.
Imagine blowing the biggest bubbles imaginable — or even making bubbles within bubbles. Or sending vessels — rockets, tea bags, airplanes — soaring through the sky for impossible distances. Now imagine making things explode, or change colors, or reveal hidden messages with just a few simple mixtures.
None of this is magic. It's all science that you can do at home, most likely with ingredients you already have in your house. So, next time you need a boredom-busting indoor activity on a rainy day or a DIY project to get their minds humming, try one of these best at-home science experiments for kids , which cover topics like cover magnetism, surface tension, astronomy, chemistry, physics and more.
First off, it's good to start them off with the scientific method. Give them a journal to record their observations, questions, hypotheses, experiments, results and conclusions. As always, safety counts: wear goggles and coats or aprons if need be (sometimes kids get a kick out of how scientific the protective gear makes them look), and always make sure that the kids are supervised when doing them. (Warning: Some of these are messy!)
These experiments are mostly designed for preschoolers through elementary schoolers — with a couple that are either demonstrations or better for older kids — but if you have a younger one, you can check out these 1-year-old learning activities , toddler learning activities and preschool/kindergarten learning activities , some of which also cover STEM subjects.
Floating Fish

Here's another one that deals with solubility and density.
- Draw the outline of a fish on the bottom of a glass plate or tray in dry-erase marker. Retrace your drawing to make sure all the lines are connected. Let dry for a minute or two.
- Fill the measuring cup with tap water. Place the pour spout just inside the corner of the dish and add water very slowly until it just covers the bottom. Be careful not to pour water directly onto your drawing or make splashes near it. The water will move toward your drawing, eventually surrounding it. Observe what happens. If the water splashes or it doesn’t work on your first try, empty the dish, erase the drawing with a paper towel, dry off the dish, and try again.
- Tilt the dish slightly from side to side. What happens? Jot it down.
The ink in dry erase markers is engineered to be slippery. It’s made with a chemical that causes it to easily release from surfaces. (Permanent markers are made with a chemical that makes the ink stick to surfaces, so be sure not to use these in your experiment!)
The easy-release ink lets go from a surface, but why does it float? There are two reasons. First, dry erase ink isn’t soluble, which means it won’t dissolve in water. Second, dry erase ink is less dense than the water, so it becomes buoyant, meaning it can float. When you tilt the dish, the fish moves around on the water’s surface.
From Good Housekeeping Amazing Science: 83 Hands-on S.T.E.A.M Experiments for Curious Kids! See more in the book »
Brush, Brush!

This one will really get them into brushing their teeth once they scientifically prove all the good things that toothpaste can do.
- Write on sticky notes: Soda 1, Soda 2, Juice 1, and Juice 2. Place them in a row on a counter.
- Fill two glasses halfway with brown soda and place behind the Soda 1 and Soda 2 sticky notes. Fill two glasses halfway with lemon juice and place behind the Juice 1 and Juice 2 sticky notes.
- Carefully place one egg in the bowl. Squeeze a big dollop — about one tablespoon — of toothpaste on top of the egg and gently rub the toothpaste all around with your hands until the egg is completely covered in a thick layer of toothpaste. Repeat with a second egg.
- Gently submerge the toothpaste-covered eggs into the liquids: one egg in the glass labeled Soda 1 and the other egg in the glass labeled Juice 1. Wash and dry your hands.
- Gently submerge the remaining eggs, without toothpaste on them, in the remaining glasses: one in the glass labeled Soda 2 and the other in the glass of juice labeled Juice 2. Wash and dry your hands. Leave the eggs in the glasses for 12 hours.
- After 12 hours, remove the eggs from the glasses of soda one at a time. Rinse them in cool water and pat them dry with the towel. Place each egg by the sticky note of the glass it was in. Are the eggs the same or different colors?
- Remove the eggs from the glasses of juice one at a time. Rinse them under the faucet and pat them dry. Place each egg by the sticky note of the glass it was in. Feel the eggs gently. Does one feel stronger or weaker than the other?
- Write down your observations in your science notebook.
The eggshells in this experiment represent the enamel (outer coating) on your teeth. Toothpaste cleans your teeth and prevents stains: it removes food and drink particles that are stuck on your teeth. Teeth can be stained easily by dark-colored liquids like cola, coffee or tea. The egg without toothpaste will be brown and discolored. The egg covered in toothpaste was protected from turning brown.
Toothpaste also protects your pearly whites from decay (breaking down). The egg without toothpaste left in the lemon juice was worn down and soft to the touch, while the egg that was protected with toothpaste is stronger. The lemon juice is acidic, and those acids broke down the shell just as acidic drinks can wear away your tooth enamel. When a tooth is worn down, a cavity can form more easily. But the fluoride in toothpaste mixes with your saliva to create a protective coating around your tooth enamel. It helps keep your teeth strong and cavity-free.
Grow an Avocado Tree

For an easy lesson in Earth Science, your family can grow an avocado tree from a pit. You can buy an AvoSeedo kit , or just peel the seed and suspend it over water with toothpicks.
Get the tutorial »
Milk Bottle Xylophone

No for an experiment in sound!
- Arrange six glass jars or bottles, all the same size with no lids, in a line. What will each jar sound like when you tap it with a spoon? Make a prediction, then tap each jar. Record your observations.
- Next, put water in each of the jars. Pour 1⁄4 cup (60 ml) of water into the first jar. Add 1⁄2 cup (120 ml) of water to the second jar. Continue in 1⁄4-cup increments, adding 3⁄4 cup (180 ml) of water to the third jar, 1 cup (240 ml) of water to the fourth jar, 11⁄4 cups (300 ml) of water to the fifth jar, and 11⁄2 cups (360 ml) to the sixth jar. Add a couple of drops of food coloring to each jar.
- What will each jar sound like? Will they sound the same or different than when the container was empty? Will they sound the same or different from one another? Record your predictions.
- Tap each jar with a metal spoon. Write down your observations about each jar’s pitch (how high or low a sound is) in your notebook.
Sound waves are created by vibrations, which are back-and-forth movements that are repeated again and again. Pitch depends on the frequency of the waves — how many are created each second. A high pitch is created by high-frequency sound waves, and can sound squeaky. A low pitch is created by low-frequency sound waves, and sounds deep and booming.
When you tapped the jar, it vibrated. The vibrations traveled from the jar to the water to the air and eventually to your ears. The jars with more water had a low pitch. The sound waves vibrated more slowly because they had more water to travel through. The jars with less water had higher pitches. The sound waves vibrated faster because they had less water to travel through. A jar with no water in it makes the highest pitch because it has the least substance to travel through.
"Elephant Toothpaste"

Okay, elephants don't really brush with this stuff, which is made from a chemical reaction between hydrogen peroxide, yeast, dish soap and a few other simple ingredients. But this experiment has a big "wow" factor since, when the substances are mixed, the "toothpaste" foams out of the bottle. You can use it to teach kids about catalysts and exothermic reactions.
Get the tutorial at Babble Dabble Do »
DIY Compass

Explore the way magnetism works, and how it affects everyday objects, by magnetizing a needle and making a DIY compass. You can even spin the compass in the water, and it'll end up pointing the right way again.
Get the tutorial at STEAM Powered Family »
Craft Stick Chain Reaction

Kids can learn about the differences between potential and kinetic energy with this chain reaction. It makes a big impact: Once the tension is released, the pom poms go flying through the air!
Get the the tutorial at Science Sparks »
Color-Changing Invisible Ink

Kids will feel like super-spies when they use this heatless method to reveal pictures or colors written with "invisible ink." You can try different acid/base combinations to see which one makes the most dramatic result.
Get the tutorial at Research Parent »
Paper Bridge

Get the engineering back into STEM with this activity, which challenges kids to create a paper bridge that's strong enough to hold as many pennies as possible. How can they manipulate the paper to make it sturdier? (Hint: Fold it!)
See the paper bridge tutorial at KidsActivities.com »

Challenge your little scientist to lift up an ice cube with just a piece of string. It's possible ... with a little salt to help. Salt melts the ice and lowers the freezing point of the ice cube, which absorbs the heat from the water around it, making the water cold enough to re-freeze around the string.
Get the tutorial at Playdough to Plato »
Marshmallow Catapult

Another lesson in potential and kinetic energy, kids will love sending mini marshmallows flying in the name of science. Change some of the variables and see how that affects the marshmallow's trajectory.
Get the tutorial at Hello, Wonderful »
Leaf Breathing

It's hard for kids to picture how plants and trees "breathe" through their leaves — until they see the bubbles appear on a leaf that's submerged in water. You can also teach them about photosynthesis by putting different leaves in different spots with varying levels of sunlight.
Get the tutorial at KC EDventures »
Hoop-and-Straw Airplane

We all remember how to fold those classic, triangular paper airplanes, but these hoop-and-straw airplanes fly way better (and straighter). Experiment by changing the length of the straw and the size of the hoops and see how it affects the flight.
Get the tutorial at Mombrite »
Film Canister Rocket

Blast off! You don't need jet fuel to make these rockets go, just Alka-Seltzer tablets and baking soda, but they'll be amazed when they achieve lift-off! (Note: If you can't find old film canisters, tubes of Airborne work, too.)
Get the tutorial at Raising Lifelong Learners »
Coin Inertia

Stack up about five or so coins on a piece of cardboard and place it over a glass of water. Then, flick the cardboard out from on top of the glass. Do the coins drop into the water, or ride with the cardboard? Due to inertia, they drop into the water — a very visual (and fun!) demonstration of Newton's First Law of Motion.
Get the tutorial at Engineering Emily »
Apple Oxidation

What works best for keeping an apple from turning brown? Test to find out! Slice up an apple, and let each slice soak in a different liquid. Then take them out, lay them on a tray, and check the brownness after three minutes, six minutes and so on. Not only does this test the properties of different liquids, it also helps students practice the scientific method if they create hypotheses about which liquids would be most effective.
Get the tutorial at Jennifer Findley »
RELATED: 50 Fun Activities for Kids Will Keep Them Entertained for Hours
Coffee Ground Fossils

By making a salt dough with coffee grounds and pressing various shapes into it (toy dinosaur feet, seashells), kids can get a better understanding of how fossils are made. If you poke a hole in the top before it dries, the kids can hang their "fossils" up in their rooms.
Get the tutorial at Crafts by Amanda »
Chromatography Flowers

Chromatography is the process of separating a solution into different parts — like the pigments in the ink used in markers. If you draw stripes around a coffee filter, then fold it up and dip the tip in water, the water will travel up the filter and separate the marker ink into its different pigments (in cool patterns that you can display as a craft project). This family made the end-result even brighter by adding an LED circuit to the center.
Get the tutorial at Steam Powered Family »
Water Walking

You'll need six containers of water for this one: three with clear water, one with red food coloring, one with blue coloring, and one with yellow coloring. Arrange them in a circle, alternating colored and clear containers, and make bridges between the containers with folded paper towels. Your kids will be amazed to see the colored water "walk" over the bridges and into the clear containers, mixing colors, and giving them a first-hand look at the magic of capillarity.
Get the tutorial at Fun Learning for Kids »
Sunscreen Test

This experiment puts the A (art) in STEAM: Paint different designs on construction paper with different sunscreens, leave the papers out in the sun and compare the results. Then, hang your "conclusions" on your fridge.
Get the tutorial at Tonya Staab »
Marisa (she/her) has covered all things parenting, from the postpartum period through the empty nest, for Good Housekeeping since 2018; she previously wrote about parents and families at Parents and Working Mother . She lives with her husband and daughter in Brooklyn, where she can be found dominating the audio round at her local bar trivia night or tweeting about movies.

Parenting Tips & Advice

100 Best Disney Baby Names

140 Chic French Baby Names

The 50 Best Animated Films to Watch With Your Kids

220 Top Gender-Neutral Baby Names

Here's What NOT to Do When Kids Go to College

The Case for the One-on-One Family Vacation

10 Things Adults Should Never Say to Kids

Tips for Getting the Kids to School on Time

Back-to-School Supply Shopping Lists

Why I Love Pilot Pens

100 Funny and Thoughtful New Baby Messages

The Ultimate List of the Best Jokes for Kids

Craig Beals travels the country with FLIR sharing the joys of science

The Beals Science Jeep Cannon shoots bowling balls more than two miles

Waiting for the ball to drop and set off hundreds of mouse traps to simulate a reaction.

Craig asks "Can Technology (re)Humanize Us?" in his TEDx talk

Brew Perfect Coffee with Chemistry Equipment

There are hundreds of ways to brew coffee and, for the most part, they all produce coffee that tastes like you'd expect coffee to taste. So, in the past, I've never worried much about how to brew the coffee, just that I wanted my coffee to be good, hot and full of caffeine. That all changed a few years ago when I really started to explore the chemistry of coffee - from roasting coffee to brewing coffee and I became fascinated with finding ways to make coffee taste amazing. In fact, every year in my High School Chemistry class, we do a 10 day lab called the Chemistry of Coffee to intertwine the key concepts of chemistry into roasting, brewing and perfecting the art and science of coffee.
I recently watched a cup of coffee being brewed with a siphon brewer (vacuum brewer) and was completely mesmerized at how beautiful this brewing process looked and, in the end, how incredible it tasted. So, I purchased a siphon brewer and it rocked my world as much as it rocked my bank account. I began to think that I should be able to make a similar device using chemistry equipment and, alas, that is what I did. This page holds all of the information, instructions and equipment needed to build a siphon brewer at home; or, as in my case, in the science lab.
How to build a siphon brewer from lab equipment
Supplies (all links redirect to Amazon.com)
Bunsen Burner or Butane Burner
Burette Clamp ( I used 2)
1000ml Florence Flask
Glass Tubing
Expensive option: Kimax Kimble KG-33 6mm OD Glass Tubing (long tubes, professional grade)
Cheaper option: Borosilicate Glass 6mm OD (*Only 12 inches long. Must attach two tubes together with rubber tubing to be long enough)
Glass tubing cutter
Rubber Stopper #6 (size 6 with 1 hole)
1/4 inch ID Clear Plastic Tubing
Heat Shrink Tubing
Heat Gun or Hair Dryer
Glass Funnel
1000ml Beaker
Water Boiler (optional)
Setting up the Homemade Siphon Brewer
-Watch the video " Brew Perfect Coffee with Chemistry Equipment " for complete instructions in building and setting up the siphon brewer.
How to brew coffee in the homemade siphon brewer
Note: The amount of water and coffee grounds will vary depending on the size of your glassware
Wrap the end of the funnel with a coffee filter. Secure in place by tightly wrapping with cotton string. Note: Rubber bands may be used but we've had better success with tightly wrapped string.
Fill Florence Flask with hot water. Keep track of how much water so you know how many coffee grounds to use (see step 7 below) Note: You can start with room temperature water but the process will take much longer
Light the burner and place it under the Florence Flask.
Insert glass tube with rubber stopper into Florence Flask. Do not insert the stopper all the way, you want to allow the flask to vent until you've set up the rest of the apparatus.
Insert the funnel with coffee filter into the beaker and move the iron ring so the filter is nearly touching the bottom on the flask (leave a 1 mm gap).
Firmly push the rubber stopper into the Florence Flask.
Once water starts to move into the beaker with the filter, add coffee . For perfect coffee, use your favorite roast, ground to medium and no less than 1 heaping tablespoon per 6 oz of water that you placed in the Florence Flask.
When all of the water has moved into the beaker with coffee grounds, set a timer for 1.5 minutes and turn down the burner slightly. You must keep the Flask hot enough that liquid will not flow back into the flask.
After 1.5 minutes, remove the burner from the bottom of the Florence Flask - the coffee should be pulled from the beaker and coffee grounds, back into the Flask.
Drink. Enjoy. Repeat.
How Does a Siphon Brewer Work? The Science of Brewing with a Siphon Coffee Pot
The vacuum brewer is a perfect way to model and learn about gas laws and, while the brewing apparatus is relatively simple, the chemistry and physics of how it works is surprisingly complex. I will "boil" the complexity of down to its simplest form:
There are numerous gas laws that help explain how temperature, pressure and volume of gases are related in a closed and open system such as our homemade coffee siphon brewer. These gas laws can be combined into one equation - the Ideal Gas Law:
P= Pressure of the gas (pascals)
V= Volume of the gas (cubic meters)
n= number of moles (amount of "substance")
R= ideal gas constant (8.318 J/K*mol)
T= Temperature of the gas (Kelvin)
For an extensive explanation of how the siphon brewer works using the ideal gas law, click " The Physics of Vacuum Pots ". A simplified explanation, with out the math, is below.

The physics of the Siphon Coffee Brewer
Start of brewing: With water heating in the Florence flask, the water begins to turn to a vapor, increasing the pressure in the flask above the water. This increased pressure pushes in all directions, including putting pressure on the water. The pressure inside the glass tube and in the beaker on the opposite end of the tube is much less than the pressure in the round flask at this point. This difference in pressure causes the liquid to be pushed into the glass tube flow toward the lower pressure end.
Middle of Brewing: Once all of the water has moved from the round flask into the beaker and the coffee is brewing, the continued heat in the round flask keeps the increased pressure in the flask, causing the brewing coffee to remain in the beaker.
End of Brewing: Removing the heat from the round flask decreases the temperature of the gas (water vapor) in the flask and it begins to condense into water droplets. Water takes up less space (less volume) than a gas so the volume begins to decrease in the flask (although it is a closed system so the volume cannot decrease) which causes the pressure to drop. Once the pressure in the round flask is less than the pressure at the other end of the tube, the brewed coffee is pushed through the filter, into the tube and back into the round flask. This process is called siphoning or vacuuming and is how this method gets it's name "Siphon Coffee" or "Vacuum Coffee"!
For instructions, lessons and videos on the Science of Coffee and the Chemistry of Coffee, visit BealsScience.com/Coffee-Science
Happy Coffee Brewing! ~Craig
#Coffee #CoffeeBrewing #ChemistryofCoffee #GasLaws #Chemistry #CoffeeScience
- Chemistry Experiments
- Science Demonstrations
- Science Experiments
Recent Posts
Genie in a Bottle Trick - Science or Magic?
Liquid Oxygen Experiments
How to Make a Leg Lamp from A Christmas Story

15 Easy Kitchen Science Experiments (With Ingredients You Already Have)
Krystal DeVille
September 19, 2023

Kitchens aren’t just for parents and making meals!
Kids can use kitchen ingredients and tools to learn from kitchen science experiments. Check out the following ideas for fun kitchen science.
—–You can download our FREE ebook with 25 STEM Activities here——
Table of Contents
1. Rubber Egg Experiment

- White vinegar
- Glass or jar
Cover an egg in a container with vinegar to see the shell disappear and the resulting egg that feels like rubber. Children learn about the chemical reaction between the eggshell (calcium carbonate) and the vinegar (acetic acid). Bubbles on the egg and on top of the water are from carbon dioxide.
2. Shaking for Butter
- Heavy whipping cream
- Jar with lid
- Sealable plastic bags
Using heavy whipping cream at various temperatures, kids shake the cream in a jar to observe changes in color and texture. They learn about emulsification and the butter-making process of churning, in which cream is agitated and fat particles begin clumping together. They can see whipped cream form first, followed by butter, when the air is no longer held by the cream.
3. Bread in a Bag

- Plain flour
- Granulated sugar
- Rapid rise yeast
Your children mix ingredients to make dough in the plastic bag, then knead the dough to bake. They discover how yeast is a dormant fungus that can be awakened with warm water and sugar as a food source for fermentation. Children also observe bubbles that form when the yeast eats the sugar and gives off carbon dioxide.
4. Growing Plants from Food Scraps
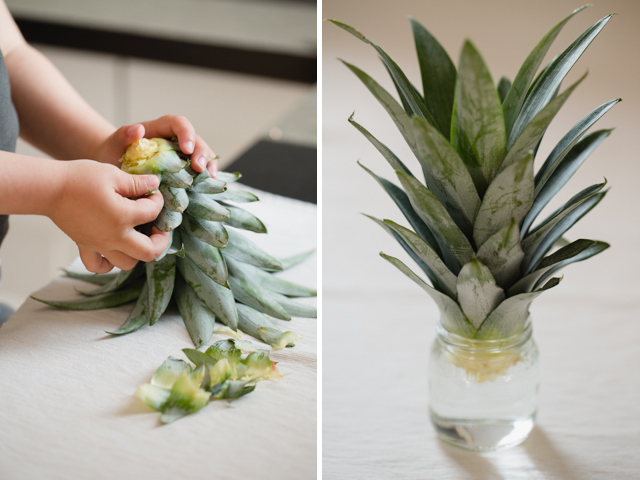
- Pineapple top
- Green onion white root sections
- Avocado pit
- Wide-mouthed, clear jars or glasses
Kids poke toothpicks into a pineapple top and avocado pit and prop over jars filled with water, while the white (root) ends of the onions are placed directly in water. They can see how roots grow on the pineapple and avocado and how the green ends of the onions poke from the top as the roots in the water continue to grow.
5. Lemon Volcano
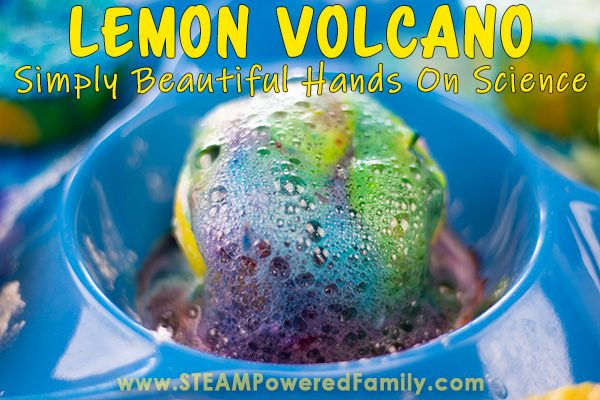
- Craft sticks
- Food coloring
- Baking soda
Your kids place cut lemons in the bowl with dish soap, food coloring, and baking soda poked in with craft sticks. They observe the reaction between the acid (lemon) and base (baking soda). Carbon dioxide is released and appears in the bubbles, made even more visible with the help of the dish soap that captures the gas.
6. Rock Candy
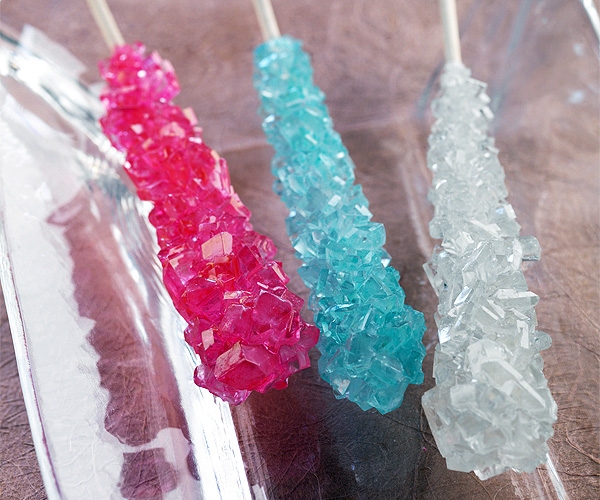
- Bamboo skewers or wooden sticks
- Large glass jar
Children squirt colors into the water you’ve heated and added sugar to melt. They roll moistened sticks in dry sugar to make the seed crystals, then place those in the jar of the cooled mixture. See how a saturated solution allows the sugar molecules to bump into each other and start sticking together.
7. Baked Potato Science
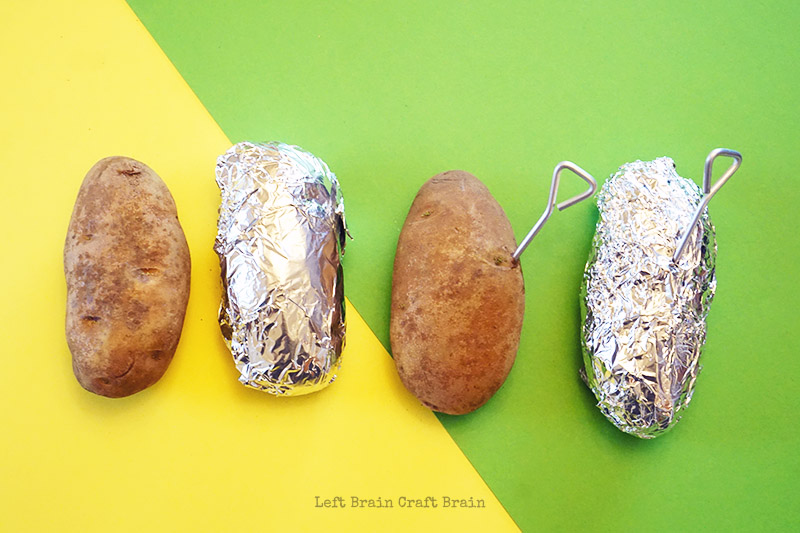
- Large potatoes
- Plastic wrap
- Baked potato pins
Kids predict which method of cooking a potato will be the fastest in the regular oven: plain potato, in foil, with baking pin, in foil with baking pin OR in the microwave plain or in plastic wrap. They explore how the wrappings may hold heat within to steam, whether the pin helps heat enter the potato sooner, and if a microwave is faster than a traditional oven.
8. Magic Milk
- Milk (whole or 2%)
- Cotton swabs
Your children squeeze colors into a shallow dish of milk and then touch the milk with a swab soaked with dish soap, to see the various colors of milk shoot away from each other. They learn that fat in milk is a nonpolar molecule, which doesn’t dissolve in water. The soap makes the fat separates from the water.
9. Solar S’Mores

- Small, low boxes, such as pizza boxes
- Black construction paper
- Foil & plastic wrap
- Long wooden skewers
- Graham crackers
- Marshmallows
- Chocolate bars
Kids make their own solar ovens with the first 4 items and then build s’mores with the food ingredients. On a sunny day, they observe the effects of solar energy to melt the chocolate and make the marshmallows puff. Discuss the purpose of the foil (reflection) black paper (heat absorption) and plastic wrap (heat retention).
10. Walking Water
- Test tubes with rack OR clear plastic cups/jars
- Paper towels cut into thin strips
Children add water and different colors to the containers and stir, then place the paper towel strips into the containers, with two ends in each. They can see how the colored water “walks” through the fibers and spreads to meet and mix. This is a capillary action, which is the same way that plants, such as celery, take in water.
11. Cake Experiment
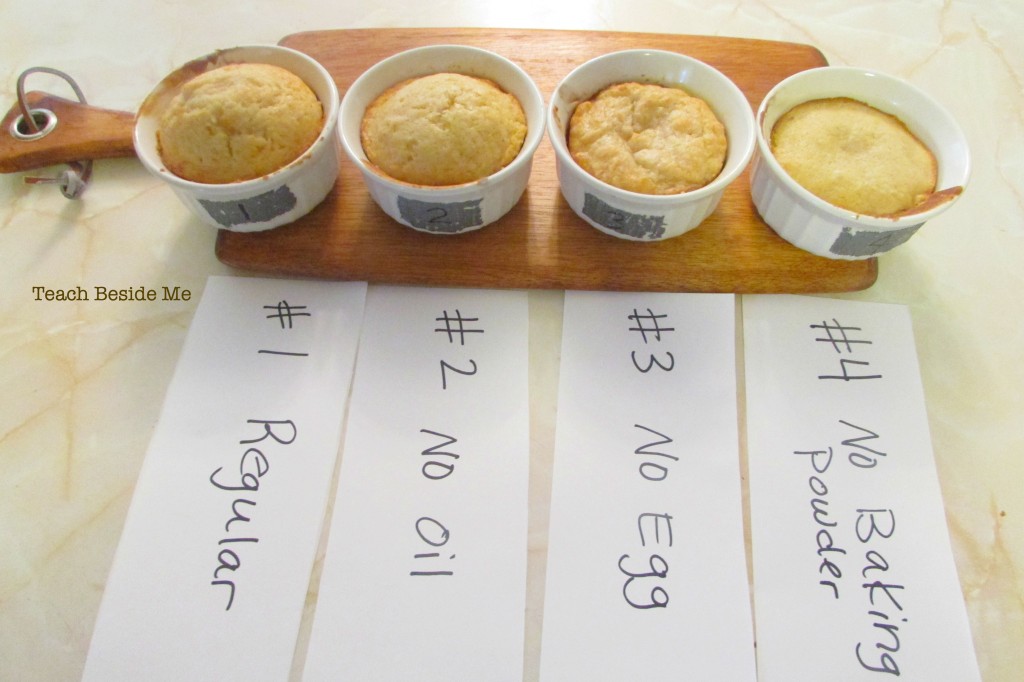
- Baking powder
- Cooking oil
- Ramekins OR other small baking dishes
Bake four different cakes with the kids, leaving one important ingredient out of three: oil, egg, or baking powder. Kids predict the various effects in looks and flavor related to each missing ingredient. They learn that eggs add color, flavor, and structure; oil adds moisture and tenderness; and baking powder makes the cakes rise with its release of carbon dioxide.
12. How Does Salt Affect Ice?
- 5 clean tin cans
- Coarse rock salt
- Measuring spoons
- Digital thermometer (no-contact type)
Have children add the same number of ice cubes to each can and then add a teaspoon or 2 tablespoons of either table salt or rock salt into each, shaking them a bit to spread the salt. They observe condensation on the bottoms of the cans as the reactions begin. Help them take temperature readings to compare the effects in each can.
13. Sandwich Bag Compost
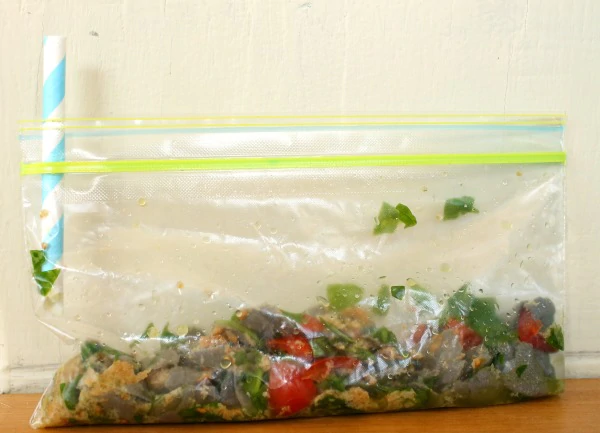
- Food waste in small pieces (veggies are best)
- Cardboard egg carton pieces
- Sandwich bags
Kids add the first two items with a bit of water to individual bags with the tops zipped most of the way and a straw inserted into a gap for air. Mush it up a bit each day and add more water, if needed for moisture. They observe on a small scale how composting turns food waste into soil.
14. Explore the Density of Liquids with Salt
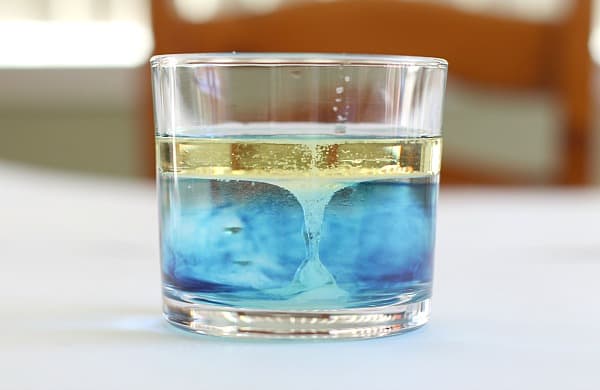
- Clear glass
- Vegetable oil
Children pour oil into water to observe what happens, adding a drop of color on top, followed by larger and larger sprinkles of salt. They offer ideas of why the various movements take place. They learn water is denser than oil and salt are denser than the liquids.
15. Ice Cream in a Bag
- Small zipper sandwich bag
- Gallon-sized zipper bag
In the small zipper bag, your child adds the first 3 ingredients and zips closed. Add salt and ice to the large bag and place the small bag inside the larger one and seal. They shake to make ice cream! Children can learn that salt (sodium chloride) lowers the freezing point of water so it can become even colder .
These kitchen science experiments are easy and require little planning! They’re great activities to learn the scientific method and for some of these food experiments, you can enjoy a tasty treat afterward too!
1 thought on “15 Easy Kitchen Science Experiments (With Ingredients You Already Have)”
Krystal, once again felt like I was back in a simpler time of my youth. That’s when I first saw some of these golden oldies in science class at school. Arthur B
Leave a Comment Cancel reply
Save my name, email, and website in this browser for the next time I comment.
most recent

Activities and Games , Toy Gift Guides
Best stem subscription boxes for kids: hands-on reviews.

Teach Kids to Code , Activities and Games , Technology , Toy Gift Guides
11 best coding robots to teach kids to code (for all ages).

Activities and Games , Math
20 stem projects that are great for middle school.

Engineering
6 projects for learning about simple machines.

Amplify Your Outdoor Living Space with Garden Décor

35 Must-Know Stats & Facts About Natural Latex Mattresses

Easy Gardening Shortcuts for Beginners
STEM Education Guide
[email protected] STEM Education Guide 9125 SVL BOX Victorville, CA 92395
Your Compass for STEM Discovery
© 2024 STEM Education Guide
The Chemistry and Physics Behind the Perfect Cup of Coffee
How science helps your barista brew your espresso perfectly every time
Christopher H. Hendon, The Conversation
/https://tf-cmsv2-smithsonianmag-media.s3.amazonaws.com/filer/89/91/8991141c-7baf-4184-ad7f-da3aaa8722d0/brewingagrea.jpg "science experiments that involve coffee")
Coffee is unique among artisanal beverages in that the brewer plays a significant role in its quality at the point of consumption. In contrast, drinkers buy draft beer and wine as finished products; their only consumer-controlled variable is the temperature at which you drink them.
Why is it that coffee produced by a barista at a cafe always tastes different than the same beans brewed at home?
It may be down to their years of training, but more likely it’s their ability to harness the principles of chemistry and physics. I am a materials chemist by day, and many of the physical considerations I apply to other solids apply here. The variables of temperature, water chemistry, particle size distribution, ratio of water to coffee, time and, perhaps most importantly, the quality of the green coffee all play crucial roles in producing a tasty cup. It’s how we control these variables that allows for that cup to be reproducible.
How strong a cup of joe?
Besides the psychological and environmental contributions to why a barista-prepared cup of coffee tastes so good in the cafe, we need to consider the brew method itself.
We humans seem to like drinks that contain coffee constituents (organic acids, Maillard products, esters and heterocycles, to name a few) at 1.2 to 1.5 percent by mass (as in filter coffee), and also favor drinks containing 8 to 10 percent by mass (as in espresso). Concentrations outside of these ranges are challenging to execute. There are a limited number of technologies that achieve 8 to 10 percent concentrations, the espresso machine being the most familiar.

There are many ways, though, to achieve a drink containing 1.2 to 1.5 percent coffee. A pour-over, Turkish, Arabic, Aeropress, French press, siphon or batch brew (that is, regular drip) apparatus – each produces coffee that tastes good around these concentrations. These brew methods also boast an advantage over their espresso counterpart: They are cheap. An espresso machine can produce a beverage of this concentration: the Americano, which is just an espresso shot diluted with water to the concentration of filter coffee.
All of these methods result in roughly the same amount of coffee in the cup. So why can they taste so different?
When coffee meets water
There are two families of brewing device within the low-concentration methods – those that fully immerse the coffee in the brew water and those that flow the water through the coffee bed.
From a physical perspective, the major difference is that the temperature of the coffee particulates is higher in the full immersion system. The slowest part of coffee extraction is not the rate at which compounds dissolve from the particulate surface. Rather, it’s the speed at which coffee flavor moves through the solid particle to the water-coffee interface, and this speed is increased with temperature.

A higher particulate temperature means that more of the tasty compounds trapped within the coffee particulates will be extracted. But higher temperature also lets more of the unwanted compounds dissolve in the water, too. The Specialty Coffee Association presents a flavor wheel to help us talk about these flavors – from green/vegetative or papery/musty through to brown sugar or dried fruit.
Pour-overs and other flow-through systems are more complex. Unlike full immersion methods where time is controlled, flow-through brew times depend on the grind size since the grounds control the flow rate.
The water-to-coffee ratio matters, too, in the brew time. Simply grinding more fine to increase extraction invariably changes the brew time, as the water seeps more slowly through finer grounds. One can increase the water-to-coffee ratio by using less coffee, but as the mass of coffee is reduced, the brew time also decreases. Optimization of filter coffee brewing is hence multidimensional and more tricky than full immersion methods.

Other variables to try to control
Even if you can optimize your brew method and apparatus to precisely mimic your favorite barista, there is still a near-certain chance that your home brew will taste different from the cafe’s. There are three subtleties that have tremendous impact on the coffee quality: water chemistry, particle size distribution produced by the grinder and coffee freshness.
First, water chemistry: Given coffee is an acidic beverage, the acidity of your brew water can have a big effect. Brew water containing low levels of both calcium ions and bicarbonate (HCO₃⁻) – that is, soft water – will result in a highly acidic cup, sometimes described as sour. Brew water containing high levels of HCO₃⁻ – typically, hard water – will produce a chalky cup, as the bicarbonate has neutralized most of the flavorsome acids in the coffee.
Ideally we want to brew coffee with water containing chemistry somewhere in the middle . But there’s a good chance you don’t know the bicarbonate concentration in your own tap water, and a small change makes a big difference. To taste the impact, try brewing coffee with Evian – one of the highest bicarbonate concentration bottled waters, at 360 mg/L.
The particle size distribution your grinder produces is critical, too.
Every coffee enthusiast will rightly tell you that blade grinders are disfavored because they produce a seemingly random particle size distribution; there can be both powder and essentially whole coffee beans coexisting. The alternative, a burr grinder, features two pieces of metal with teeth that cut the coffee into progressively smaller pieces. They allow ground particulates through an aperture only once they are small enough.
There is contention over how to optimize grind settings when using a burr grinder, though. One school of thought supports grinding the coffee as fine as possible to maximize the surface area, which lets you extract the most delicious flavors in higher concentrations. The rival school advocates grinding as coarse as possible to minimize the production of fine particles that impart negative flavors. Perhaps the most useful advice here is to determine what you like best based on your taste preference.
Finally, the freshness of the coffee itself is crucial. Roasted coffee contains a significant amount of CO₂ and other volatiles trapped within the solid coffee matrix : Over time these gaseous organic molecules will escape the bean. Fewer volatiles means a less flavorful cup of coffee. Most cafes will not serve coffee more than four weeks out from the roast date, emphasizing the importance of using freshly roasted beans.
One can mitigate the rate of staling by cooling the coffee (as described by the Arrhenius equation ). While you shouldn’t chill your coffee in an open vessel (unless you want fish finger brews), storing coffee in an airtight container in the freezer will significantly prolong freshness.
So don’t feel bad that your carefully brewed cup of coffee at home never stacks up to what you buy at the café. There are a lot of variables – scientific and otherwise – that must be wrangled to produce a single superlative cup. Take comfort that most of these variables are not optimized by some mathematical algorithm , but rather by somebody’s tongue. What’s most important is that your coffee tastes good to you… brew after brew.
Get the latest Science stories in your inbox.
Image adapted from: Taylor Franz via Unsplash; CC0
- People & medicine
Brew up some coffee chemistry
What's in your cup?
18 June 2020
There’s a lot going on in your cup of coffee. All those complex and varied taste sensations, the aroma, the ‘mouthfeel’ or texture of the brew—they all contribute to your overall experience of consuming the drink. And those elements are each the result of some interesting underlying chemistry.
From the farm to your cup , there are many processes that affect the chemical composition, flavour and sensory experience of the beverage you finally get to sip. Generally, the fruit from farmed Coffea plants, called coffee cherries, are harvested, then the outer layer of the cherry is removed in a fermentation process or by drying, revealing the seed or the ‘green bean’. The next step, roasting the beans, is also an important process for a number of chemical reactions such as the Maillard reaction (really a series of reactions) and caramelisation, further changing the chemical structure and flavour profile of the beans. As soon as the roasted beans are ground ready for serving, the inside is exposed to air and even more chemical reactions take place.

Every brew you or your barista concocts will have a different chemical composition and provide a slightly varied sensory experience. Let’s take a look at some of the key constituents that affect the taste and flavour of coffee.
Alkaloids (caffeine and trigonelline)
Caffeine, an alkaloid, may well be the reason you like to drink coffee. Alkaloids have a stimulating effect on the central nervous system, increasing alertness, and are extractable in water. They have a bitter flavour in their original form.
Caffeine contributes to the strength, body and bitterness which are characteristic of coffee. This may be why the flavour isn’t quite the same in decaf coffee. Depending on the species and variety, caffeine makes up 0.6 to 4 per cent of the bean. Roasting does not reduce the amount of caffeine.
Trigonelline is an alkaloid found in coffee beans at slightly lower concentrations than caffeine. It starts to decompose at 160°C so in the roasting process (which is hotter—up to 200°C), more than half the trigonelline is lost, in the process producing aromatic compounds that create sweet, caramel and earthy aromas.

Volatile compounds
Volatile compounds are organic compounds that evaporate at room temperature. These are responsible for much of coffee’s aroma and generally come about from reactions during the roasting process, but storage may impact them too. They may be grouped by their odour, such as earthy odorants, fruity odorants or spicy odorants.
Chemists are continuing to isolate which volatile compounds create certain attributes of coffee. For example, furan compounds are usually responsible for a sweet, malty aroma and pyrazine compounds contribute nutty, earthy, roasty, green aromas. Investigating all these compounds is a work in progress, as there are more than 1000 volatile compounds found in a typical cup of coffee. They are volatile by name and nature—they tend to fly away before there is time to measure them!
Green beans have a high level of acidity compared to roasted beans. Acids in coffee include citric, malic, chlorogenic and quinic acids, among others—all of which have a tart flavour and tend to balance the sweetness and bitterness of coffee. The products of broken-down acids are often involved in the Maillard reaction and produce a wide range of compounds including the very bitter-tasting and brown-coloured melanoidins. Thus, the darker the roast, generally, the more bitter the bean will be.

Lipids (coffee oil)
Most of a green coffee bean is made up of lipids, or coffee oil. During roasting, the lipids move from inside the bean to the surface. Once extracted into the coffee brew, they provide the crema—that creamy, flavourful part floating on the top of an espresso. The oils carry volatile compounds and fat-soluble vitamins. They contribute to the mouthfeel and texture of a brew.
Knowing the chemical intricacies of coffee helps the industry to manipulate parts of the process to obtain a certain taste, aroma or mouthfeel. It is also useful for identifying potential health impacts and effects of coffee. The growers, harvesters, transporters, processors, roasters, baristas and many other people in between have a hand (whether deliberate or not) in influencing how the chemistry will change the end product. No wonder coffee has a lot of character—so much has gone into each cup.
- coffee beans
- coffee processing
Coffee Affection is reader-supported. When you buy through links on our site, we may earn an affiliate commission. Learn more.
The Chemistry of Coffee: The Science Behind Your Drink

Coffee is deceptively complicated. On the surface, coffee is only two things: ground cherry seeds (the beans) and water. However, from these two ingredients blossoms a world of emergent complexity as one considers how green coffee beans are roasted and ground and how you prepare the water for brewing.
In this article, we take a deep dive into the science of coffee, covering everything from how the water you use affects your coffee’s taste to why grinding your own beans at home makes your coffee better. Grab your lab notebook and a hot cup of coffee, and get ready to explore the world of coffee science.
- Botany: The Coffee Plant
We will start at the root, the root of the coffee plant, that is. Before the roaster gets their hands on a batch of green coffee beans , the coffee farmer has already put untold hours into cultivating the perfect coffee tree. Coffee grows on low trees, and what we call the coffee bean is the seed of the coffee tree’s fruit.
Most coffee cherries contain two seeds of similar sizes and weights, and each healthy tree produces about 2,000 cherries per year. Keeping the conditions right for their coffee trees is a coffee farmer’s top priority, and even small changes to a tree’s environment can affect its yield. All plants need water, sunlight, and healthy soil, but coffee trees need some extra attention to reach their full potential.
The majority of coffee production happens between the Tropic of Capricorn and the Tropic of Cancer, in a region of the world colloquially known as the coffee belt . Coffee thrives in hot and humid areas that have alternating periods of heavy rainfall and intense sunshine. Additionally, soil quality plays an essential role in the healthy development of the coffee tree. Farmers take great pains to ensure their soil is rich in nutrients and contains enough nitrogen, phosphorus, and potassium , specifically.
Coffee is a relatively resilient plant, although farmers prefer high-altitude environments to get the most out of their coffee trees. Farms at higher elevations have two main advantages. First, comparatively harsh conditions at higher elevations cause coffee trees to grow slower than they do at lower elevations. When the maturation process takes longer, the coffee cherries have more time to absorb nutrients and develop complex sugars, resulting in a more flavorful coffee bean.
Second, high-altitude farms often have angled growing fields thanks to the uneven terrain of mountainous regions. Sloped farmland aids natural drainage and reduces the amount of water coffee trees can absorb. When coffee trees consume less water, the growing process slows, giving the cherries more time to develop.
Coffee Chemistry 101:
Alright, enough plant stuff, let’s move on to some chemical reactions. Coffee roasting is a rich, complex process filled with nuance and subtlety. Expert roasters perfect their craft over years, and their battle is mostly with chemistry. The first challenge in coffee roasting is heating green coffee beans enough to kickstart certain chemical reactions without heating them so much that they undergo pyrolysis.
Pyrolysis is a chemical process that occurs when a material is heated above a threshold temperature called its decomposition temperature. Pyrolysis is the first step in combustion, and wood charring is an example of extreme pyrolysis. If you think that combustion and charring both sound bad for coffee beans, you’re on the right track. Coffee roasters take great pains to ensure their coffee beans never come close to undergoing full pyrolysis.
On the other hand, another chemical reaction called the Maillard reaction is what coffee roasters seek. The Maillard reaction takes place when food is heated and involves the interaction of sugars and amino acids. Browned food gets its unique flavor from the Maillard reaction, and baked crusts, browned meat, and caramelized onions all owe their delicious flavor and texture to the Maillard reaction.
The Maillard reaction starts at about 302°F, and roasters pay careful attention to their beans when the roaster reaches this temperature. How long a batch of beans undergoes the Maillard reaction has a dramatic impact on its flavor. Shorter durations create coffee beans with more sweetness and acidity, while longer durations take on a maltier characteristic.
Chemistry plays an important role in coffee roasting, but it is also a key player in brewing coffee. In general, there are two main classes of brewing methods: immersion brewers, where coffee grounds soak in water, and percolation methods , where water passes through ground coffee. The differences between immersion and percolation brewing come down to how they facilitate the interaction between coffee grounds and water.
It is natural to assume that brewing coffee is all about giving coffee grounds enough time to dissolve in water, but while dissolving is an important factor, it’s not the most important factor. Coffee grounds dissolve quickly once they contact water; what takes more time is the process of moving flavor molecules from the interior of the coffee grounds to the edge. Flavor travels slowly in a particle of ground coffee, but it moves faster at higher temperatures, meaning we can extract more flavor from coffee grounds if we keep them at higher temperatures.
Immersion style brewing methods—like French press brewing —keep the coffee grounds at a higher temperature than percolation brewing methods—like pour overs. To extract a similar amount of flavor from both a French press and a pour over, we need to level the playing field by making the French press coffee grounds take longer. Since flavor travels faster in a high-temperature French press, baristas grind the beans more coarsely, so the flavor has farther to go from the center of the particles to the edge.
What water you use also plays an important role in brewing coffee. You might think that all water is the same, but, in reality, tap water varies significantly from one location to another. The mineral content of water changes your coffee’s flavor directly by imparting its own taste on your cup and indirectly by changing the extraction process. There is a lot of debate among coffee experts about what mineral concentrations make the best coffee, and there is some consensus. Some companies make mineral packets for customers to add to distilled water to get the optimal mineral profile for brewing coffee.
You can make an argument that grind size is more of a physics topic than chemistry, but since the grind size affects extraction and extraction is a process rife with chemistry, we’re going to keep it under the chemistry category.
We already discussed grind size when comparing French press brewing with pour-over brewing, but we can even go one step finer—pun intended.
Grinding coffee shortly before you brew it is one of the best ways to make your coffee more flavorful, and the reason has a little to do with chemistry. Freshly ground coffee is fresher than pre-ground coffee because freshly ground coffee hasn’t been in contact with air for an extended period of time. When coffee is ground and exposed to the air, it starts to oxidize. Oxidation fundamentally changes the chemical composition of coffee, making it unsuitable for drinking. It isn’t dangerous, but it doesn’t taste very good. For comparison, oxidation is the process responsible for rusting, not exactly something that makes you think, “yum!”
Besides freshness, how coffee beans are ground also helps determine what flavors get extracted during the brewing process. Even the best, most expensive coffee grinders don’t produce uniform grind sizes. Some particles will be big, and some will be small, and the ratio of large to small particles determines how coffee tastes when you brew it. Which flavor compounds are extracted depends on how big a particle is, with smaller particles contributing stronger flavors. If your grinder has too many small particles, it will be difficult to extract the more subtle flavors, and your coffee will usually taste harsh and bitter.
A good coffee grinder will produce very similar grind size distributions every time you use it. Consistent grind size distributions make it possible to tune other brewing parameters like the temperature and extraction size to make your coffee taste better. Cheap grinders and pre-ground coffee often don’t have consistent grind size distributions, making it frustrating to try to get a consistently good cup.
If you only have enough money for one piece of coffee-making gear, make it a high-quality grinder. The impact a good grinder will have on your coffee’s quality is dramatic.
- Class Dismissed
We hope you enjoyed this coffee science 101 crash course. We’ve barely scratched the surface of all the scientific intricacies that go into growing, roasting, and brewing coffee, but, hopefully, you now have a better overview of some of the complexity behind the coffee industry. A lot of thought goes into making coffee, and knowledge of chemistry is beneficial for people looking to squeeze every last drop of flavor out of their coffee beans. That’s all for today; the quiz is tomorrow!
Featured Image Credit: Pixabay
Table of Contents
Sean Brennan
Popular posts, 21 different types of espresso drinks (with pictures), cold brew vs iced coffee: differences explained, how to make coffee while camping (10 easy methods), related posts, homemade very berry hibiscus lemonade: recipe & variations.
This article is going to be a slight divergence from our typical coffee-focused fare to bring you a delicious, refreshing summertime recipe for a homemade
How Much Caffeine Is in a Death Wish Latte? 2024 Breakdown
How much caffeine is in a mocha 2024 breakdown, how much caffeine is in stipe miocic extra strength 2024 breakdown, try our coffee recipes, how to make matcha latte at home: the tasty recipe, how to make a chai tea latte at home (easy recipe), how to make arabic coffee at home (easy recipe), homemade coffee creamer (simple recipe), other categories.
Copyright 2024 Coffee Affection. All Rights Reserved.
- Privacy policy
Get the best coffee deals, expert brewing guides and coverage of the latest innovations and products.
- svg]:fill-accent-900">
The chemistry behind decaf coffee
By Michael W. Crowder / The Conversation
Posted on Jul 29, 2024 8:00 AM EDT
6 minute read
This article was originally featured on The Conversation .
For many people, the aroma of freshly brewed coffee is the start of a great day. But caffeine can cause headaches and jitters in others. That’s why many people reach for a decaffeinated cup instead.
I’m a chemistry professor who has taught lectures on why chemicals dissolve in some liquids but not in others. The processes of decaffeination offer great real-life examples of these chemistry concepts. Even the best decaffeination method, however, does not remove all of the caffeine – about 7 milligrams of caffeine usually remain in an 8-ounce cup.
Producers decaffeinating their coffee want to remove the caffeine while retaining all – or at least most – of the other chemical aroma and flavor compounds. Decaffeination has a rich history , and now almost all coffee producers use one of three common methods .
All these methods, which are also used to make decaffeinated tea , start with green, or unroasted, coffee beans that have been premoistened. Using roasted coffee beans would result in a coffee with a very different aroma and taste because the decaffeination steps would remove some flavor and odor compounds produced during roasting.
The carbon dioxide method
In the relatively new carbon dioxide method, developed in the early 1970s, producers use high-pressure CO₂ to extract caffeine from moistened coffee beans. They pump the CO₂ into a sealed vessel containing the moistened coffee beans, and the caffeine molecules dissolve in the CO₂.
Once the caffeine-laden CO₂ is separated from the beans, producers pass the CO₂ mixture either through a container of water or over a bed of activated carbon . Activated carbon is carbon that’s been heated up to high temperatures and exposed to steam and oxygen, which creates pores in the carbon. This step filters out the caffeine, and most likely other chemical compounds , some of which affect the flavor of the coffee.
These compounds either bind in the pores of the activated carbon or they stay in the water. Producers dry the decaffeinated beans using heat. Under the heat, any remaining CO₂ evaporates. Producers can then repressurize and reuse the same CO₂.
This method removes 96% to 98% of the caffeine , and the resulting coffee has only minimal CO₂ residue.
This method, which requires expensive equipment for making and handling the CO₂, is extensively used to decaffeinate commercial-grade, or supermarket, coffees.
Swiss water process
The Swiss water method, initially used commercially in the early 1980s , uses hot water to decaffeinate coffee.
Initially, producers soak a batch of green coffee beans in hot water, which extracts both the caffeine and other chemical compounds from the beans.
It’s kind of like what happens when you brew roasted coffee beans – you place dark beans in clear water, and the chemicals that cause the coffee’s dark color leach out of the beans into the water. In a similar way, the hot water pulls the caffeine from not yet decaffeinated beans.
During the soaking, the caffeine concentration is higher in the coffee beans than in the water, so the caffeine moves into the water from the beans. Producers then take the beans out of the water and placed them into fresh water, which has no caffeine in it – so the process repeats, and more caffeine moves out of the beans and into the water. The producers repeat this process, up to 10 times, until there’s hardly any caffeine left in the beans.
The resulting water, which now contains the caffeine and any flavor compounds that dissolved out from the beans, gets passed through activated charcoal filters. These trap caffeine and other similarly sized chemical compounds, such as sugars and organic compounds called polyamines , while allowing most of the other chemical compounds to remain in the filtered water.
Producers then use the filtered water – saturated with flavor but devoid of most of the caffeine – to soak a new batch of coffee beans. This step lets the flavor compounds lost during the soaking process reenter the beans.
The Swiss water process is prized for its chemical-free approach and its ability to preserve most of the coffee’s natural flavor. This method has been shown to remove 94% to 96% of the caffeine.
Solvent-based methods
This traditional and most common approach, first done in the early 1900s , uses organic solvents , which are liquids that dissolve organic chemical compounds such as caffeine. Ethyl acetate and methylene chloride are two common solvents used to extract caffeine from green coffee beans. There are two main solvent-based methods.
In the direct method, producers soak the moist beans directly in the solvent or in a water solution containing the solvent.
The solvent extracts most of the caffeine and other chemical compounds with a similar solubility to caffeine from the coffee beans. The producers then remove the beans from the solvent after about 10 hours and dry them.
In the indirect method, producers soak the beans in hot water for a few hours and then take them out. They then treat the water with solvent to remove caffeine from the water. Methylene chloride, the most common solvent, does not dissolve in the water, so it forms a layer on top of the water. The caffeine dissolves better in methylene chloride than in water, so most of the caffeine stays up in the methylene chloride layer, which producers can separate from the water.

As in the Swiss water method, the producers can reuse the “caffeine-free” water, which may return some of the flavor compounds removed in the first step.
These methods remove about 96% to 97% of the caffeine .
Is decaf coffee safe to drink?
One of the common solvents, ethyl acetate, comes naturally in many foods and beverages. It’s considered a safe chemical for decaffeination by the Food and Drug Administration.
The FDA and the Occupational Safety and Health Administration have deemed methylene chloride unsafe to consume at concentrations above 10 milligrams per kilogram of your body weight. However, the amount of residual methylene chloride found in roasted coffee beans is very small – about 2 to 3 milligrams per kilogram . It’s well under the FDA’s limits .
OSHA and its European counterparts have strict workplace rules to minimize methylene chloride exposure for workers involved in the decaffeination process.
After producers decaffeinate coffee beans using methylene chloride, they steam the beans and dry them. Then the coffee beans are roasted at high temperatures. During the steaming and roasting process, the beans get hot enough that residual methylene chloride evaporates. The roasting step also produces new flavor chemicals from the breakdown of chemicals into other chemical compounds. These give coffee its distinctive flavor.
Plus, most people brew their coffee at between 190 F to 212 F , which is another opportunity for methylene chloride to evaporate.
Retaining aroma and flavor
It’s chemically impossible to dissolve out only the caffeine without also dissolving out other chemical compounds in the beans, so decaffeination inevitably removes some other compounds that contribute to the aroma and flavor of your cup of coffee.
But some techniques, like the Swiss water process and the indirect solvent method, have steps that may reintroduce some of these extracted compounds. These approaches probably can’t return all the extra compounds back to the beans, but they may add some of the flavor compounds back.
Thanks to these processes, you can have that delicious cup of coffee without the caffeine – unless your waiter accidentally switches the pots.
Latest in Science
How climate change is expanding the reach of eee, a rare and deadly mosquito-borne illness how climate change is expanding the reach of eee, a rare and deadly mosquito-borne illness.
By Zoya Teirstein/Grist
These proteins have been secretly managing your cells These proteins have been secretly managing your cells
By Viviane Callier / Knowable Magazine
- The coffee lab
- The Science Behind Coffee...
The Science Behind Coffee Roasting
Curious about what actually happens during roasting? Here is a scientific explanation of the process.
Coffee begins its journey as cherry seeds-turned beans in their hard, green form. They are generally tasteless and smell rather vegetal. Before farms bag these beans and ship them to consumers, they are first transferred to facilities where they experience a process of heating to bring out their aroma, flavor, and solubility– a process known as coffee roasting.
Roasting alters the physical and chemical properties of green coffee. The same or a higher level of sugars, acids, protein, and caffeine is present in unroasted beans compared to roasted ones. However, roasting is mainly the reason why you get the flavor in your cup of coffee every day.
Several chemical reactions are happening within the coffee beans at certain temperatures during roasting. Varied acids, aromatics, and flavor components are produced, changed, or balanced when this happens. And as a result, this will make your coffee achieve the perfect aroma, flavor, body, and acidity.
Maillard Reaction
The Maillard reaction is the chemical reaction between amino acids and reducing sugars present in “brown” food, giving it its distinctive flavor. This happens when we fry dumplings, grill steak, make beer, and of course, roast coffee. It is also a kind of non-enzymatic process which means that external energy is required in order to initiate the reaction, like heat.
People in the food industry call this phenomenon “browning,” which does not translate to the burning of food but the reaction between carbohydrates (sugars) and amino acids once the heat is applied.
In the case of coffee, when roasting reaches the 150-200 degrees Celsius, different carbonyl groups (derived from sugars) and amino acids will interact and form the aromas and flavors. Typical Maillard-induced flavors are meaty, toasty, burnt, nutty, and caramelly.
Caramelization
Both amino acids and sugars are present in green beans. However, this is not entirely the reason that makes your coffee dark brown in color. It is mainly because of caramelization.
Caramelization also takes place when the heat in roasting reaches 170-200 degrees Celsius. And while the Maillard reaction occurs in both amino acids and sugars, caramelization will only involve sugar.
Sucrose, the sugar present in green coffee, does not undergo the Maillard reaction. Instead, it will produce brown-colored, caramelized compounds. At the same time, this will release the aromatic and acidic compounds as well. Roasting your coffee too lightly will not degrade the existing bitter-tasting components.
As the temperature increases and as the roasting continues, other chemical reactions will occur. The brown hue will transition to a darker color since the sucrose and cellulose will then break down into carbon.
The First Crack
At around 205 degrees Celsius, the water present inside the beans will begin to vaporize. This will cause them to physically expand and crack and produce a popping sound. About five percent of the beans’ weight is lost due to water loss at this point in the process. Blonde or light roasts happens after this step.
Scientifically, pyrolysis is defined as the thermochemical process of decomposing organic material through heat application. This chemical reaction can happen with a minimal amount or no oxygen at all. During pyrolysis, solids (ash, char), liquids (oils), and gases (carbon dioxide) are produced with different compositions.
In the case of coffee roasting, pyrolysis occurs when the temperature reaches 220 degrees Celsius. By then, carbon dioxide will be released from the beans. This phenomenon is also where we begin to see a medium brown color and oils coming out of the beans. The coffee will also lose about 13% of its weight at this point.
Second Crack
Pyrolysis will still continue to occur as the roasting temperatures reach 225-230 degrees Celsius. And a second crack takes place. This means that the cellulose in each bean cell wall is already beginning to break apart. By this time, the roaster should have already achieved the desired taste and flavors for the coffee.
Final Thoughts
The science of roasting allows our master roasters to achieve many variations with very similar beans. With enough knowledge and skill, consistent results can be achieved in a very predictable manner. However, roasting is also a form of art. The roaster is given the freedom to explore everything that the coffee has to offer. And this is what really translates to the unique experience we get when we take a sip of our favorite coffee.
About the author
8-year barista for a world-class coffee chain from the Philippines. Passionate writer and coffee champion. "Coffee has always been one of my biggest love interests in life. And I am here to share it with all of you through this platform."
Coffee Culture in the Land of Green Tea: Japan
Vasileia Fanarioti
Time to realise the true value of coffee
Kajsa-Lisa Ljudén
This is How You Make the Best Macchiato Coffee
Chandra Melo
Do you take water for granted?
Coffee Beans From Poop
Anaerobic Fermentation In Coffee Processing
Joachim Estal
Recent discussions on forum
How much starch exists in green coffee beans?
What is parchment?
What benefits of freshly ground coffee.??
I'm seriously considering getting a burr coffee grinder but I'm currently short on cash. I'm looking at this one https://burrgirl.com/capresso-infinity-plus/ as it fits my needs perfectly. Is it worth saving up for?
What is the best type of coffee machine?
My brand new machine seems to have come with scale buildup? Bought a brand new Breville Barista Express. Was flushing the machine, running water through steamer, hot water spout and group head until I emptied the entire water tank. I notic
What is the difference between an espresso macchiato, a latte and a cappuccino? I believe it has something to do with the amount of milk that goes into it but are there any other differences? I just had a close encounter with a coffee maker
The reusable pods I use with my Nespresso machine work well After trying several, I found the Ecological Method ones and loved them. However, I have to grind my coffee very finely. A burr grinder is great, but I am looking for an automatic
What are the strongest Nespresso compatible pods?
Hi everyone! So I've been experiencing bad acidity after drinking coffee. I drink a medium-light roast, about two cups a day, and I brew with a French Press. Is there any way for me to reduce the acidity without switching to a dark roas
Hi everybody, a big "ciao" from Italy. Do you guys have any suggestions about books regarding green coffee, sustainability, botanics and climate change, related to coffee of course? Thanks heaps
Has anyone tried Liberica coffee? I'm looking for something new to try, and this seems interesting.
Hi! I have tried coffee from the Whiitestone Farms, Kenya this morning. It was really nice. I have two questions. One about the varieties, is it both SL28 and Ruiru11? Is this coffee 100% Arabica?
Does cold brew coffee make you poop?
What is the difference between a cappuccino and a flat white?
Subscribe to our newsletter
- facilitators
- Hospitality
- Specialty roasters
- Press and Media
- Privacy policy
- Terms & Conditions
- Cookie policy
- Our Mission
- Sustainability
- Traceability
- Community News
©2024SEWN Technology Solutions ABAll rights reserved
©2024 SEWN Technology Solutions AB All rights reserved
September 27, 2017
Brewing a Great Cup of Coffee Depends on Chemistry and Physics
Coffee is unique among artisanal beverages in that the brewer plays a significant role in its quality at the point of consumption
By Christopher Hendon & The Conversation US

barnimages.com Flickr ( CC BY 2.0 )
The following essay is reprinted with permission from The Conversation , an online publication covering the latest research.
Coffee is unique among artisanal beverages in that the brewer plays a significant role in its quality at the point of consumption. In contrast, drinkers buy draft beer and wine as finished products; their only consumer-controlled variable is the temperature at which you drink them.
On supporting science journalism
If you're enjoying this article, consider supporting our award-winning journalism by subscribing . By purchasing a subscription you are helping to ensure the future of impactful stories about the discoveries and ideas shaping our world today.
Why is it that coffee produced by a barista at a cafe always tastes different than the same beans brewed at home?
It may be down to their years of training, but more likely it’s their ability to harness the principles of chemistry and physics. I am a materials chemist by day, and many of the physical considerations I apply to other solids apply here. The variables of temperature, water chemistry, particle size distribution, ratio of water to coffee, time and, perhaps most importantly, the quality of the green coffee all play crucial roles in producing a tasty cup. It’s how we control these variables that allows for that cup to be reproducible.
How strong a cup of joe?
Besides the psychological and environmental contributions to why a barista-prepared cup of coffee tastes so good in the cafe, we need to consider the brew method itself.
We humans seem to like drinks that contain coffee constituents (organic acids, Maillard products, esters and heterocycles, to name a few) at 1.2 to 1.5 percent by mass (as in filter coffee), and also favor drinks containing 8 to 10 percent by mass (as in espresso). Concentrations outside of these ranges are challenging to execute. There are a limited number of technologies that achieve 8 to 10 percent concentrations, the espresso machine being the most familiar.
There are many ways, though, to achieve a drink containing 1.2 to 1.5 percent coffee. A pour-over, Turkish, Arabic, Aeropress, French press, siphon or batch brew (that is, regular drip) apparatus—each produces coffee that tastes good around these concentrations. These brew methods also boast an advantage over their espresso counterpart: They are cheap. An espresso machine can produce a beverage of this concentration: the Americano, which is just an espresso shot diluted with water to the concentration of filter coffee.
All of these methods result in roughly the same amount of coffee in the cup. So why can they taste so different?
When coffee meets water
There are two families of brewing device within the low-concentration methods—those that fully immerse the coffee in the brew water and those that flow the water through the coffee bed.
From a physical perspective, the major difference is that the temperature of the coffee particulates is higher in the full immersion system. The slowest part of coffee extraction is not the rate at which compounds dissolve from the particulate surface. Rather, it’s the speed at which coffee flavor moves through the solid particle to the water-coffee interface, and this speed is increased with temperature.
A higher particulate temperature means that more of the tasty compounds trapped within the coffee particulates will be extracted. But higher temperature also lets more of the unwanted compounds dissolve in the water, too. The Specialty Coffee Association presents a flavor wheel to help us talk about these flavors—from green/vegetative or papery/musty through to brown sugar or dried fruit.
Pour-overs and other flow-through systems are more complex. Unlike full immersion methods where time is controlled, flow-through brew times depend on the grind size since the grounds control the flow rate.
The water-to-coffee ratio matters, too, in the brew time. Simply grinding more fine to increase extraction invariably changes the brew time, as the water seeps more slowly through finer grounds. One can increase the water-to-coffee ratio by using less coffee, but as the mass of coffee is reduced, the brew time also decreases. Optimization of filter coffee brewing is hence multidimensional and more tricky than full immersion methods.
Other variables to try to control
Even if you can optimize your brew method and apparatus to precisely mimic your favorite barista, there is still a near-certain chance that your home brew will taste different from the cafe’s. There are three subtleties that have tremendous impact on the coffee quality: water chemistry, particle size distribution produced by the grinder and coffee freshness.
First, water chemistry: Given coffee is an acidic beverage, the acidity of your brew water can have a big effect. Brew water containing low levels of both calcium ions and bicarbonate (HCO 3 - )—that is, soft water—will result in a highly acidic cup, sometimes described as sour. Brew water containing high levels of HCO 3 - —typically, hard water—will produce a chalky cup, as the bicarbonate has neutralized most of the flavorsome acids in the coffee.
Ideally we want to brew coffee with water containing chemistry somewhere in the middle . But there’s a good chance you don’t know the bicarbonate concentration in your own tap water, and a small change makes a big difference. To taste the impact, try brewing coffee with Evian—one of the highest bicarbonate concentration bottled waters, at 360 mg/L.
The particle size distribution your grinder produces is critical, too.
Every coffee enthusiast will rightly tell you that blade grinders are disfavored because they produce a seemingly random particle size distribution; there can be both powder and essentially whole coffee beans coexisting. The alternative, a burr grinder, features two pieces of metal with teeth that cut the coffee into progressively smaller pieces. They allow ground particulates through an aperture only once they are small enough.
There is contention over how to optimize grind settings when using a burr grinder, though. One school of thought supports grinding the coffee as fine as possible to maximize the surface area, which lets you extract the most delicious flavors in higher concentrations. The rival school advocates grinding as coarse as possible to minimize the production of fine particles that impart negative flavors. Perhaps the most useful advice here is to determine what you like best based on your taste preference.
Finally, the freshness of the coffee itself is crucial. Roasted coffee contains a significant amount of CO 2 and other volatiles trapped within the solid coffee matrix : Over time these gaseous organic molecules will escape the bean. Fewer volatiles means a less flavorful cup of coffee. Most cafes will not serve coffee more than four weeks out from the roast date, emphasizing the importance of using freshly roasted beans.
One can mitigate the rate of staling by cooling the coffee (as described by the Arrhenius equation ). While you shouldn’t chill your coffee in an open vessel (unless you want fish finger brews), storing coffee in an airtight container in the freezer will significantly prolong freshness.
So don’t feel bad that your carefully brewed cup of coffee at home never stacks up to what you buy at the café. There are a lot of variables—scientific and otherwise—that must be wrangled to produce a single superlative cup. Take comfort that most of these variables are not optimized by some mathematical algorithm , but rather by somebody’s tongue. What’s most important is that your coffee tastes good to you… brew after brew.
This article was originally published on The Conversation . Read the original article .

Brewing a great cup of coffee depends on chemistry and physics

Assistant Professor of Computational Materials and Chemistry, University of Oregon
Disclosure statement
Christopher H. Hendon does not work for, consult, own shares in or receive funding from any company or organisation that would benefit from this article, and has disclosed no relevant affiliations beyond their academic appointment.
View all partners
Coffee is unique among artisanal beverages in that the brewer plays a significant role in its quality at the point of consumption. In contrast, drinkers buy draft beer and wine as finished products; their only consumer-controlled variable is the temperature at which you drink them.
Why is it that coffee produced by a barista at a cafe always tastes different than the same beans brewed at home?
It may be down to their years of training, but more likely it’s their ability to harness the principles of chemistry and physics. I am a materials chemist by day, and many of the physical considerations I apply to other solids apply here. The variables of temperature, water chemistry, particle size distribution, ratio of water to coffee, time and, perhaps most importantly, the quality of the green coffee all play crucial roles in producing a tasty cup. It’s how we control these variables that allows for that cup to be reproducible.
How strong a cup of joe?
Besides the psychological and environmental contributions to why a barista-prepared cup of coffee tastes so good in the cafe, we need to consider the brew method itself.
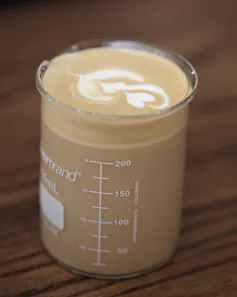
We humans seem to like drinks that contain coffee constituents (organic acids, Maillard products, esters and heterocycles, to name a few) at 1.2 to 1.5 percent by mass (as in filter coffee), and also favor drinks containing 8 to 10 percent by mass (as in espresso). Concentrations outside of these ranges are challenging to execute. There are a limited number of technologies that achieve 8 to 10 percent concentrations, the espresso machine being the most familiar.
There are many ways, though, to achieve a drink containing 1.2 to 1.5 percent coffee. A pour-over, Turkish, Arabic, Aeropress, French press, siphon or batch brew (that is, regular drip) apparatus – each produces coffee that tastes good around these concentrations. These brew methods also boast an advantage over their espresso counterpart: They are cheap. An espresso machine can produce a beverage of this concentration: the Americano, which is just an espresso shot diluted with water to the concentration of filter coffee.
All of these methods result in roughly the same amount of coffee in the cup. So why can they taste so different?
When coffee meets water
There are two families of brewing device within the low-concentration methods – those that fully immerse the coffee in the brew water and those that flow the water through the coffee bed.
From a physical perspective, the major difference is that the temperature of the coffee particulates is higher in the full immersion system. The slowest part of coffee extraction is not the rate at which compounds dissolve from the particulate surface. Rather, it’s the speed at which coffee flavor moves through the solid particle to the water-coffee interface, and this speed is increased with temperature.
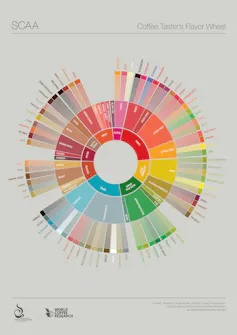
A higher particulate temperature means that more of the tasty compounds trapped within the coffee particulates will be extracted. But higher temperature also lets more of the unwanted compounds dissolve in the water, too. The Specialty Coffee Association presents a flavor wheel to help us talk about these flavors – from green/vegetative or papery/musty through to brown sugar or dried fruit.
Pour-overs and other flow-through systems are more complex. Unlike full immersion methods where time is controlled, flow-through brew times depend on the grind size since the grounds control the flow rate.
The water-to-coffee ratio matters, too, in the brew time. Simply grinding more fine to increase extraction invariably changes the brew time, as the water seeps more slowly through finer grounds. One can increase the water-to-coffee ratio by using less coffee, but as the mass of coffee is reduced, the brew time also decreases. Optimization of filter coffee brewing is hence multidimensional and more tricky than full immersion methods.

Other variables to try to control
Even if you can optimize your brew method and apparatus to precisely mimic your favorite barista, there is still a near-certain chance that your home brew will taste different from the cafe’s. There are three subtleties that have tremendous impact on the coffee quality: water chemistry, particle size distribution produced by the grinder and coffee freshness.
First, water chemistry: Given coffee is an acidic beverage, the acidity of your brew water can have a big effect. Brew water containing low levels of both calcium ions and bicarbonate (HCO₃⁻) – that is, soft water – will result in a highly acidic cup, sometimes described as sour. Brew water containing high levels of HCO₃⁻ – typically, hard water – will produce a chalky cup, as the bicarbonate has neutralized most of the flavorsome acids in the coffee.
Ideally we want to brew coffee with water containing chemistry somewhere in the middle . But there’s a good chance you don’t know the bicarbonate concentration in your own tap water, and a small change makes a big difference. To taste the impact, try brewing coffee with Evian – one of the highest bicarbonate concentration bottled waters, at 360 mg/L.
The particle size distribution your grinder produces is critical, too.
Every coffee enthusiast will rightly tell you that blade grinders are disfavored because they produce a seemingly random particle size distribution; there can be both powder and essentially whole coffee beans coexisting. The alternative, a burr grinder, features two pieces of metal with teeth that cut the coffee into progressively smaller pieces. They allow ground particulates through an aperture only once they are small enough.
There is contention over how to optimize grind settings when using a burr grinder, though. One school of thought supports grinding the coffee as fine as possible to maximize the surface area, which lets you extract the most delicious flavors in higher concentrations. The rival school advocates grinding as coarse as possible to minimize the production of fine particles that impart negative flavors. Perhaps the most useful advice here is to determine what you like best based on your taste preference.
Finally, the freshness of the coffee itself is crucial. Roasted coffee contains a significant amount of CO₂ and other volatiles trapped within the solid coffee matrix : Over time these gaseous organic molecules will escape the bean. Fewer volatiles means a less flavorful cup of coffee. Most cafes will not serve coffee more than four weeks out from the roast date, emphasizing the importance of using freshly roasted beans.
One can mitigate the rate of staling by cooling the coffee (as described by the Arrhenius equation ). While you shouldn’t chill your coffee in an open vessel (unless you want fish finger brews), storing coffee in an airtight container in the freezer will significantly prolong freshness.
So don’t feel bad that your carefully brewed cup of coffee at home never stacks up to what you buy at the café. There are a lot of variables – scientific and otherwise – that must be wrangled to produce a single superlative cup. Take comfort that most of these variables are not optimized by some mathematical algorithm , but rather by somebody’s tongue. What’s most important is that your coffee tastes good to you… brew after brew.
- Particulates
- Chemistry of coffee
- Food preparation
Director of STEM
Community member - Training Delivery and Development Committee (Volunteer part-time)
Chief Executive Officer
Finance Business Partner
Head of Evidence to Action
IMAGES
VIDEO
COMMENTS
Caffeine Science Fair Projects. Caffeine (trimethylxanthine coffeine theine mateine guaranine methyltheobromine) is a stimulant drug and mild diuretic. In pure form, caffeine is a white crystalline solid. Icey/Wikipedia Commons. Dr. Helmenstine holds a Ph.D. in biomedical sciences and is a science writer, educator, and consultant.
Go Science Kids. 43. "Flip" a drawing with water. Light refraction causes some really cool effects, and there are multiple easy science experiments you can do with it. This one uses refraction to "flip" a drawing; you can also try the famous "disappearing penny" trick.
Caffeine and Coffee - science fair projects and experiments: topics, ideas, resources, and sample projects by scientific field.
The Bulletproof Coffee Experiments. Wed, Aug 17, 2016. Est. Reading Time 5 min. Coffee is extremely popular. In fact, coffee is the number #1 consumed drink in Canada and people worldwide have been drinking it for over 500 years. That's because coffee contains caffeine, a stimulant that makes you feel more energetic and alert.
1. Rainbow Milk Experiment. In the Rainbow Milk Magic Experiment, students will combine milk, dish soap, and food coloring to learn all about why the colors begin to swirl and look as if they are exploding into a rainbow. This is such a simple science experiment that works great with students of any age! 2.
A cup of coffee first thing in the morning is a ritual—from grinding the beans to boiling the water and brewing your cup. But following those steps won't always get you a consistent pour. Researchers developed a mathematical model to determine how the size of grind affects water flow and the amount of coffee that gets into the final liquid.
The effect of caffeine on plant growth is still a subject under study. Using grounded coffee in garden lawns is a common practice to make plants grow faster. However, coffee also contains other ingredients like potassium and phosphorous, which are known to enhance plant growth. Experiments on plant growth using only caffeine have resulted in ...
The Chemistry of Coffee was developed by Chemistry teachers at Billings Senior High School as an activity-based unit where students learn the process of roasting coffee beans, brewing coffee and tasting coffee. Along the way, they learn Chemistry topics including pH, Acids and Bases, Solutions and Dilutions, Experimental Design and so much more!
Mix 1/2 spoonful of crushed chalk with 1/2 cup of water in a clear glass jar. Add a few drops of food coloring to the water. The chalk will represent toxins present in the blood, while the water will represent the blood. Place a coffee filter over the top of the second jar and secure it with a rubber band. The filter will represent the kidneys ...
Here's the scoop on coffee's flavor: the taste comes from compounds locked into roasted coffee beans. Add hot water, and those flavors escape into your pot—but not all flavors come out at the same time, says Harold McGee, food science writer and author of On Food and Cooking.For example, sour flavors, acids, come first and the plant carbohydrates responsible for coffee's body come later.
Experiment with Beverages Science Projects. (5 results) Discover for yourself what your drink really contains. Build an electronic device to measure the strength of tea or test electrolytes (a salt that can conduct electricity) in a sports drink. Or discover ways to test sugar content in milk or soda. Electrolyte Challenge: Orange Juice Vs.
And you can bring that awesomeness into your very own home with these 20 safe DIY experiments you can do right now with ordinary household items. 1. Make Objects Seemingly Disappear. Refraction is ...
Wash and dry your hands. Leave the eggs in the glasses for 12 hours. After 12 hours, remove the eggs from the glasses of soda one at a time. Rinse them in cool water and pat them dry with the ...
Firmly push the rubber stopper into the Florence Flask. Once water starts to move into the beaker with the filter, add coffee . For perfect coffee, use your favorite roast, ground to medium and no less than 1 heaping tablespoon per 6 oz of water that you placed in the Florence Flask. When all of the water has moved into the beaker with coffee ...
1. Rubber Egg Experiment. Materials: Egg. White vinegar. Glass or jar. Cover an egg in a container with vinegar to see the shell disappear and the resulting egg that feels like rubber. Children learn about the chemical reaction between the eggshell (calcium carbonate) and the vinegar (acetic acid).
This experiment comes from Harold McGee, author of the definitive tome on food science, On Food and Cooking (and whose tips you've seen here before). It isn't exactly the best cup of coffee you'll ...
First, water chemistry: Given coffee is an acidic beverage, the acidity of your brew water can have a big effect. Brew water containing low levels of both calcium ions and bicarbonate (HCO₃ ...
Caffeine contributes to the strength, body and bitterness which are characteristic of coffee. This may be why the flavour isn't quite the same in decaf coffee. Depending on the species and variety, caffeine makes up 0.6 to 4 per cent of the bean. Roasting does not reduce the amount of caffeine. Trigonelline is an alkaloid found in coffee ...
Chemistry plays an important role in coffee roasting, but it is also a key player in brewing coffee. In general, there are two main classes of brewing methods: immersion brewers, where coffee grounds soak in water, and percolation methods, where water passes through ground coffee. The differences between immersion and percolation brewing come ...
The Swiss water process is prized for its chemical-free approach and its ability to preserve most of the coffee's natural flavor. This method has been shown to remove 94% to 96% of the caffeine. ...
Caramelization also takes place when the heat in roasting reaches 170-200 degrees Celsius. And while the Maillard reaction occurs in both amino acids and sugars, caramelization will only involve sugar. Sucrose, the sugar present in green coffee, does not undergo the Maillard reaction. Instead, it will produce brown-colored, caramelized compounds.
First, water chemistry: Given coffee is an acidic beverage, the acidity of your brew water can have a big effect. Brew water containing low levels of both calcium ions and bicarbonate (HCO 3 ...
Science helps optimize the coffee. Chris Hendon, CC BY-ND. We humans seem to like drinks that contain coffee constituents (organic acids, Maillard products, esters and heterocycles, to name a few ...